Are you ready to give your cabinets a fresh new look with stylish hardware? Before you start drilling, there’s one crucial step you can’t afford to skip: marking your cabinets for hardware placement.
Getting this right makes all the difference between a flawless finish and a frustrating mess. In this guide, you’ll discover simple, foolproof techniques to mark your cabinets perfectly every time. By the end, you’ll feel confident and ready to transform your space with precision and ease.
Keep reading—your dream cabinets are just a few marks away!
Tools Needed
Marking cabinets for hardware requires a few simple tools. These tools help ensure accuracy and make the job easier. Using the right tools saves time and reduces mistakes.
Measuring Tape
A measuring tape helps find exact distances on your cabinet. It measures the space for handles or knobs. Choose a tape that is easy to read and flexible. This tool is essential for precise markings.
Pencil And Marker
Use a pencil for light marks you can erase later. A marker works well for bold, clear points. Both tools help mark spots for screws or holes. Make sure the pencil is sharp and the marker does not bleed.
Template Or Jig
A template or jig guides your marks for consistent placement. It keeps holes evenly spaced and aligned. You can buy a hardware template or make one yourself. This tool speeds up marking and reduces errors.

Credit: www.walmart.com
Choose Hardware Style
Choosing the right hardware style sets the look for your cabinets. Mark each spot carefully to ensure handles and knobs fit perfectly. Accurate marks make installation easy and neat.
Choosing the right hardware style is important for your cabinets. It changes how your kitchen or room looks. Hardware adds character and can match your design theme. Think about the style before you mark your cabinets for hardware. This helps you place knobs or pulls correctly and evenly.
Knobs Vs Pulls
Knobs are small and simple. They need only one screw to attach. Good for small doors or drawers. Pulls are longer and need two screws. They work well on large drawers or heavy doors. Pulls offer a better grip. Knobs give a classic and clean look. Decide what fits your cabinet size and style best.
Finish And Size
Hardware comes in many finishes. Chrome, brass, black, and bronze are popular. Choose a finish that matches your room colors. Size matters too. Large hardware stands out more. Small hardware looks subtle and neat. Measure your cabinet doors and drawers. Pick the right size to fit well and look balanced.
Determine Placement Height
Determining the right height to place cabinet hardware is important for both style and function. Proper height makes cabinets easy to use and look balanced. It also ensures handles and knobs feel comfortable to reach.
Different types of cabinets need different hardware heights. Drawers and doors do not share the same measurements. Knowing the standard heights helps you mark hardware accurately. This saves time and avoids mistakes during installation.
Standard Heights For Drawers
Drawers usually have hardware placed in the center. Measure the drawer height and mark the middle point. This spot allows easy grip and creates a clean look. For wide drawers, handles go horizontally across the middle. For narrow drawers, knobs sit right in the center.
Standard Heights For Doors
Cabinet doors need hardware placed near the edge. Handles or knobs sit about 2 to 3 inches from the top or bottom corner. This height fits most hand sizes and looks natural on doors. Mark the spot carefully to keep all doors consistent. Consistency keeps the kitchen or bathroom neat and tidy.

Credit: www.marklewisinteriordesign.com
Measure And Mark
Measuring and marking cabinets for hardware is a key step in any kitchen or furniture project. Accurate marks ensure handles and knobs fit perfectly. This process saves time and prevents mistakes. Careful measurement keeps everything aligned and balanced. Follow simple steps to mark cabinets like a pro.
Finding Center Points
Start by finding the center of the cabinet door or drawer. Use a tape measure to get the width. Divide this number by two. Mark the middle point lightly with a pencil. This spot is where the hardware will go. Double-check the measurement for accuracy. A centered handle looks clean and professional.
Consistent Spacing
Keep spacing uniform across all cabinets. Measure the distance from the edge to the center point. Use the same measurement for every door or drawer. Mark these points carefully before drilling holes. Consistency makes your cabinets look neat. It also helps hardware line up perfectly.
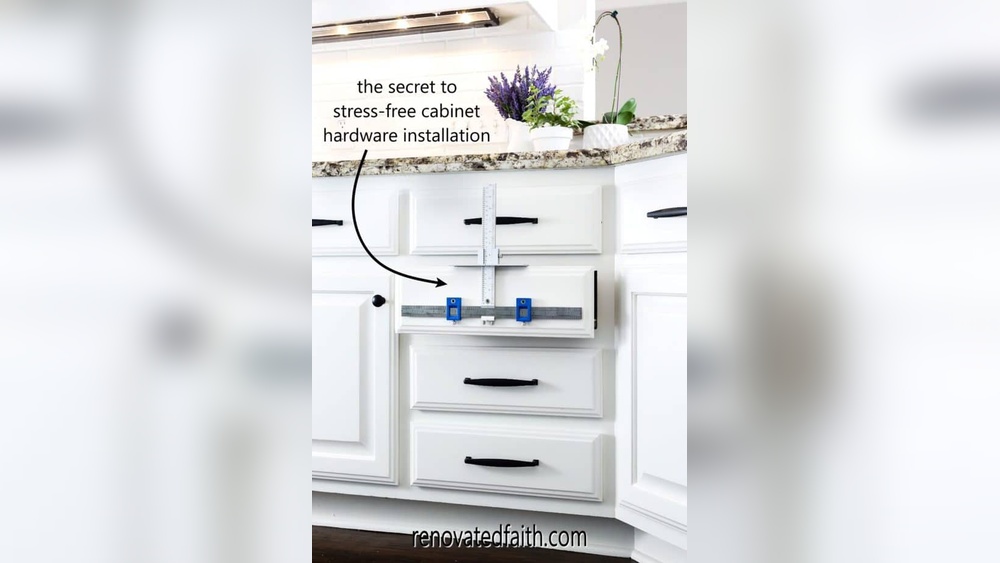
Use Templates For Accuracy
Using templates helps mark cabinets for hardware with precision. Templates create consistent hole placements for handles and knobs. This reduces mistakes and saves time during installation.
Creating A Template
Start by choosing the hardware you want to install. Measure the distance between screw holes carefully. Transfer these measurements to a piece of sturdy cardboard or plastic. Cut out the shape to match the hardware exactly. Mark the drill holes clearly on the template.
Applying The Template
Place the template on the cabinet door or drawer front. Align it so that it looks straight and centered. Use a pencil to mark the drill holes through the template. Double-check the marks before drilling. Using a template ensures each hole is in the right place every time.
Double-check Measurements
Double-checking measurements is a crucial step in marking cabinets for hardware. Small errors can cause misaligned handles or knobs. Taking time to review your marks can save headaches later. Precision ensures your hardware looks balanced and fits perfectly.
Verify Symmetry
Check both sides of the cabinet for equal spacing. Measure from edges and center points carefully. Symmetry makes cabinets look neat and professional. Use a ruler or tape measure for accuracy. Mark spots lightly to avoid mistakes.
Confirm Alignment
Ensure all marks line up horizontally or vertically. Use a level or straight edge to guide your marks. Proper alignment prevents handles from looking crooked. Double-check each mark before drilling holes. Consistent alignment improves the overall cabinet appearance.
Prepare For Drilling
Preparing for drilling is a crucial step before marking cabinets for hardware. Proper preparation helps ensure precise holes and prevents damage. Taking the right measures saves time and effort.
Select Drill Bits
Choose drill bits that match your hardware screws. Use bits made for wood or metal, depending on your cabinet material. Sharp bits create clean holes and reduce splitting. Avoid worn or dull bits as they can damage the surface. Match the drill bit size to the screw diameter for a snug fit.
Protecting Cabinet Surfaces
Protect cabinet surfaces to avoid scratches or dents. Place painter’s tape where you will drill. The tape holds wood fibers and prevents chipping. Use a scrap piece of wood behind the drilling spot. This supports the cabinet and stops splintering. Work slowly and steady for best results.

Credit: www.amazon.com
Frequently Asked Questions
How Do I Measure Cabinets For Hardware Placement?
Measure the cabinet door’s width and height accurately. Mark the exact spot where the hardware will go. Use a ruler and pencil for precision. Consistency in measurements ensures hardware aligns properly on all cabinets.
What Tools Are Needed To Mark Cabinets For Hardware?
You need a tape measure, pencil, ruler, and a marking template. A level can help maintain straight lines. These tools ensure precise and consistent hardware placement on your cabinets.
How To Ensure Hardware Is Aligned On Cabinet Doors?
Use a measuring tape and level to mark spots evenly. Double-check measurements on all doors for uniformity. Consistent marking prevents uneven hardware placement and improves cabinet aesthetics.
Can I Use A Template To Mark Cabinet Hardware?
Yes, templates simplify marking by providing fixed drill points. They save time and improve accuracy. Templates are especially useful for multiple cabinets needing identical hardware placement.
Conclusion
Marking cabinets for hardware needs care and clear steps. Measure twice to avoid mistakes. Use a pencil to mark spots gently. Keep marks straight and even for best results. Check your work before drilling or attaching hardware. Taking time here makes installation smooth and neat.
This simple process helps your cabinets look great and work well. A little patience goes a long way. Enjoy your updated cabinets with perfect hardware placement.