Are your brake lights acting up or staying on when they shouldn’t? The brake light switch might be the culprit.
Knowing how to remove the brake light switch yourself can save you time and money. In this guide, you’ll get simple, clear steps to help you fix the problem quickly. Whether you’re a beginner or just need a quick refresher, you’ll find everything you need to get the job done right.
Keep reading, and soon you’ll have full control over your brake lights again.
Credit: www.yourmechanic.com
Tools Needed
Removing the brake light switch requires a few basic tools. These tools help make the job easier and faster. Having the right tools ensures safety and precision during the process.
Below is a list of essential tools needed to remove the brake light switch effectively.
Socket Set
A socket set is needed to remove bolts and screws holding the switch. Use the right size socket for a secure fit. This prevents damage to the bolts and switch.
Screwdrivers
Flathead and Phillips screwdrivers help to loosen clips or screws. These tools are handy for small parts around the switch. Choose a screwdriver that fits the screw head well.
Pliers
Pliers help grip and pull connectors or clips. Needle-nose pliers work best for tight spaces. They provide control and prevent damage to wires.
Flashlight
A flashlight improves visibility under the dashboard. It helps to see the brake light switch clearly. Good lighting reduces mistakes during removal.
Gloves
Wear gloves to protect your hands from sharp edges. Gloves also keep your hands clean. They improve grip on tools and parts.
Credit: service.tesla.com
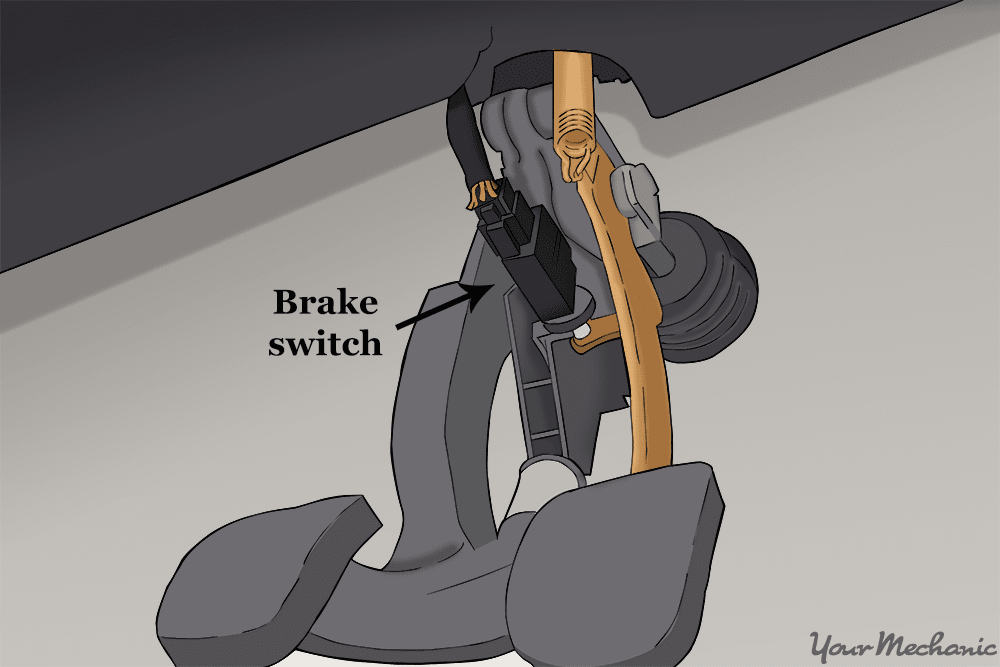
Locate The Brake Light Switch
Start by finding the brake light switch near the brake pedal inside the car. It usually looks like a small button or sensor attached to the pedal arm. This part controls the brake lights and needs careful handling during removal.
Locate The Brake Pedal Area
The brake light switch sits near the brake pedal. This small part connects to the pedal arm. It triggers the brake lights when you press the pedal. To find it, sit in the driver’s seat and look under the dashboard. Focus on the area where your foot pushes the brake pedal.
Identify The Switch Shape And Color
The brake light switch is usually a small, rectangular device. It often has a plastic body with a metal or plastic plunger. The color is often white or black. It also has a wire connector attached to it. Recognizing this shape helps you spot it quickly.
Check The Wiring Harness
Look for a bundle of wires near the brake pedal. The brake light switch connects to these wires. The connector is often clipped onto the switch. Follow the wires from the pedal area to find the switch. This step makes locating the switch easier.
Use A Flashlight For Better Visibility
The space under the dashboard can be dark. Use a flashlight to see clearly. Shine the light around the brake pedal arm. This helps reveal the brake light switch and its connectors. Good lighting makes the job faster and safer.
Prepare The Vehicle
Start by parking the vehicle on a flat surface and turning off the engine. Disconnect the battery to avoid any electrical issues during the brake light switch removal. Make sure the car is secure and ready for safe work.
Park The Vehicle On A Flat Surface
Start by parking your vehicle on a flat and stable surface. This helps prevent any movement while you work. A level spot keeps the car steady and safe.
Turn Off The Engine And Remove The Key
Switch off the engine completely. Take the key out of the ignition to avoid any electrical hazards. This step ensures no power runs through the brake light switch.
Disconnect The Negative Battery Terminal
Locate the battery under the hood. Use a wrench to disconnect the negative terminal. This stops electricity from flowing and protects you from shocks.
Gather Basic Tools And Safety Gear
Have simple tools ready, like a screwdriver or pliers. Wear safety gloves to protect your hands. Good preparation prevents delays and accidents.
Disconnect The Battery
Disconnecting the battery is the first and most important step before removing the brake light switch. This step stops electricity from flowing through the car’s system. It helps avoid shocks and protects the vehicle’s electronics. Safety is the top priority when working with any car parts.
Turning off the battery also stops accidental short circuits. These can cause damage to the car or injury to you. Taking this simple step makes the brake light switch removal safer and easier.
Locate The Battery
Open the car hood to find the battery. It usually sits near the front on one side. Look for a rectangular box with two cables attached.
Identify The Negative Terminal
The negative terminal has a minus (-) sign. It may be black or marked with a black cover. This is the terminal you will disconnect first.
Use The Right Tools
Get a wrench or socket set that fits the battery terminal bolt. Using the correct tool prevents damage to the bolt or cable.
Disconnect The Negative Terminal
Loosen the bolt on the negative terminal. Carefully lift the cable off the battery post. Keep the cable away from the battery to avoid contact.
Secure The Cable
Place the disconnected cable where it cannot touch the terminal. This stops accidental power flow while you work on the brake light switch.
Remove The Brake Light Switch
Removing the brake light switch is a simple task you can do yourself. This switch controls the brake lights. It tells the lights to turn on when you press the brake pedal. Sometimes, the switch stops working and needs replacement. Follow these steps to remove it safely and easily.
Accessing The Switch
First, locate the brake light switch. It is usually under the dashboard, near the brake pedal. Sit in the driver’s seat and look up. You may need a flashlight to see it clearly. The switch is small and attached to the brake pedal arm. Clear any objects that block your access.
Unplugging The Connector
Next, find the electrical connector on the switch. This connector supplies power to the switch. Press the tab on the connector to unlock it. Gently pull the connector away from the switch. Avoid pulling the wires directly to prevent damage. Set the connector aside safely.
Unscrewing The Switch
Now, check how the switch is held in place. It may have a clip or a small nut. Use a screwdriver or wrench if needed. Turn the nut or unclip the switch carefully. Pull the switch away from its mounting point. Keep the removed parts for the new switch installation.

Credit: www.youtube.com
Inspect The Switch And Wiring
Inspecting the brake light switch and wiring is a key step before removal. It helps spot problems early and saves time later. Careful checks prevent damage and ensure safety.
Look closely at the switch itself. Check for cracks, dirt, or signs of wear. A damaged switch may not work properly and might need replacement.
Next, examine the wiring connected to the switch. Look for frayed wires, loose connectors, or corrosion. Damaged wiring can cause brake light failure or electrical shorts.
Testing the switch with a multimeter can confirm if it works. Measure continuity to see if the switch opens and closes correctly. This step avoids guessing and ensures the switch functions well.
Visual Check Of The Brake Light Switch
Start by cleaning the area around the switch. Dirt can hide cracks or damage. Look for broken parts or worn-out plastic. Any damage means the switch should be replaced.
Examining The Wiring For Damage
Follow the wires from the switch to the connector. Look for cuts, cracks, or melted spots. Ensure all connections are tight and secure. Loose wires can cause the brake lights to fail.
Using A Multimeter To Test The Switch
Set the multimeter to continuity mode. Connect the leads to the switch terminals. Press the brake pedal and watch the meter. If the meter shows continuity, the switch works.
Install New Brake Light Switch
Installing a new brake light switch is a key step after removing the old one. This part controls the brake lights and ensures safety. Proper installation is crucial for the switch to work correctly. Follow these simple steps to place the new switch in the right position, secure it firmly, and reconnect the wiring.
Positioning The Switch
Place the new brake light switch where the old one was removed. Align it with the brake pedal arm or bracket. Make sure the switch button presses when the pedal is released. This position allows the brake lights to turn on at the correct time. Check the fit before tightening anything.
Securing The Switch
Use the mounting nut or screws to hold the switch firmly in place. Tighten them enough to stop movement but avoid over-tightening. The switch should stay steady without shifting during pedal use. A secure switch prevents brake light failure and keeps the system reliable.
Reconnecting The Connector
Attach the electrical connector to the new brake light switch. Push it in until you hear a click or feel it lock. This connection powers the brake lights and sends signals to the vehicle’s system. Double-check the connection to avoid loose wiring or poor contact.
Test The Brake Lights
Testing the brake lights is a crucial step after removing the brake light switch. It ensures your brake system signals correctly and keeps you safe on the road.
Brake lights warn drivers behind you when you slow down or stop. A quick test can confirm if the lights work properly after the switch removal.
Turn On The Car
Start your car’s engine. This powers the electrical system. The brake lights will only work when the car is on.
Press The Brake Pedal
Push the brake pedal firmly. This action sends power to the brake lights. Hold it down for a few seconds.
Check The Brake Lights
Look at the brake lights from behind the vehicle. Ask a friend to help if needed. The lights should glow bright red.
Use A Mirror For Solo Testing
Place a mirror behind the car. Press the brake pedal and watch the lights in the mirror. This helps when testing alone.
Inspect Each Light
Make sure all brake lights work. Check the left, right, and center lights. Any light not working needs attention.
Fix Issues Before Driving
If the brake lights do not turn on, check the wiring and switch. Do not drive until the problem is fixed.
Frequently Asked Questions
What Tools Are Needed To Remove A Brake Light Switch?
You need a screwdriver, pliers, and possibly a socket wrench. These tools help safely disconnect and remove the brake light switch. Always check your vehicle’s manual for specific tool recommendations.
How Do You Locate The Brake Light Switch?
The brake light switch is typically located near the brake pedal arm. It attaches to the pedal bracket and activates the brake lights when pressed. Consult your vehicle’s manual for the exact position.
Can I Remove The Brake Light Switch Myself?
Yes, removing the brake light switch is a simple DIY task. Ensure the car is off and follow safety precautions. Disconnect the battery before starting to avoid electrical issues.
How To Disconnect The Brake Light Switch Wiring?
Gently unplug the wiring connector attached to the brake light switch. Press the release tab and pull the connector straight out. Avoid pulling on the wires to prevent damage.
Conclusion
Removing the brake light switch is a simple task anyone can do. Follow the steps carefully and take your time. Double-check the connections before finishing the job. This helps ensure your brake lights work properly again. Safety on the road depends on well-functioning brake lights.
Keep your tools ready and stay patient throughout the process. Small repairs like this save money and boost confidence. Now, you can handle this task with ease. Ready for your next car fix?