Have you ever wanted to control a single light from two different switches? Installing a three-way light switch lets you do just that, giving you convenience and flexibility in your home.
Whether you’re upgrading your lighting setup or fixing a tricky switch, this guide will walk you through the process step by step. By the end, you’ll feel confident handling the wiring and enjoy the ease of controlling your lights from multiple spots.
Ready to make your home smarter and more functional? Let’s dive in!
Tools And Materials Needed
Installing a three-way light switch requires the right tools and materials. Having everything ready makes the job easier and safer.
This section lists all essential items you need. Each tool and material has a specific role in the installation process.
Basic Tools
You need a screwdriver set, both flathead and Phillips. A voltage tester is important to check power before starting. Wire strippers help remove insulation without damaging wires. A pair of needle-nose pliers assists in bending and twisting wires.
Electrical Materials
Buy two three-way switches designed for your setup. Get electrical wire, usually 14/3 or 12/3 gauge, depending on your circuit. Wire connectors or wire nuts secure wire connections safely. Electrical tape provides extra insulation for wire joints.
Safety Equipment
Wear safety glasses to protect your eyes from debris. Use insulated gloves to avoid electric shocks. A flashlight or headlamp helps if your work area is dark. Always turn off the power at the breaker before starting.
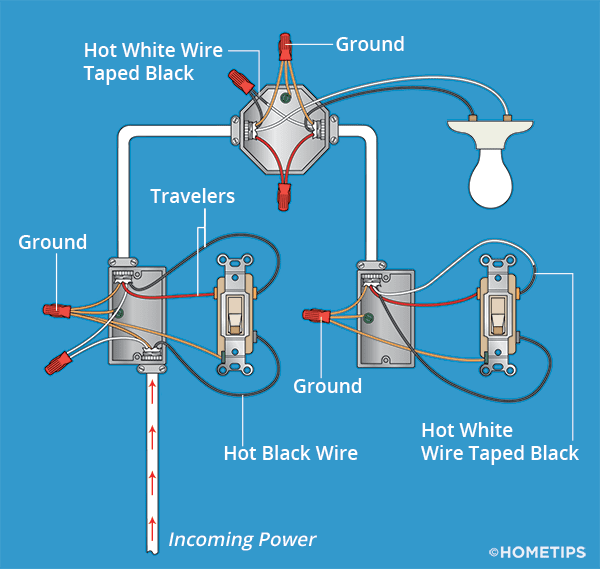
Credit: www.hometips.com
Safety Precautions
Working with electrical wiring can be risky. Safety must come first when installing a three way light switch. Taking the right precautions helps prevent shocks and accidents. This section covers key safety steps to follow before and during installation.
Turn Off Power At The Circuit Breaker
Always switch off the power at the circuit breaker. Double check by testing the wires with a voltage tester. Never start work without confirming the power is off.
Use Insulated Tools
Use tools with insulated handles to avoid electric shocks. Avoid using damaged or worn tools. Insulated tools add a layer of protection while working with wires.
Wear Safety Gear
Wear rubber-soled shoes and safety glasses. Rubber soles reduce the chance of electric shock. Glasses protect your eyes from sparks or debris.
Follow Wiring Diagrams Carefully
Use clear wiring diagrams to guide your work. Incorrect connections can cause short circuits or fires. Check each wire color and connection twice.
Keep Work Area Dry
Water and electricity do not mix. Ensure the work area is dry. Avoid standing on wet floors or holding wet tools.
Consult A Professional If Unsure
Call a licensed electrician if you feel unsure. Electrical work can be dangerous without experience. It is better to be safe than sorry.
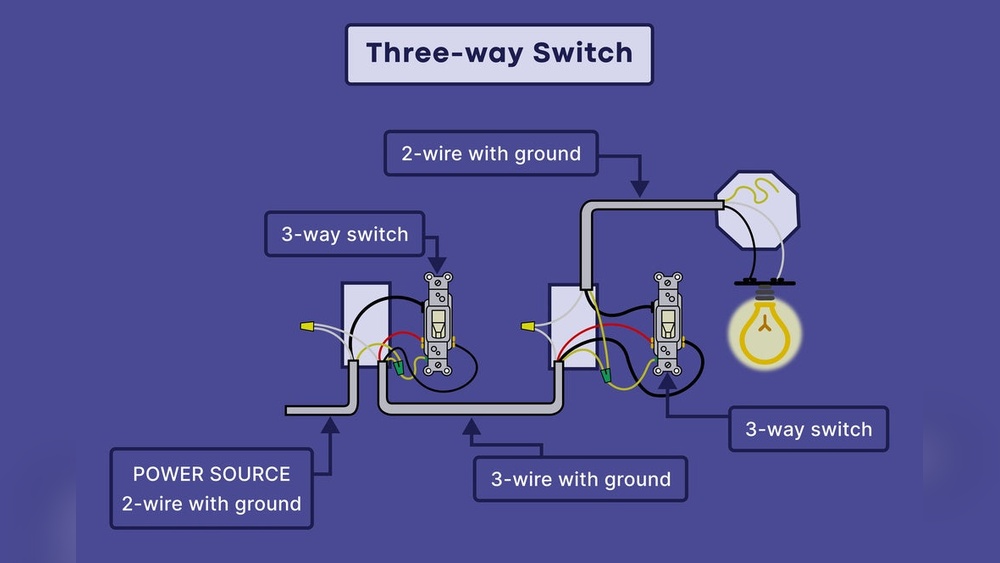
How Three Way Switches Work
Three way switches allow you to control one light from two different places. This setup is common in hallways, staircases, or large rooms. Understanding how these switches work helps you install them correctly and safely.
Each switch has three terminals. One terminal is the common, and the other two are travelers. The common terminal connects to the power source or the light fixture.
Basic Components Of A Three Way Switch
A three way switch has a unique design with three screw terminals. The common terminal is usually darker. The traveler terminals are lighter in color. Wires connect these terminals between the two switches.
How Electricity Flows Through The Switches
Electricity flows from the power source to the light fixture through the switches. The traveler wires carry current between the two switches. The position of each switch controls the path of electricity.
Switch Positions And Light Control
Each switch can be up or down. The light turns on or off based on the switches’ positions. Changing one switch breaks or completes the electrical circuit.
The Role Of Traveler Wires
Traveler wires connect the two switches. They carry current back and forth. These wires allow you to control the light from either switch.

Credit: mepacademy.com
Turn Off Power Supply
Turning off the power supply is the first and most important step before installing a three way light switch. It keeps you safe from electric shocks and prevents damage to the electrical system.
Always double-check that the power is completely off. This step protects you throughout the entire installation process.
Locate The Circuit Breaker
Find the main electrical panel in your home. It usually holds all circuit breakers. Look for the breaker that controls the light switch you want to replace.
Switch Off The Correct Breaker
Flip the breaker to the off position. This stops electricity from flowing to the switch. If unsure, turn off the main breaker to cut power to the entire house.
Use A Voltage Tester
After switching off, test the wires with a voltage tester. Ensure no electricity is running through the wires. This confirms your safety before you begin work.
Inform Others In The House
Let family members know about the power shutdown. Prevent anyone from turning the breaker back on by mistake. Safety comes first during electrical work.
Remove Existing Switches
Removing the existing switches is the first step in installing a three way light switch. This step requires caution to ensure safety. Always turn off the power at the circuit breaker before starting. Use a voltage tester to double-check that the power is off.
Carefully remove the switch cover plates using a screwdriver. Keep the screws safe for later use. Next, unscrew the switches from the electrical boxes. Gently pull the switches out to expose the wires behind them. Take note of the wire connections or take a photo for reference.
Turn Off The Power
Find the correct circuit breaker in your panel. Switch it off to cut power to the switches. Use a voltage tester at the switch terminals. Confirm no electricity flows before touching wires.
Remove The Switch Cover Plates
Use a screwdriver to unscrew the cover plates. Remove them carefully to avoid damage. Set the plates and screws aside safely.
Unscrew And Pull Out The Switches
Unscrew the mounting screws holding the switches. Pull the switches out from the wall box slowly. Do not force or yank the wires.
Document Wire Connections
Look closely at how wires attach to the switches. Use your phone to take clear photos. Label wires with tape if needed. This step helps during the new switch installation.
Identify Wires
Start by finding the common wire, usually black or dark-colored. Next, identify traveler wires, often red or black, that connect switches. Knowing each wire’s role makes the installation easier and safer.
Identifying wires is a key step in installing a three-way light switch. It helps connect the switches correctly. Wrong connections can cause the switch to fail or become unsafe.
Different wires have specific roles. Knowing these roles makes installation easier and safer. Use a voltage tester to check wires before touching them.
Understand Common Wire Types
Three-way switches usually involve three wire types: common, traveler, and ground. The common wire connects to the power source or the light. Traveler wires run between the two switches. Ground wires ensure safety and are often green or bare copper.
Locate The Common Wire
The common wire is usually darker in color or marked with black tape. It connects to the black screw on the switch. Identifying this wire first is important to avoid confusion.
Find The Traveler Wires
Traveler wires connect the two switches. They often have red and black insulation. These wires attach to the brass screws on the switch. Confirm these wires run between the two switch boxes.
Identify The Ground Wire
The ground wire is green or bare copper. It connects to the green screw on the switch. Ground wires provide a path for electrical faults. Always ensure the ground wire is connected properly.
Connect Wires To New Switches
Connecting wires to new three-way switches is a key step for proper installation. This part ensures the switches control the light from two locations. Careful attention to wire placement will prevent electrical issues.
Before starting, turn off the power at the circuit breaker. Use a voltage tester to confirm no current flows. This keeps you safe while working with wires.
Wiring The Common Terminal
Locate the common terminal on the switch. It is usually a different color screw, often black or dark bronze. Connect the wire that comes from the power source or the light fixture here. Make sure the wire is tightly wrapped around the screw. A loose connection can cause flickering or failure.
Connecting Traveler Wires
Two traveler wires link the two switches. These wires connect to the brass or lighter colored screws. Attach each traveler wire to one of these screws. Keep track of which wire goes where. Consistent wiring helps switches work together smoothly.
Ground Wire Connection
The ground wire is usually green or bare copper. Attach it to the green screw on the switch. If the box has a ground wire, connect it as well. Grounding protects against electrical shocks and ensures safety.

Credit: community.smartthings.com
Install The Switches
Installing the switches is a key step in setting up a three-way light switch system. This process involves connecting the wires properly and securing the switches in their boxes. Taking care during this stage ensures the switches will work correctly and safely.
Each switch controls the same light from different locations. Wiring must match the right terminals to avoid confusion and malfunction. Follow these clear steps to install both switches smoothly.
Prepare The Switch Boxes
Turn off the power at the circuit breaker. Use a voltage tester to confirm no electricity flows. Remove the old switches and clean the boxes. Make sure wires are untangled and stripped properly. Leave about half an inch of exposed wire for connections.
Connect The Traveler Wires
Locate the two traveler wires running between the switch boxes. Attach these wires to the traveler terminals on each switch. These terminals are usually brass or labeled. Make sure the connections are tight and secure.
Attach The Common Wire
Find the common wire in each box. This wire connects to the black or dark-colored terminal. It serves as the main power source or the load wire. Secure it firmly to ensure proper function.
Connect The Ground Wire
Locate the bare copper or green wire for grounding. Attach it to the green grounding screw on the switch. Proper grounding prevents electrical shock and improves safety. Double-check this connection before moving on.
Secure The Switches In Place
Carefully fold the wires back into the switch boxes. Screw the switches into the boxes using the mounting screws. Ensure the switches sit flush with the wall surface. Avoid over-tightening to prevent damage.
Restore Power And Test
Restoring power and testing the three way light switch is a crucial step. It confirms the wiring works correctly. Before this, double-check all connections for safety.
Turn the power back on at the circuit breaker. This allows electricity to flow through the new wiring.
Turn On The Circuit Breaker
Locate the correct breaker in your electrical panel. Flip it to the “on” position carefully. This restores power to the switch circuit.
Test Each Switch Position
Go to the first switch and flip it on. Watch the light to see if it turns on. Then, move to the second switch and change its position. The light should turn off or on depending on the switch.
Check For Proper Operation
Flip both switches in all possible ways. The light must respond correctly every time. No flickering or failure should occur.
Troubleshoot If Needed
If the light does not work, turn off power again. Recheck all wiring connections carefully. Look for loose wires or wrong terminals.
Troubleshooting Tips
Troubleshooting a three way light switch can be tricky. Problems may arise due to wiring errors or faulty parts. Knowing how to check common issues saves time and effort. This guide helps spot and fix problems quickly.
Check The Power Supply
Start by ensuring power reaches the switch. Use a voltage tester to check the wires. No power means a breaker might be off. Reset the breaker and test again.
Inspect The Wiring Connections
Loose or wrong connections cause switches to fail. Turn off power before opening the switch box. Tighten all wire nuts and screws. Match the wires by color and terminal.
Test The Switch Function
Switches can wear out over time. Use a multimeter to test switch continuity. Flip the switch and check for a signal. Replace the switch if no continuity shows.
Look For Damaged Wires
Damaged wires cause shorts or open circuits. Examine wires for cuts or frays. Replace any damaged wiring safely. Damaged wires can cause serious hazards.
Verify The Light Fixture
The problem might not be the switch. Check the light bulb and fixture. Replace the bulb or fixture if needed. Confirm the fixture has power when switched on.
Frequently Asked Questions
What Tools Are Needed To Install A Three Way Light Switch?
You need a screwdriver, wire stripper, voltage tester, electrical tape, and wire nuts. These tools ensure safe and proper installation.
How Do Three Way Light Switches Work Together?
They control one light from two locations by using traveler wires that connect both switches. Flipping either switch changes the light’s state.
Can I Replace A Single Pole Switch With A Three Way Switch?
No, a three way switch requires two switches and traveler wires. Simply replacing one won’t work without proper wiring.
Is It Necessary To Turn Off Power Before Installation?
Yes, always turn off the circuit breaker to avoid electric shock during installation. Safety is crucial when handling electrical wiring.
Conclusion
Installing a three-way light switch is simpler than it seems. Follow each step carefully for safety and success. Double-check your wiring before turning power back on. Test the switches to ensure they work properly. This setup gives you control over lights from two places.
Take your time and don’t rush the process. With patience, you can improve your home lighting easily. Enjoy the convenience a three-way switch brings to your space.