Are you looking to light up a space quickly and easily without complicated wiring? Connecting an LED light with a switch using a battery is a simple project you can do yourself.
Imagine being able to control your LED light with just a flick of a switch, powered by a battery anywhere you want. In this guide, you’ll discover step-by-step instructions that anyone can follow—even if you have no prior experience. By the end, you’ll have the confidence to create your own portable lighting solution.
Ready to make your LED light work exactly how you want? Let’s get started!

Credit: www.youtube.com
Required Materials
Safety is very important when connecting an LED light with a switch using a battery. Small mistakes can cause damage or injury. Follow these safety rules to protect yourself and your devices.
Handling Electrical Components
Always handle wires and parts with dry hands. Wet hands can cause electric shock. Use tools with insulated handles to avoid accidents. Check all components for damage before use. Broken wires or parts can be dangerous. Work in a clean, dry area. Keep the workspace free of clutter to avoid mistakes. Turn off or disconnect the battery before starting work.
Avoiding Short Circuits
A short circuit happens when wires touch incorrectly. This can cause sparks or damage the battery. Make sure wires do not touch each other except at the correct points. Use electrical tape to cover exposed wire ends. Keep wires organized and separate. Double-check connections before turning on the battery. Use the right battery for your LED and switch to prevent overload.
Credit: www.oznium.com
Safety Precautions
Wiring an LED light with a switch and battery is simple once you know the basics. Proper wiring helps the light work safely and correctly. Understanding the parts and their connections is the first step. This section explains the essential wiring concepts.
Understanding Led Polarity
LEDs have two legs: positive and negative. The longer leg is usually positive, called the anode. The shorter leg is negative, called the cathode. Connecting the LED the wrong way stops it from lighting. Always check the polarity before wiring.
Polarity matters because LEDs only allow current to flow one way. Positive connects to the battery’s positive side. Negative connects to the battery’s negative side. This ensures the LED lights up properly.
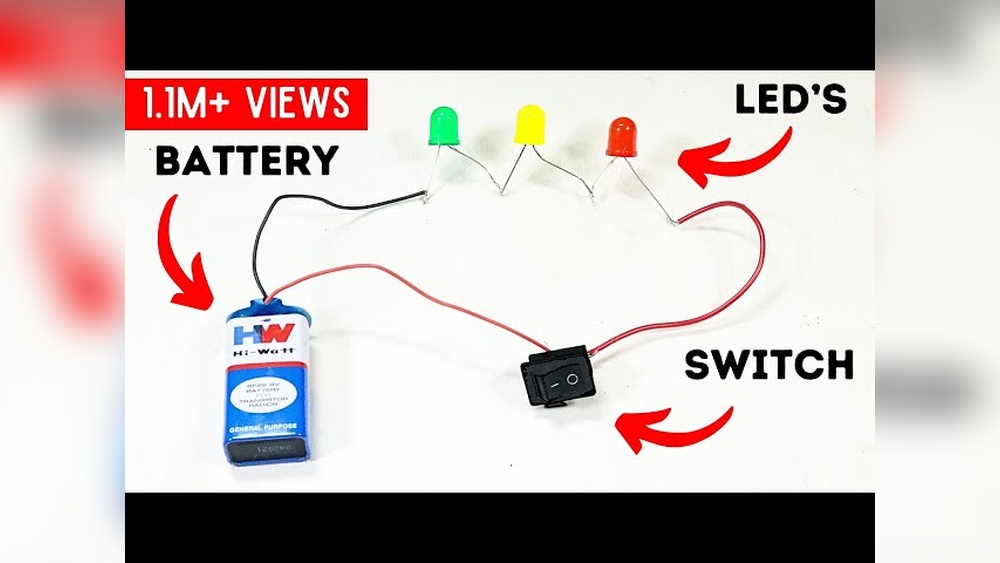
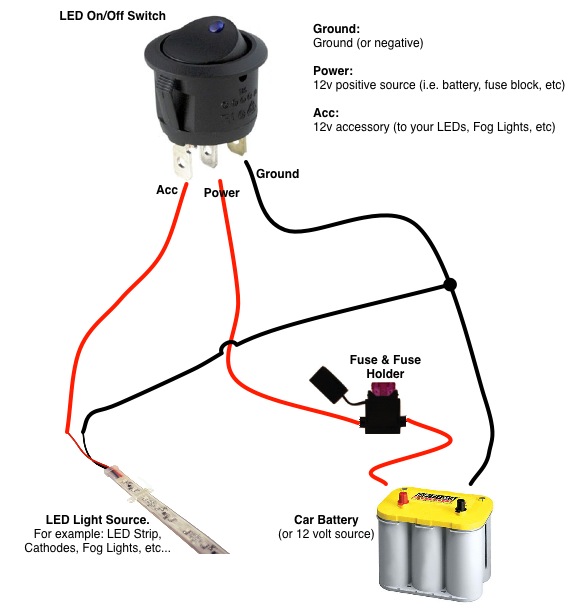
Battery And Switch Connections
The battery powers the LED, and the switch controls the power flow. Connect the positive terminal of the battery to one switch terminal. Connect the other switch terminal to the LED’s positive leg.
Then, connect the LED’s negative leg back to the battery’s negative terminal. This completes the circuit. Pressing the switch closes the circuit, lighting the LED. Releasing the switch opens the circuit, turning off the LED.
Wiring Basics
Connecting an LED light to a switch using a battery is simple. Follow these clear steps to build your own basic circuit. This guide helps you understand each part and how to join them correctly.
Preparing The Components
Gather all parts before starting. You need an LED light, a switch, a battery, and some wires. Check that the LED and battery voltages match. Use a battery holder for easy handling. Make sure the switch works by testing it separately.
Connecting The Led To The Switch
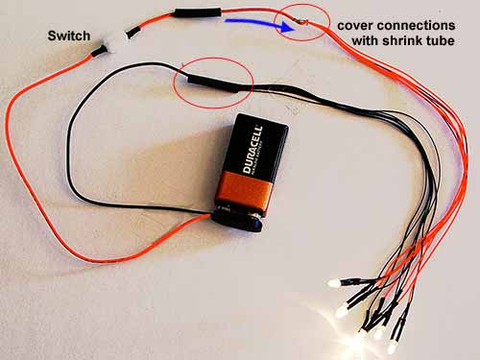
Take one wire and connect the LED’s positive leg. Attach the other end to one terminal of the switch. Use a small piece of tape or a connector to secure the wire. Connect the LED’s negative leg to another wire. Leave the other end free for now.
Attaching The Battery
Connect the free wire from the LED’s negative leg to the battery’s negative terminal. Use a battery holder or tape to fix the wire. Take another wire and attach it to the battery’s positive terminal. Connect this wire to the free terminal of the switch. This completes the circuit loop.
Testing The Circuit
Switch on the button. The LED should light up. If not, check all connections. Make sure wires touch terminals firmly. Swap the battery if the LED stays off. A bright LED means your circuit works perfectly.
Step-by-step Connection
Troubleshooting is key when connecting an LED light with a switch and battery. Small mistakes can stop your light from working. Knowing common problems saves time and frustration. Follow simple steps to fix your setup.
Common Connection Issues
Loose wires are the top cause of connection problems. Check all wires are tight and secure. Reversed polarity can prevent the LED from lighting. Make sure the battery’s positive and negative ends match the LED’s terminals. A faulty switch may stop the circuit. Test the switch separately to confirm it works. Using the wrong battery type or voltage can damage the LED or stop it from lighting.
Fixing Non-working Leds
Test the LED with a fresh battery to see if it works. Replace the LED if it stays off. Clean any dirt or corrosion from the battery and contacts. Dirt blocks the electrical flow. Use a multimeter to check the circuit’s continuity. Replace any broken wires or parts. Make sure the switch is in the ON position. Sometimes, a simple reset solves the problem.
Troubleshooting Tips
Enhancing your LED light setup with a switch and battery can improve both safety and performance. Small tweaks make a big difference in how your circuit works and lasts. Focus on simple additions that protect your components and offer flexibility.
Adding Resistors For Safety
Resistors control the flow of electric current. They stop too much current from reaching the LED. This prevents the LED from burning out quickly. Choose a resistor with the right value for your battery and LED. Use a multimeter or online calculator to find the correct resistance. Connecting a resistor in series with the LED is easy and safe.
Using Different Battery Types
Different batteries provide different voltages and currents. Alkaline batteries are common and easy to find. Rechargeable batteries save money over time and reduce waste. Lithium batteries offer longer life but cost more. Check the LED’s voltage needs before picking a battery. Match the battery voltage to avoid damage or poor light output.
Credit: evandesigns.com
Frequently Asked Questions
How Do I Connect An Led Light To A Battery?
To connect an LED to a battery, connect the LED’s positive leg to the battery’s positive terminal. Attach the negative leg to the switch, then connect the switch to the battery’s negative terminal. This completes the circuit and powers the LED when the switch is on.
What Type Of Battery Is Best For Led Lights?
A 9V or AA battery is commonly used for powering LED lights. Choose a battery that matches the LED’s voltage and current needs. Using the correct battery ensures safe operation and optimal brightness of the LED light.
Why Is A Switch Necessary In Led Circuits?
A switch controls the flow of electricity to the LED. It allows you to turn the LED light on or off easily. This helps conserve battery power and protects the LED from continuous operation.
How To Prevent Led Damage In Battery Circuits?
Use a resistor in series with the LED to limit current. This prevents excess current that can damage the LED. Calculate the resistor value based on the battery voltage and LED specifications.
Conclusion
Connecting an LED light with a switch and battery is simple. Follow the steps carefully and use the right tools. This setup lets you control light easily and saves energy. You can try this project at home or school. It helps you learn basic electrical skills.
Keep safety in mind while working. Now, you can enjoy a working LED light with a switch powered by a battery. Easy, quick, and useful!