Have you ever wished you could control a power outlet with a simple flip of a light switch? Imagine turning on your favorite lamp or charging your devices without reaching for the plug every time.
Connecting a power outlet to a light switch is easier than you might think, and it can make your daily routine much more convenient. In this guide, you’ll learn exactly how to do it safely and effectively, step by step.
Keep reading to discover the simple tricks that can transform your space and put control right at your fingertips.

Credit: www.angi.com
Tools And Materials Needed
Connecting a power outlet to a light switch requires specific tools and materials. Having the right items ensures the job is safe and done correctly. Gather everything before starting the work. This saves time and avoids interruptions.
Essential Tools
You need some basic tools to handle wiring and installation. A screwdriver set is important for screws and terminals. Wire strippers help remove insulation from wires safely. A voltage tester checks if wires carry current. Needle-nose pliers bend or hold wires. A tape measure helps with accurate placement. Electrical tape insulates wire connections.
Required Materials
Choose the right electrical components for your project. A standard power outlet matches your home’s voltage. A compatible light switch controls the outlet or light. Electrical wires connect the switch and outlet. Wire nuts secure wire connections. A wall box holds the switch or outlet in place. Faceplates cover the installed switch and outlet for safety.
Safety Gear
Protect yourself while working with electricity. Wear insulated gloves to avoid shocks. Safety goggles protect your eyes from debris. Turn off power at the circuit breaker before starting. Use a flashlight if the area is dark. Keep a fire extinguisher nearby for emergencies.
Safety Precautions
Working with electrical wiring requires care and attention. Safety precautions protect you from shocks and accidents. Always prepare before starting any electrical project. Taking simple steps can prevent serious injuries.
Turn Off The Power Supply
Always switch off the main power at the circuit breaker. Double-check by using a voltage tester on wires. Never trust that the power is off without testing. This step stops electric shocks during work.
Use Proper Tools And Equipment
Use insulated tools designed for electrical work. Avoid metal tools without insulation. Wear rubber-soled shoes and gloves to reduce shock risk. Proper equipment helps keep you safe.
Understand The Wiring Diagram
Study the wiring diagram carefully before starting. Know where each wire connects and its function. Miswiring can cause fires or damage devices. Clear knowledge prevents dangerous mistakes.
Work In A Dry Environment
Make sure the work area is dry and clean. Water conducts electricity and increases shock risk. Avoid working in damp places or with wet hands. Safety improves in dry conditions.
Do Not Work Alone
Have someone nearby when working on electrical wiring. They can help in case of emergencies. A second person adds an extra layer of safety. Never take risks alone with electricity.
Basic Electrical Concepts
Understanding basic electrical concepts is key before connecting a power outlet to a light switch. It helps to know the parts and how they work together. This knowledge keeps the work safe and effective. Below are important concepts every beginner should learn.
Wiring Types
There are different wiring types used in homes. The most common are the hot wire, neutral wire, and ground wire. The hot wire carries electricity to the device. The neutral wire returns electricity back to the source. The ground wire protects from electrical shocks by directing current safely to the earth.
Each wire has a color code. Hot wires are usually black or red. Neutral wires are white or gray. Ground wires are green or bare copper. Recognizing these helps avoid mistakes during wiring.
Circuit Breakers
Circuit breakers stop electrical flow during problems. They protect the wiring and devices from damage. If too much current flows, the breaker trips to cut power. This prevents fires and shocks.
Each circuit breaker controls power to specific areas or devices. Knowing which breaker controls the outlet or switch you work on is important. Always turn off the correct breaker before starting any electrical work.
Grounding Basics
Grounding is a safety measure. It prevents electric shocks by giving electricity a safe path to the earth. Ground wires connect metal parts of devices to the ground system.
Without proper grounding, metal parts can become dangerous. Grounding also helps electrical systems work correctly. Checking grounding before starting ensures safer installation.
Planning Your Connection
Planning your connection is the first step to a safe and efficient setup. It helps avoid mistakes and ensures everything works well. Careful planning saves time and effort during installation. This part focuses on choosing the right outlet and switch and mapping the circuit clearly.
Choosing The Right Outlet And Switch
Select outlets and switches that match your needs. Standard outlets work for most rooms. Use weather-resistant ones for outdoor areas. Choose switches designed to handle the load of the connected device. Check the voltage and current ratings carefully. Pick materials that are durable and meet safety standards. Proper selection prevents electrical problems and hazards.
Mapping The Circuit
Draw a simple map of the circuit before starting. Mark the power source, switch, and outlet locations. Note the wiring paths between each point. This plan helps visualize how electricity flows. Confirm the switch controls only the outlet or both outlet and light. Label each wire type and color for clarity. A clear map reduces confusion and ensures correct wiring.
Turning Off Power
Turning off power is the first step before working on electrical wiring. It keeps you safe from shocks and injuries. Always treat electricity with respect and caution.
Power should be completely off before handling wires. This prevents accidents and damage to your tools or devices.
Locate The Circuit Breaker
Find your home’s circuit breaker panel. It is usually in the basement, garage, or utility room. The breakers control power to different areas of your house.
Identify The Correct Breaker
Look for the breaker that controls the room or outlet you will work on. The breakers are often labeled. If not, test carefully to find the right one.
Switch Off The Breaker
Flip the breaker switch to the OFF position. This stops the electricity flow to the chosen circuit. Double-check by trying the light switch or outlet.
Use A Voltage Tester
Confirm power is off with a voltage tester. Test the wires or outlet terminals. If no voltage shows, it is safe to proceed with wiring.
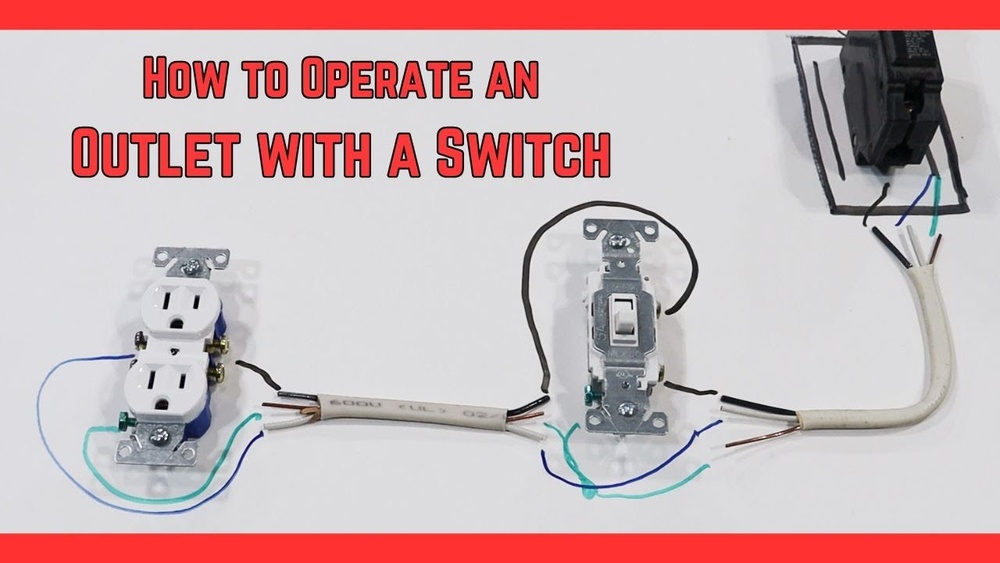
Wiring The Power Outlet
Wiring the power outlet is a key step in connecting it to a light switch. It involves attaching the right wires to the correct terminals on the outlet. This ensures the outlet works safely and properly. Understanding each wire’s role helps avoid mistakes and hazards.
Connecting The Hot Wire
The hot wire carries electricity from the power source. It is usually black or red. Attach this wire to the brass-colored screw on the outlet. Make sure the connection is tight to prevent sparks or shorts. Double-check that the wire is stripped just enough to fit under the screw.
Connecting The Neutral Wire
The neutral wire completes the electrical circuit. It is usually white. Connect this wire to the silver-colored screw on the outlet. Secure it firmly for a good electrical path. Avoid letting extra wire stick out, which can cause shorts or shocks.
Connecting The Ground Wire
The ground wire protects against electrical faults. It is usually bare copper or green. Attach this wire to the green grounding screw on the outlet. This connection helps prevent electric shocks. Ensure the wire is wrapped tightly around the screw for safety.
Wiring The Light Switch
Wiring the light switch is a key step to control power outlets safely. Understanding basic wiring helps avoid common mistakes. This section breaks down the process clearly.
Switch Wiring Basics
A light switch has two main terminals for wires. One terminal connects to the power source. The other terminal connects to the device or outlet. Use a screwdriver to loosen and tighten terminal screws. Always turn off the power before starting any wiring work. This prevents electric shock and damage.
Connecting To The Power Outlet
Run a wire from the switch’s output terminal to the power outlet. This wire controls the flow of electricity to the outlet. Make sure the wire is the right gauge for your circuit. Connect the neutral wire directly to the outlet’s neutral terminal. Secure all connections with wire nuts or terminal screws. Test your work by turning the power back on and using the switch.
Testing The Connection
Testing the connection after wiring a power outlet to a light switch is important. It confirms that the wiring is safe and working correctly. This step helps avoid electrical hazards and ensures the outlet and switch operate as expected. Use simple tools to check the wiring before finalizing the setup.
Using A Voltage Tester
A voltage tester is a handy tool for checking electrical connections. First, turn on the power at the circuit breaker. Then, place the tester’s probe on the outlet’s terminals. The tester shows if electricity flows through the outlet.
Next, flip the light switch on and off. Watch the tester for changes in power. If the tester lights up when the switch is on, the connection works. If not, the wiring might need adjustment.
Troubleshooting Tips
Start by turning off the power before checking wires. Loose or wrong connections cause most problems. Tighten screws and ensure wires connect to correct terminals.
Check the circuit breaker to see if it tripped. Reset it if needed. Use the voltage tester again to confirm power is back.
If the outlet still does not work, test the switch itself. Replace the switch if it is faulty. Keep testing until the outlet works properly with the switch.
Finalizing And Securing
Finalizing and securing the connection between a power outlet and a light switch is a crucial step. This part ensures everything is safe, stable, and ready to use. Proper mounting and restoring power carefully are key to avoid hazards.
Mounting The Outlet And Switch
Start by carefully placing the outlet and switch into their boxes. Align them so the screws fit easily. Tighten the screws firmly but do not over-tighten. Over-tightening can crack the plastic or damage the box.
Make sure wires stay inside the box without pinching. Use a screwdriver to secure the faceplates. This protects the wiring and gives a clean look.
Restoring Power Safely
Before restoring power, double-check all connections. Look for loose wires or exposed copper. These can cause short circuits or shocks. Turn the circuit breaker back on slowly.
Test the switch and outlet with a voltage tester or plug in a small device. Confirm they work as expected. Turn off power immediately if anything feels wrong. Safety is the top priority.

Credit: www.do-it-yourself-help.com

Credit: www.youtube.com
Frequently Asked Questions
Can I Connect A Power Outlet To A Light Switch Safely?
Yes, you can connect a power outlet to a light switch safely. Use proper wiring methods and follow electrical codes. Always turn off the power before working. Consult a professional if unsure to avoid hazards.
What Tools Are Needed To Connect An Outlet To A Switch?
You need a screwdriver, wire stripper, voltage tester, electrical tape, and wire nuts. Also, use a voltage tester to ensure power is off before starting.
Does Connecting An Outlet To A Switch Affect Electrical Load?
Yes, connecting an outlet to a switch may affect the load. Ensure the circuit can handle the combined load to prevent overloads or tripped breakers.
Can I Control An Outlet With A Light Switch?
Yes, you can control an outlet with a light switch by wiring the outlet to the switch. This setup allows the switch to turn power on or off to the outlet.
Conclusion
Connecting a power outlet to a light switch can save space and add convenience. Always turn off the power before starting any electrical work. Follow the steps carefully and use the right tools. Double-check your wiring to avoid mistakes. Safety matters most when working with electricity.
Taking your time helps prevent accidents. Now, you can handle this simple project with confidence. Keep learning and practicing to improve your skills. Small projects like this build your knowledge and independence.