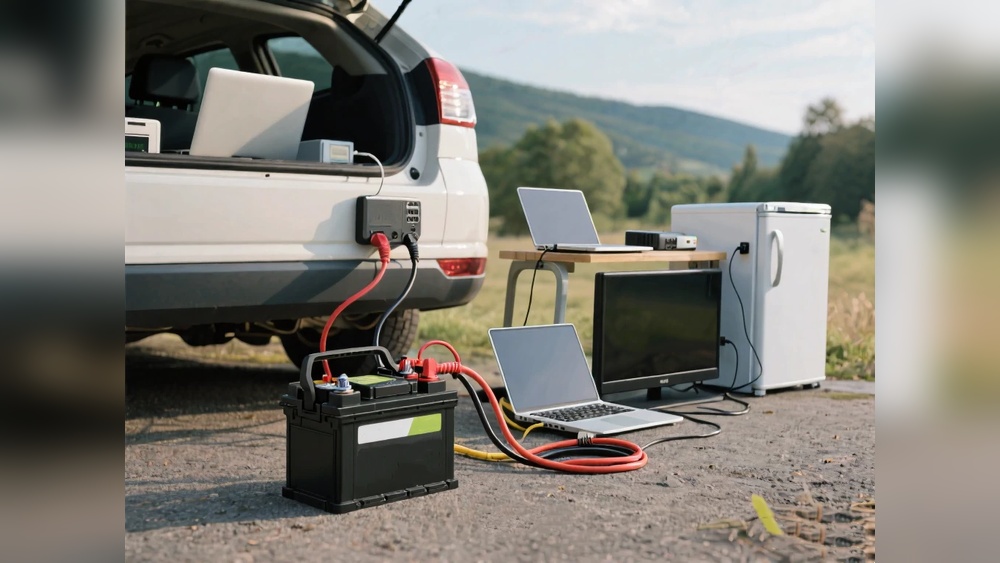
Have you ever found yourself needing power on the go and wondered if you could use your car battery to run a wall socket? Connecting a wall socket to a car battery might sound complicated, but with the right steps, you can do it safely and effectively.
In this guide, you’ll learn exactly how to set up a connection that lets you power your devices wherever you are. Keep reading, because mastering this simple skill could save you time, money, and stress when you need electricity away from home.
Necessary Tools And Materials
Before you start hooking a wall socket to a car battery, gather the right tools and materials. Having everything ready makes the process easier and safer. Using proper equipment prevents damage and reduces risks.
List Of Required Equipment
- Car battery with sufficient charge
- Wall socket adapter or inverter
- Heavy-duty cables with clamps
- Wire stripper and cutter
- Multimeter to check voltage
- Electrical tape or heat shrink tubing
- Screwdriver set
Safety Gear Essentials
- Insulated gloves to avoid shocks
- Safety goggles to protect eyes
- Non-conductive footwear
- Fire extinguisher nearby
- Clear workspace free of clutter

Credit: soundcertified.com
Preparing The Car Battery
Preparing the car battery is the first step before hooking a wall socket to it. This step ensures safety and proper connection. A well-prepared battery reduces the risk of damage to your car or devices.
Start by understanding where the battery is and checking its condition carefully. These actions make the process smooth and secure.
Locating The Battery
Open the car hood to find the battery. Usually, it sits near the front of the engine compartment. Look for a rectangular box with two cables attached.
The battery has a positive terminal marked with a plus (+) sign. The negative terminal shows a minus (-) sign. Knowing these helps avoid wrong connections.
Checking Battery Condition
Inspect the battery for cracks or leaks. These signs mean the battery is unsafe to use. Also, check the terminals for corrosion or rust.
Clean terminals with a brush if you see white or green powder. A clean battery holds power better and connects more safely.
Make sure the battery is fully charged. A weak battery can cause problems when hooking to a wall socket.
Selecting The Right Wall Socket
Selecting the right wall socket is key to safely hook it to a car battery. The socket must match the battery’s power and the device’s needs. Using the wrong socket can cause damage or risk safety. Understanding the type and ratings of the socket helps ensure a good connection.
Choosing Compatible Sockets
Not all wall sockets fit car batteries. Choose a socket designed for DC power, not just AC. Look for sockets that match the battery terminal size and shape. Some sockets come with adapters for easier connection. Check if the socket supports the cable thickness used for the battery. Compatibility prevents loose connections and sparks.
Understanding Voltage And Current Ratings
Voltage rating shows the maximum power the socket can handle safely. Car batteries usually provide 12 volts DC. The socket must support this voltage or higher. Current rating is the maximum current flow the socket allows. It must meet or exceed the battery’s output amperage. Using a socket with low ratings causes overheating and failure. Always pick sockets with clear voltage and current labels.

Credit: www.youtube.com
Wiring Basics
Wiring a wall socket to a car battery requires basic electrical knowledge. Knowing the wiring basics keeps the connection safe and reliable. It helps to prevent short circuits and damage to devices. You must handle wires carefully and connect them correctly.
Understanding which wire is positive and which is negative is key. Choosing the right wire size also matters for safety and efficiency. These simple steps make your project work well and last longer.
Identifying Positive And Negative Terminals
Car batteries have two terminals: positive and negative. The positive terminal usually has a red cover or plus (+) sign. The negative terminal has a black cover or minus (-) sign. Connecting wires to the wrong terminal can cause sparks or damage.
Use a multimeter to double-check terminals if unsure. Always connect the positive wire to the positive terminal first. Then attach the negative wire to the negative terminal. This order reduces the risk of short circuits.
Choosing Appropriate Wire Gauge
The wire gauge shows the thickness of the wire. Thicker wires carry more current without overheating. Thin wires can cause voltage drop and become hot.
Check the current rating of your device to pick the right wire size. For most car battery connections, use wires between 10 and 14 gauge. Use shorter wires to reduce power loss. Proper wire gauge keeps your setup safe and efficient.
Step-by-step Connection Process
Connecting a wall socket to a car battery requires careful steps. Follow each step clearly to ensure safety and proper function. This guide breaks down the process into simple parts.
Disconnecting The Battery
Start by turning off the car engine. Remove the negative cable first. Then, remove the positive cable. This prevents any sparks or shorts. Always use insulated tools for safety.
Attaching Wires To Battery Terminals
Choose wires with correct thickness for power load. Connect the positive wire to the positive terminal. Secure the connection tightly. Attach the negative wire to the negative terminal. Double-check that connections are firm.
Connecting Wires To Wall Socket
Identify the socket’s live, neutral, and ground terminals. Connect the positive wire to the live terminal. Attach the negative wire to the neutral terminal. Connect a ground wire if available. Follow the socket’s wiring diagram carefully.
Securing And Insulating Connections
Use electrical tape to cover all exposed wires. Wrap tape tightly around each connection point. Use cable ties to bundle wires neatly. Check that no bare wires remain visible. This prevents short circuits and electric shocks.
Testing The Setup
Testing the setup is a key step after hooking a wall socket to a car battery. It ensures the connection works correctly and safely. This step helps avoid damage to your devices and the battery.
Checking Voltage Output
Use a multimeter to check the voltage output. Set the multimeter to measure DC voltage. Touch the positive probe to the socket’s positive terminal. Touch the negative probe to the socket’s negative terminal. The reading should match the car battery voltage, around 12 volts. A lower or higher reading signals a problem. Fix any wiring issues before use.
Ensuring Safe Operation
Look for any sparks or unusual smells near the socket. These signs show unsafe wiring or short circuits. Check all connections are tight and insulated. Avoid using the setup in wet or damp places. Monitor the battery temperature while in use. If it gets too hot, disconnect immediately. Safety is the top priority to prevent accidents.
Common Mistakes To Avoid
Connecting a wall socket to a car battery can be risky without proper care. Many beginners make simple mistakes that can cause damage or injury. Avoiding these errors ensures a safe and effective setup. Here are common mistakes to watch out for.
Incorrect Polarity Connection
Connecting the positive and negative terminals wrongly can damage devices. Always match the red cable to the positive terminal. The black cable must go to the negative terminal. Double-check before powering anything.
Using Inadequate Wire Gauge
Thin wires cannot handle high current safely. They may overheat or melt during use. Choose thick wires designed for the battery’s power output. This prevents fire hazards and power loss.
Skipping A Fuse Or Circuit Breaker
No fuse or breaker means no protection from short circuits. Sparks or fire can result from electrical faults. Always install a fuse or circuit breaker close to the battery connection.
Ignoring Battery Voltage Limits
Wall sockets use standard AC voltage. Car batteries supply DC voltage, usually 12 volts. Using the wrong voltage can harm appliances. Use an inverter that matches your device’s voltage needs.
Connecting While Battery Is Charging
Hooking up wires during charging can cause sparks. Sparks may ignite battery gases, causing explosions. Always disconnect the battery charger before making connections.

Credit: www.youtube.com
Safety Tips And Precautions
Working with a car battery and a wall socket can be risky without proper care. Safety is the top priority. Following key safety tips prevents accidents and damage. This section covers important precautions to keep you safe.
Wear Protective Gear
Always wear safety glasses to protect your eyes. Use gloves to avoid electric shocks and burns. Long sleeves help protect your skin from sparks or acid.
Disconnect The Battery First
Before starting, disconnect the car battery. Remove the negative terminal cable first. This reduces the chance of short circuits and sparks.
Use Proper Tools And Equipment
Use insulated tools designed for electrical work. Avoid using damaged wires or connectors. Check all equipment for wear or damage before use.
Work In A Well-ventilated Area
Car batteries can release harmful gases. Perform the work outdoors or in a space with good airflow. Avoid enclosed or poorly ventilated areas.
Double-check Connections
Ensure all connections are secure and correct. Incorrect wiring can cause shorts or fires. Match the positive and negative terminals carefully.
Avoid Water And Moisture
Keep the area dry. Water increases the risk of electric shock. Never work near puddles or wet surfaces.
Frequently Asked Questions
How Do I Safely Connect A Wall Socket To A Car Battery?
Use a proper inverter to convert DC to AC power. Connect the inverter to the car battery terminals securely. Avoid direct wiring without an inverter to prevent damage or hazards.
What Tools Are Needed To Hook A Wall Socket To A Car Battery?
You need an inverter, heavy-gauge cables, clamps, and a multimeter. Safety gloves and insulated tools are also essential for protection.
Can I Power Household Devices From A Car Battery?
Yes, but only low-wattage devices. Use an inverter to convert 12V DC to 110/220V AC. Avoid high-power appliances to prevent battery drain or damage.
How Long Can A Car Battery Power A Wall Socket?
Depends on the battery capacity and device power usage. Typically, small devices run for a few hours. Larger devices drain the battery faster.
Conclusion
Hooking a wall socket to a car battery requires care and the right tools. Always check connections twice to avoid mistakes. Use proper cables and keep wires secure. Safety matters most to prevent shocks or damage. This setup can power small devices during trips or emergencies.
Follow the steps carefully and stay safe while working. With patience, you can do this easily at home. Keep learning and practicing to improve your skills. Simple tasks become easier with time and attention.