Are you tired of fumbling for the light switch in dark hallways or large rooms? Installing a 3 way light switch can change that.
It lets you control one light from two different places, making your home more convenient and smarter. You don’t need to be an expert to do this. With the right steps and tools, you can upgrade your lighting setup quickly and safely.
Keep reading, and you’ll learn exactly how to install a 3 way light switch yourself—no confusion, no hassle.
Tools And Materials Needed
Installing a 3 way light switch requires the right tools and materials. Having these ready makes the job easier and safer. Each tool plays an important role in the installation process.
Gather all materials before starting. This helps avoid interruptions and keeps you organized. Use tools that are in good condition to ensure safety and accuracy.
Tools Needed
- Voltage tester – checks if wires carry electricity
- Screwdrivers – both flathead and Phillips for screws
- Wire stripper – removes insulation from wires
- Needle-nose pliers – bends and twists wires
- Electric drill – drills holes if needed for mounting
- Flashlight – provides light in dark spaces
- Electrical tape – secures wire connections
Materials Needed
- 3 way light switches – two switches for controlling one light
- Electrical wire – usually 14/3 or 12/3 gauge
- Wire nuts – connects wires safely
- Wall plates – covers switches for a neat look
- Light fixture – the bulb and holder you want to control
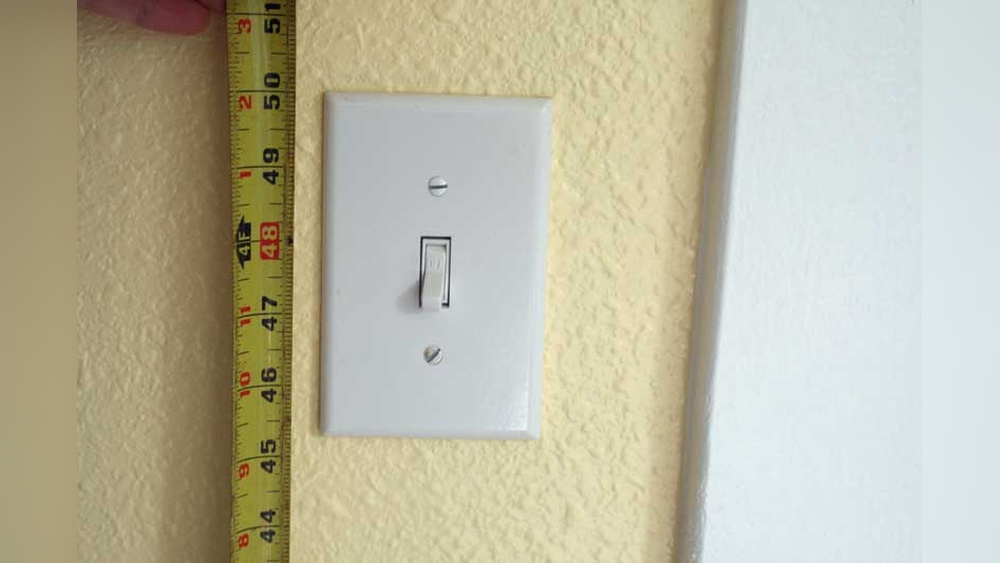
Credit: www.kennethballard.com
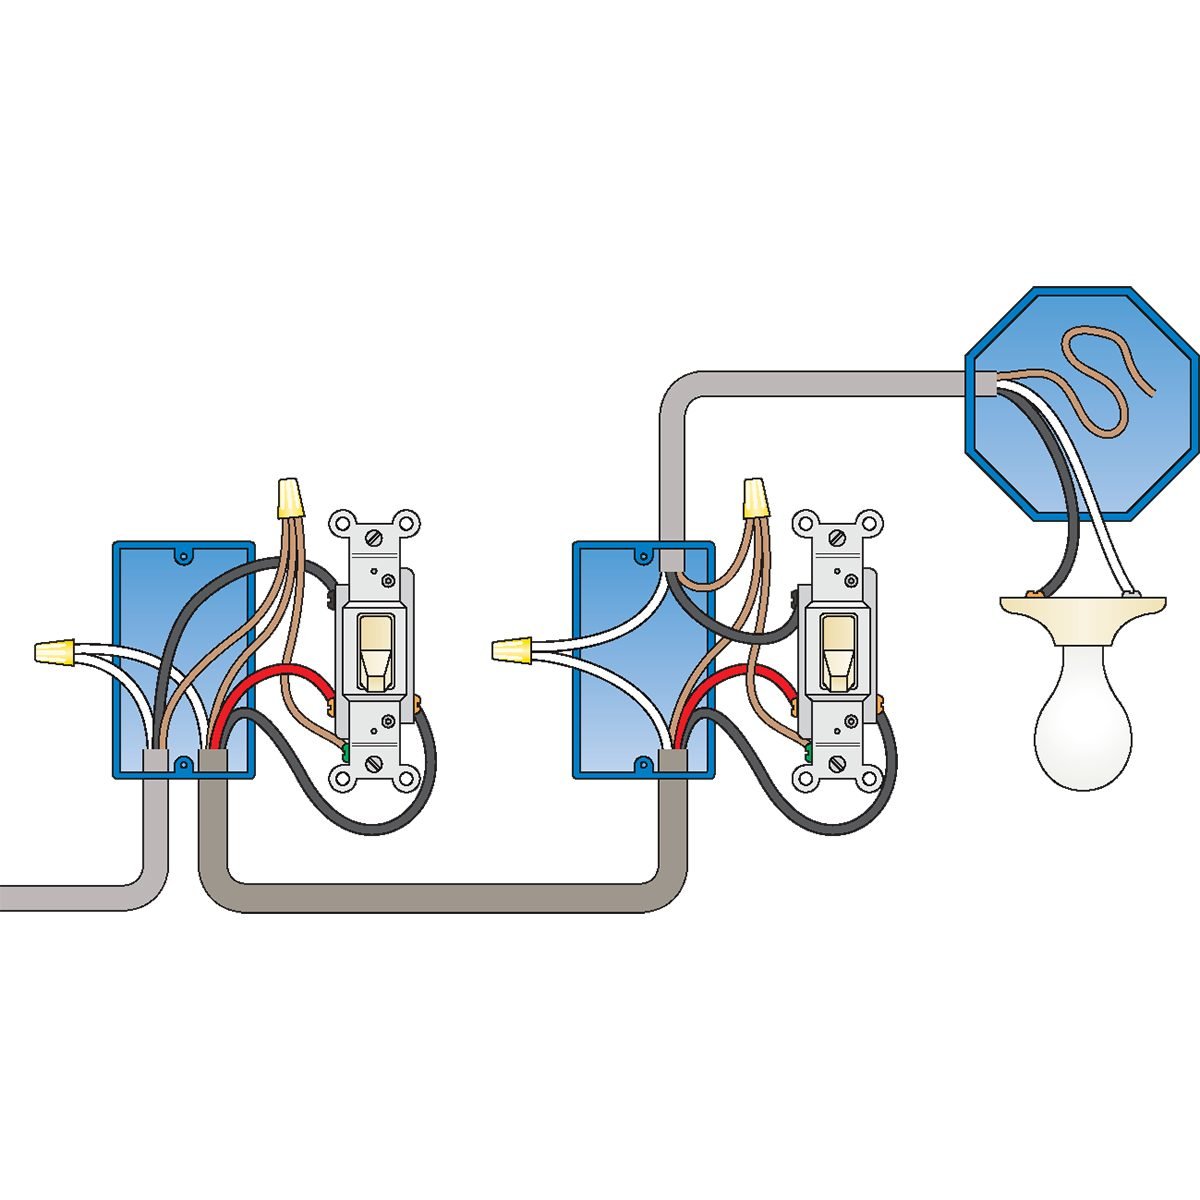
How A 3 Way Switch Works
A 3 way switch lets you control one light from two different places. This is useful in hallways, staircases, or large rooms.
Understanding how it works helps with installation and troubleshooting. It uses special wiring to connect two switches to the same light.
Basic Components Of A 3 Way Switch
A 3 way switch has three terminals. Two traveler terminals and one common terminal.
The traveler terminals connect the two switches. The common terminal connects to the power source or the light fixture.
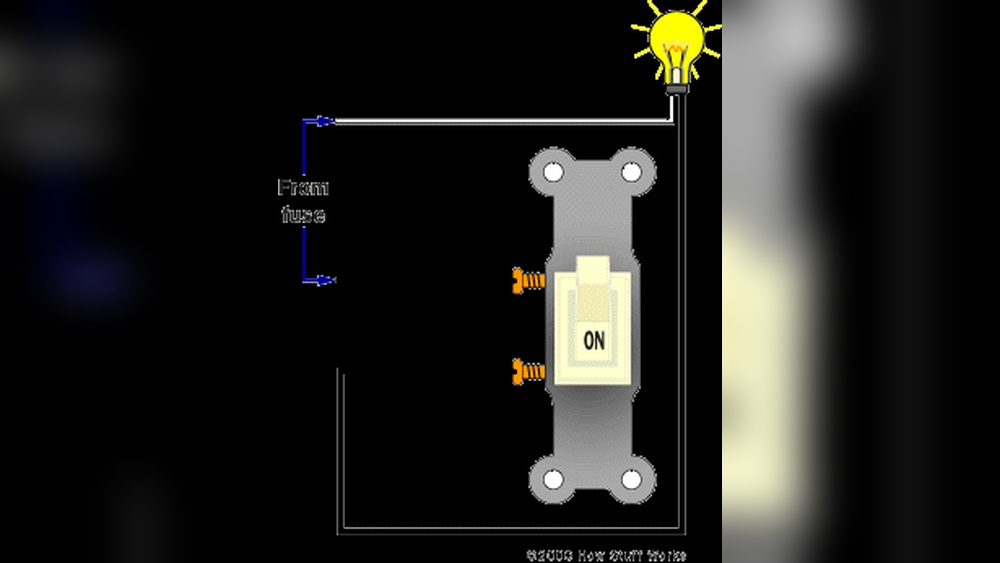
How The Switches Work Together
Each switch changes the path of electricity. Flipping a switch connects different traveler wires.
This changes the circuit. It either sends power to the light or stops it.
Role Of Traveler Wires
Traveler wires carry electricity between the two switches. They allow the switches to communicate.
Switching between traveler wires changes the circuit path. This controls whether the light is on or off.
Common Terminal Explained
The common terminal is the main connection point. It connects to either the power source or the light fixture.
This terminal is key to completing or breaking the circuit. It determines if the light receives power.
Safety Tips Before Starting
Working with electrical wiring requires care and attention. Safety is the top priority before starting to install a 3 way light switch. Follow these tips to protect yourself and your home.
Turn Off Power At The Circuit Breaker
Always switch off the power from the circuit breaker panel. Do not rely only on the wall switch to cut electricity. Confirm the power is off using a voltage tester.
Use Proper Tools And Equipment
Use tools designed for electrical work. Insulated screwdrivers and pliers reduce the risk of shock. Wear rubber-soled shoes to add extra protection.
Check For Live Wires Before Touching
Test all wires with a voltage tester before handling them. Treat every wire as if it is live. This habit avoids accidental electric shocks.
Work In A Dry Environment
Water and electricity do not mix. Make sure your work area is dry. Avoid installing switches during rain or in damp rooms.
Keep Children And Pets Away
Electrical work can be dangerous for kids and pets. Keep them out of the work area. This prevents accidents and distractions.
Credit: www.doityourself.com
Turn Off Power And Test
Turning off power and testing is the first step in installing a 3 way light switch. It keeps you safe from electric shocks. Never skip this step. Safety must come first in any electrical work.
Testing ensures that no electricity flows to the switch wires. This helps you avoid accidents and damage. Use the right tools for accurate results.
Turn Off Power At The Circuit Breaker
Go to your home’s main electrical panel. Find the circuit breaker that controls the switch. Flip the breaker to the OFF position. This cuts power to the switch and light.
Double check by trying to turn on the light. It should not work. This confirms power is off.
Use A Voltage Tester To Confirm Power Is Off
Use a non-contact voltage tester or a multimeter. Hold the tester near the switch wires. No light or beep means no power. If the tester shows power, turn off the breaker again.
Double Check All Wires Before Touching
Open the switch box carefully. Look at all wires inside. Test each wire with the voltage tester. Make sure none have power. This prevents shocks while working.
Remove Existing Switches
Removing existing switches is the first step in installing a 3 way light switch. It makes space for new wiring and the new switch. This process requires care to avoid electrical hazards.
Turn off the power at the circuit breaker before touching any wires. Use a voltage tester to confirm no electricity flows to the switch. Safety first.
Remove The Switch Cover Plate
Unscrew the cover plate on the switch using a screwdriver. Keep the screws safe for later use. The cover plate will come off easily once the screws are removed.
Unscrew The Existing Switch
Remove the screws holding the switch to the electrical box. Gently pull the switch out to expose the wires behind it. Do not pull too hard to avoid damaging wires.
Label The Wires
Identify and label each wire connected to the switch. Use tape and a marker for clear labels. This step helps connect wires correctly to the new switch.
Disconnect The Wires
Loosen the terminal screws to free the wires from the switch. Carefully remove each wire and set the old switch aside. Make sure no wires touch each other or metal parts.
Identify Wires And Terminals
Identifying wires and terminals is the first step in installing a 3-way light switch. Understanding the wiring helps you connect the switch properly and safely. This step prevents mistakes and makes your installation smooth.
Every 3-way switch has three main terminals. Each terminal connects to a different wire. These wires carry power and signals between switches and the light fixture.
Types Of Wires In A 3-way Switch
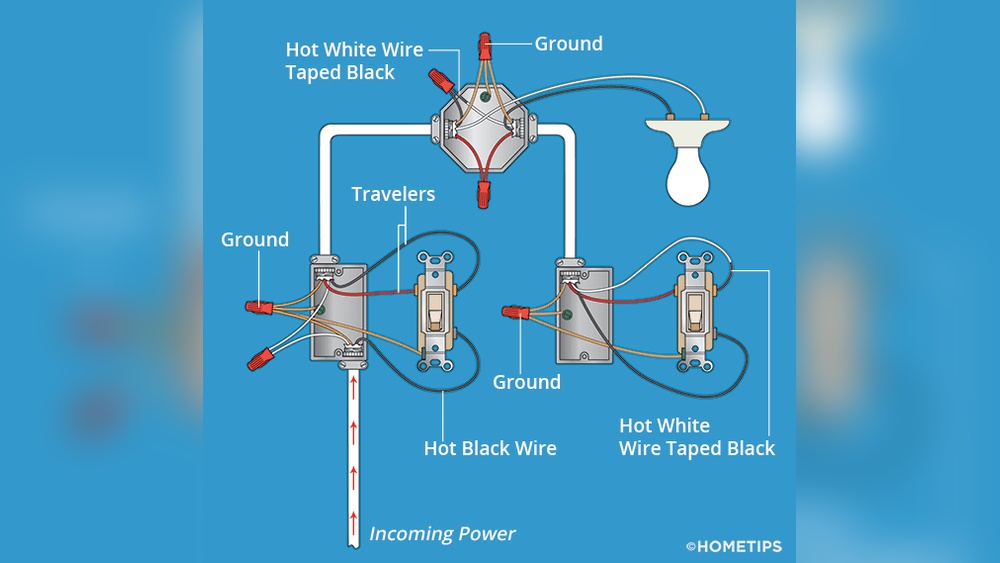
Three types of wires appear in a 3-way switch setup: the common wire, traveler wires, and ground wire. The common wire usually connects to the power source or the light. Traveler wires link the two switches. The ground wire ensures safety by preventing electrical shocks.
How To Identify The Common Wire
The common wire is often black or marked with black tape. It connects to the common terminal, which is usually a different color from the other terminals. This wire carries electricity either to the light or from the power source.
Recognizing Traveler Wires
Traveler wires are usually red and black or two different colors. They connect to the traveler terminals, which are the same color on the switch. These wires allow the switches to communicate and control the light from two locations.
Locating The Ground Wire
The ground wire is bare copper or green. It connects to the green grounding screw on the switch. This wire protects you by directing electricity safely into the ground if there is a fault.
Understanding Terminals On The Switch
3-way switches have three terminals: one common and two travelers. The common terminal is often darker or marked. Traveler terminals usually match in color. The ground terminal is green and separate from the others.
Connect The First 3 Way Switch
Connecting the first 3 way switch is an important step in this wiring project. This switch controls the light from one location. It needs careful wiring to work correctly with the second switch.
Start by turning off the power at the circuit breaker. Safety is the top priority. Use a voltage tester to make sure the wires are not live before touching them.
Identify The Common Terminal
Look for the common terminal on the switch. It is usually a different color screw, often black or dark. This terminal connects to the power source or the light fixture.
Connect The Hot Wire
Attach the hot wire from the power source to the common terminal. Tighten the screw firmly to hold the wire in place. Loose connections can cause problems later.
Attach Traveler Wires
Connect the two traveler wires to the other two terminals. These terminals are usually brass-colored screws. They allow the switches to communicate and control the light together.
Secure The Ground Wire
Connect the ground wire to the green grounding screw. This step is crucial for safety. Proper grounding helps prevent electrical shocks.
Mount The Switch And Restore Power
Carefully tuck the wires into the electrical box. Secure the switch with screws. Turn the power back on and test the switch to ensure proper operation.
Connect The Second 3 Way Switch
Connecting the second 3 way switch is a key step in your installation. This switch controls the same light as the first switch. It lets you turn the light on or off from two different places.
Follow these steps carefully to ensure a safe and working connection. Use a voltage tester to check power is off before starting. Safety first.
Identify The Wires On The Second Switch
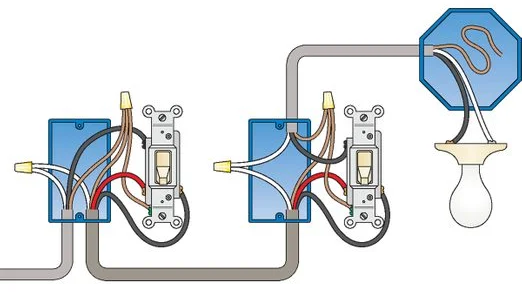
Look for three wires connected to the second switch. Two are traveler wires from the first switch. The third is the common wire that goes to the light fixture.
The traveler wires usually have the same color or markings. The common wire may be darker or labeled “COM.”
Connect The Traveler Wires
Attach the two traveler wires to the brass or copper screws on the switch. It does not matter which traveler goes to which screw.
Secure the wires tightly to ensure a good connection. Loose wires cause flickering or no light.
Attach The Common Wire
Connect the common wire to the darker or black screw on the switch. This wire controls the flow of electricity to the light.
Double-check the connection for safety. A wrong connection may damage the switch or cause a short.
Secure The Ground Wire
Find the green or bare copper ground wire. Attach it to the green screw on the switch. Grounding protects against electrical shocks.
Make sure the ground wire is firmly attached to the switch box if metal.
Finish And Test The Switch
Push the switch back into the electrical box carefully. Screw it in place without damaging wires.
Turn the power back on at the breaker. Test both switches to make sure they work correctly.
Secure Switches And Attach Covers
Securing the switches and attaching covers is the final step in installing a 3 way light switch. This step ensures the switches stay in place and look neat. Properly secured switches prevent any loose wires or accidental touches.
Cover plates protect the wiring and give a clean finish. They also help avoid dust and moisture entering the switch box. Follow the steps carefully for safety and a professional look.
Secure The Switches To The Electrical Box
First, push the switches gently into the electrical box. Align the screw holes on the switch with the holes on the box. Use a screwdriver to tighten the mounting screws. Do not over-tighten. The switch should feel firm but not forced.
Check The Switch Operation
Before attaching the cover, test the switches. Flip each switch to see if the light turns on and off correctly. Ensure both switches control the light as expected. If there is a problem, fix wiring before moving ahead.
Attach The Cover Plates
Place the cover plate over the switch carefully. Align the screw holes on the cover with the switch. Use screws provided with the cover. Tighten them evenly with a screwdriver. Do not overtighten to avoid cracking the cover.

Credit: www.belkin.com
Restore Power And Test Switches
After installing your 3 way light switch, restoring power and testing the switches is crucial. This step confirms that your installation works correctly and safely. It helps spot any wiring errors or issues before finalizing the setup.
Turn the power back on carefully at the circuit breaker. Then, test each switch to see if it controls the light as expected. This process ensures the switches work together to operate the light from two locations.
Turn On The Circuit Breaker
Locate the circuit breaker that controls the light switch. Flip it to the “on” position to restore power. Avoid rushing. Make sure the breaker is fully switched on.
Test Each Switch Separately
Flip the first switch and watch the light. It should turn on or off smoothly. Next, try the second switch. Confirm it also controls the light independently.
Check For Any Flickering Or Issues
Observe the light for flickering or dimming. These signs may indicate loose connections. If you see problems, turn off the power and recheck your wiring.
Verify Both Switches Operate The Light
Toggle each switch in different positions. The light should respond correctly every time. This confirms the 3 way switch installation works well.
Troubleshooting Common Issues
Troubleshooting common issues with a 3 way light switch helps ensure your installation works correctly. Problems can happen during or after installation. Understanding these issues saves time and effort. This section covers the most frequent problems and how to fix them.
Incorrect Wiring Connections
Incorrect wiring is the top cause of 3 way switch problems. Check that the traveler wires connect to the right terminals. Confirm the ground wire is secure. Use a voltage tester to verify power flow. Rewiring might be necessary if connections are wrong.
Switch Does Not Control Light
The switch may not control the light if wires are loose or broken. Tighten all screws on the switch terminals. Inspect wires for damage or breaks. Replace the switch if it feels loose or faulty.
Light Flickers Or Works Intermittently
Flickering lights often result from poor connections. Ensure all wire nuts are tight. Check the bulb and replace it if needed. Loose switches or worn-out parts can cause flickering too.
Both Switches Must Be On Or Off
This problem points to traveler wire issues. The traveler wires might be swapped or disconnected. Recheck wiring diagrams and switch terminals. Correct the wiring to allow independent control.
Power Is Off After Installation
Power loss can happen if the circuit breaker trips. Reset the breaker and test the switches again. Verify that the main power is on. Look for short circuits or grounding problems in the wiring.
Frequently Asked Questions
What Tools Are Needed To Install A 3 Way Light Switch?
You need a screwdriver, voltage tester, wire stripper, electrical tape, and wire nuts. These tools help ensure safe and accurate installation.
How Do 3 Way Switches Control One Light?
They work by allowing two switches to control one light from different locations. They use traveler wires for communication between switches.
Can I Replace A Single Switch With A 3 Way Switch?
Yes, but you must install a second 3 way switch to complete the circuit. Both switches work together to control the light.
Is It Safe To Install A 3 Way Switch Myself?
Yes, if you follow safety protocols like turning off power and testing wires. If unsure, consult a licensed electrician to avoid hazards.
Conclusion
Installing a 3 way light switch can seem tough at first. Take your time and follow each step carefully. Double-check your wiring to avoid mistakes. Safety matters most, so turn off the power before starting. Once done, enjoy controlling your lights from two spots.
This simple upgrade adds convenience to any room. Keep this guide handy for future electrical projects. You now have the know-how to handle this task. Small changes like these make your home smarter and easier to use.