Have you ever wished you could control a light right from your outlet? Adding a light switch off an outlet can make your space more convenient and safer.
Imagine turning on a lamp or a fan without bending down or unplugging devices. It’s easier than you think, and you don’t need to be an expert to do it. You’ll discover simple steps to add a light switch off an outlet quickly and safely.
Keep reading, and you’ll have full control over your lighting in no time!
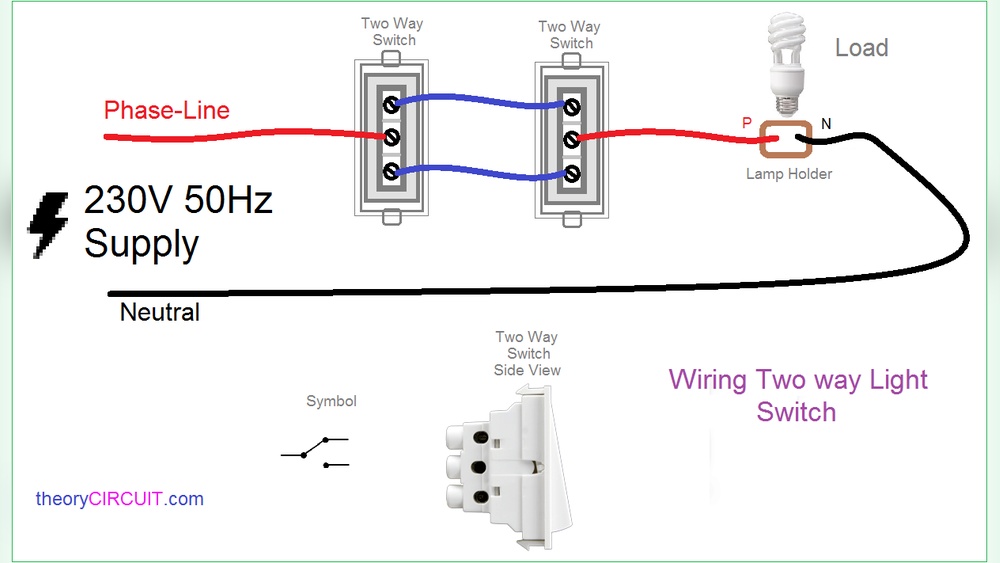
Credit: www.reddit.com
Tools And Materials Needed
Before starting to add a light switch off an outlet, gather the right tools and materials. This step ensures a smooth, safe installation. Having everything ready saves time and prevents mistakes. Below are the essentials needed for this project.
Basic Tools
- Screwdriver set: flathead and Phillips
- Wire stripper and cutter
- Voltage tester
- Needle-nose pliers
- Drill with bits (optional for new holes)
- Electrical tape
Electrical Components
- Single-pole light switch
- Switch box (old work box for drywall)
- Wire nuts (connectors)
- 12 or 14-gauge electrical wire (Romex)
- Outlet cover plate
- Switch cover plate
Safety Gear
- Insulated gloves
- Safety goggles
- Dust mask (if drilling)
- Non-conductive shoes or boots

Credit: www.youtube.com
Safety Precautions
Safety is the top priority when working with electrical outlets and switches. Taking the right precautions reduces risks and protects you from harm. Always prepare carefully before starting any electrical project.
Power Shutdown
Turn off power at the circuit breaker. Do not rely on the wall switch alone. Confirm the power is off to avoid shocks or short circuits. This step is essential for your safety and peace of mind.
Testing For Live Wires
Use a voltage tester to check wires. Test each wire to make sure no electricity flows. Never touch wires before testing. This simple step prevents accidents and ensures a safe work area.
Using Insulated Tools
Use tools with insulated handles only. Insulation stops electric current from reaching your hand. Avoid metal or unprotected tools. Proper tools reduce the chance of electrical shocks and injuries.
Preparing The Outlet
Preparing the outlet is the first step in adding a light switch off an outlet. This step ensures safety and proper function. You must work carefully and follow the right process to avoid electrical problems.
Removing The Outlet Cover
Start by turning off the power at the circuit breaker. Use a screwdriver to remove the screws holding the outlet cover. Take off the cover gently. This exposes the outlet and wiring behind it. Keep the screws safe for reinstallation.
Identifying Wires
Look inside the outlet box to see the wires. Typically, you will find black, white, and ground wires. The black wire is usually the hot wire. The white wire is neutral. The ground wire is green or bare copper. Identifying these wires helps connect the light switch correctly.
Checking Wiring Compatibility
Check if the outlet wiring can support a switch. Some outlets have a separate hot wire for a switch. Others do not. Use a voltage tester to check the wires. Make sure the wiring can handle the added switch load. If unsure, consult an electrician for safety.

Credit: www.do-it-yourself-help.com
Wiring The Light Switch
Wiring the light switch is the key step in adding a switch off an outlet. This process controls the flow of electricity and turns your light on or off. It needs care and clear steps to ensure safety and proper function.
Start by safely handling the outlet wires. Then, connect the wires to the new switch. Finally, secure all connections to avoid loose ends. Each step is simple but important.
Disconnecting The Outlet Wires
Turn off the power at the circuit breaker before touching any wires. Use a voltage tester to confirm no electricity flows. Unscrew the outlet cover carefully. Note the position of each wire on the outlet. Gently disconnect the wires from the outlet terminals. Keep the wires straight and untangled for easy handling.
Connecting Switch Wires
Identify the wires that will connect to the switch. Usually, this includes the hot wire from the outlet and the wire leading to the light. Attach the hot wire to one terminal on the switch. Connect the wire going to the light to the other terminal. Make sure wires are wrapped clockwise around the screws. This ensures a tight and secure connection.
Securing Connections
Use wire nuts to join any wire pairs safely. Twist the nuts on firmly until they hold tight. Wrap electrical tape around the wire nuts for extra security. Push the wires gently back into the electrical box. Screw the switch into place without pinching the wires. Replace the switch cover plate to finish the job.
Mounting The Switch
Mounting the switch is a key step in adding a light switch off an outlet. It involves placing the switch in the right spot and securing it properly. This step ensures the switch works well and looks neat on your wall.
Choosing The Location
Pick a spot near the outlet but easy to reach. The switch should be at a comfortable height. Avoid placing it too close to the floor or ceiling. Make sure there is enough space for the switch box. Check the wall for any obstacles inside.
Installing The Switch Box
Use a switch box that fits the switch size. Mark the wall where the box will go. Cut the drywall carefully to fit the box. Insert the box and secure it with screws. Ensure the box is flush with the wall surface.
Attaching The Switch
Connect the wires to the switch terminals. Follow the wiring diagram for correct placement. Push the switch into the box gently. Screw the switch to the box tightly. Attach the switch cover plate to finish.
Testing The Installation
Testing the installation is a crucial step after adding a light switch off an outlet. This process ensures your work is safe and the switch functions correctly. Take your time to follow these steps carefully.
Restoring Power
First, turn the circuit breaker back on. This restores power to the outlet and switch. Use caution during this step to avoid shocks. Keep your hands dry and stand on a dry surface.
Operating The Switch
Next, test the light switch by flipping it on and off. Check if the connected light responds to the switch. The light should turn on and off smoothly. If it does, the installation worked well.
Troubleshooting Common Issues
If the light does not work, double-check your wiring. Ensure all connections are tight and correct. Make sure the switch is wired to the right outlet terminals. If the breaker trips, turn it off and inspect for faults.
Final Touches
After installing a light switch off an outlet, the final touches make your work look neat and last longer. These steps help keep the area safe and clean. Taking time to finish well shows care and skill.
Replacing Covers
Start by putting back the switch and outlet covers. Use a screwdriver to secure them tightly. Make sure the covers fit flush against the wall. This protects wires and prevents dust or dirt from entering.
Cleaning The Work Area
Clear any debris, dust, or wire scraps around the outlet. Wipe the wall and switch plate with a damp cloth. A clean space reduces risk of accidents and keeps your home tidy. Proper cleanup shows professionalism.
Maintaining Your Installation
Check the switch and outlet regularly for loose parts or damage. Tighten screws if they feel loose. Avoid overloading the outlet with too many devices. Proper care extends the life of your installation and keeps it safe.
Frequently Asked Questions
How Do I Wire A Light Switch From An Outlet?
To wire a light switch from an outlet, turn off power first. Connect the switch’s black wire to the outlet’s black wire. Attach the white wires together, and connect the ground wires properly. Use a switch loop for controlling the light safely from the outlet.
Can I Add A Switch Without Rewiring The Whole Circuit?
Yes, adding a switch off an outlet is possible without full rewiring. Use the existing outlet wiring to create a switch loop. This method saves time and materials while ensuring the light is controlled safely and efficiently.
What Tools Are Needed To Add A Switch Off An Outlet?
You need a screwdriver, wire strippers, voltage tester, wire nuts, electrical tape, and a light switch. These tools ensure safe and accurate installation of the switch from the outlet. Always follow safety guidelines when working with electrical wiring.
Is It Safe To Add A Switch To An Existing Outlet?
Yes, it is safe if done correctly. Always turn off the power before starting. Use proper wiring techniques and tools. If unsure, consult a licensed electrician to avoid hazards and ensure compliance with electrical codes.
Conclusion
Adding a light switch off an outlet can make your space more convenient. Always turn off the power before starting any work. Use the right tools and follow safety steps carefully. Take your time and double-check your wiring. Small projects like this help you learn and save money.
With patience, you can complete the job successfully. Stay safe and enjoy your new light switch setup.