Are you ready to take control of your home lighting and add a new light switch by yourself? It might sound tricky, but with the right steps, you can do it safely and easily.
Imagine flipping a switch you installed, instantly brightening your room exactly how you want. This guide will walk you through every step, so you feel confident and avoid common mistakes. Keep reading, and you’ll discover how simple it is to upgrade your space with just a few tools and clear instructions.
Your perfect lighting setup is closer than you think!
Tools And Materials Needed
Before adding a light switch, gather the right tools and materials. This step saves time and avoids mistakes. Using proper tools makes the job safer and easier. Below is a clear list to prepare you for the task.
Essential Tools
- Screwdriver (flathead and Phillips)
- Wire stripper
- Voltage tester
- Drill with bits
- Needle-nose pliers
- Utility knife
- Measuring tape
Required Materials
- Light switch (single-pole or three-way)
- Electrical box
- Wire connectors (wire nuts)
- Electrical wire (14/2 or 12/2 gauge)
- Switch plate cover
- Electrical tape
Safety Gear
- Insulated gloves
- Safety glasses
- Dust mask
- Non-slip shoes
Turn Off Power Safely
Turning off power safely is the first step before adding a light switch. It stops electrical shocks and accidents. Never work on wiring with power on. Follow these steps to cut power properly.
Locate The Circuit Breaker
Find your home’s circuit breaker box. It is often in the basement, garage, or utility room. Open the box carefully. Look for the switch labeled for the room or area where you will work. This switch controls the power to that space.
Flip the switch to the OFF position. This cuts electricity to the wires you need to work on. If switches are not labeled, turn off the main breaker to shut power to the whole house.
Confirm Power Is Off
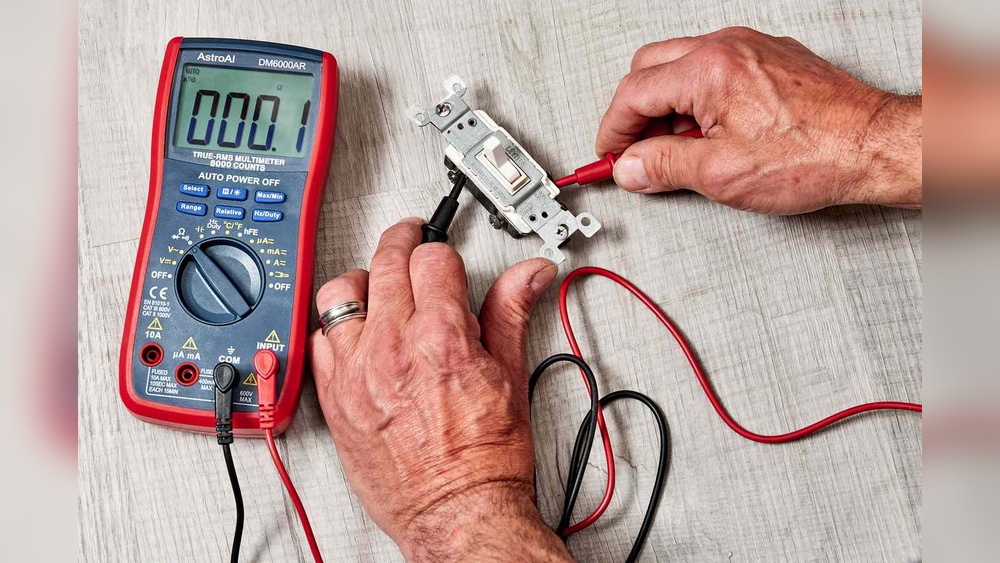
Do not guess if power is off. Use a voltage tester or multimeter to check wires. Touch the tester to the wires in the switch box. No light or sound means no electricity.
Try turning the light switch on. If the light does not come on, power is off. Always test twice to be sure. Safety first.
Remove Existing Switch Or Cover
Removing the existing switch or cover is the first step in adding a new light switch. This step prepares the wall and wiring for the new installation. Handle each part carefully to avoid damage or injury. Make sure the power is off before you start.
Take your time and follow the steps below to safely remove the old switch or cover.
Unscrew The Switch Plate
Find the screws holding the switch plate on the wall. Use a screwdriver to turn them counterclockwise. Keep the screws safe; you will need them later. Gently pull the switch plate away from the wall. Avoid pulling too hard to prevent damaging the wires inside.
Disconnect Wires Carefully
Look at how the wires connect to the switch. Note their positions or take a photo for reference. Use a screwdriver to loosen the screws holding the wires. Carefully pull the wires off the switch terminals. Keep the wires separate to avoid short circuits or confusion later.

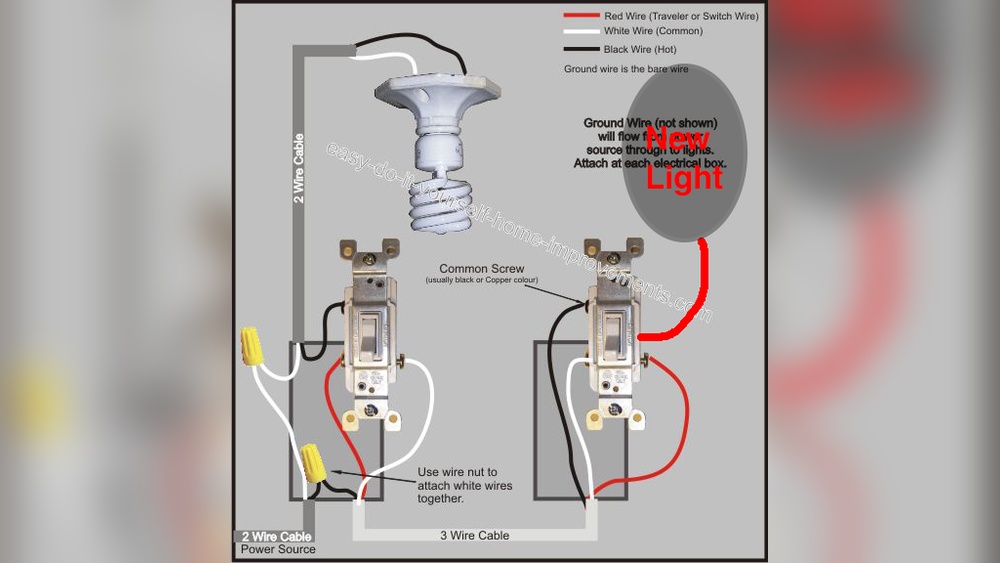
Credit: www.do-it-yourself-help.com
Prepare Wiring For New Switch
Preparing the wiring for a new light switch is an important step. It ensures safe and proper connections. Handling wires correctly prevents electrical hazards. Follow clear steps to get ready for installation.
Careful preparation saves time and frustration during the switch setup. It helps the switch work smoothly and safely.
Identify Wire Types
First, find the different wire types in your switch box. Usually, you will see three main wires: live, neutral, and ground. The live wire carries electricity to the switch. The neutral wire completes the circuit. The ground wire protects against shocks. Each wire has a different color. Black or red is often live. White is neutral. Green or bare copper is ground. Knowing these colors helps you connect wires correctly.
Check the wires carefully to avoid mistakes. Use a voltage tester to confirm the live wire. This step is crucial for safety.
Strip Wire Ends
After identifying wires, strip the ends to expose the copper. Use a wire stripper tool for clean removal. Strip about half an inch of insulation from each wire end. Avoid damaging the copper inside. Twisting the exposed wires slightly helps make strong connections. Keep the stripped ends neat and ready to attach to the switch terminals. Proper stripping makes the installation easier and safer.
Connect The New Switch
Connecting the new light switch is a key step in the installation process. It requires care and attention to ensure safety and proper function. Follow the steps below to attach wires and secure connections correctly.
Attach Wires To Terminals
Start by identifying the wires from your wall. Usually, there are three types: live, neutral, and ground. Match each wire to the correct terminal on the switch. The live wire goes to the brass terminal. The neutral wire attaches to the silver terminal. The ground wire connects to the green terminal or grounding screw. Use a screwdriver to tighten the screws firmly. Loose wires can cause electrical problems or sparks.
Secure Connections
Double-check each wire connection for tightness. Tug gently on the wires to confirm they stay in place. Fold the wires neatly into the electrical box to avoid damage. Make sure no copper wire is exposed outside the terminals. Finally, attach the switch to the wall box using screws. This keeps the switch stable and safe to use.

Credit: diy.stackexchange.com
Install The Switch And Plate
Installing the switch and plate is a key step in adding a light switch. This part secures the switch in place and gives a clean look to your wall. It also protects the wires and makes the switch safe to use.
Follow simple steps to mount the switch properly. Then attach the switch plate carefully. These actions ensure the switch works well and looks neat.
Mount Switch In Box
Start by placing the switch inside the electrical box. Align the switch so the screw holes match the box holes. Use a screwdriver to tighten the screws. Do not overtighten; the switch must be firm but not damaged. Check that the switch moves smoothly after mounting.
Attach Switch Plate
Next, position the switch plate over the switch. Make sure it fits evenly against the wall. Insert the screws into the plate holes and tighten gently. Avoid cracking the plate by tightening slowly. The plate should cover the box edges completely. This step finishes the look and keeps the switch secure.
Restore Power And Test
After installing a light switch, restoring power and testing are key steps. These actions confirm the switch works safely. Follow simple steps to bring power back and check the switch’s function.
Turn Circuit Breaker On
Locate the circuit breaker box in your home. Find the breaker that controls the switch’s circuit. Flip the breaker switch to the “on” position. This restores electricity to the switch and connected lights. Wait a moment for the power to stabilize before testing.
Check Switch Functionality
Press the new light switch on and off slowly. Watch the connected light or fixture carefully. The light should turn on and off with the switch. If the light stays off, check connections again. If the light flickers, the wiring might be loose. Ensure the switch works smoothly without any sparks or noise.

Credit: www.youtube.com
Troubleshooting Tips
Troubleshooting is important when adding a light switch. It helps fix common problems fast. Understanding simple issues saves time and effort. Here are easy tips to solve typical problems.
Switch Not Working
Check if the power is off before starting. Use a voltage tester to confirm no electricity flows. Make sure the wires connect to the right terminals. Sometimes, a loose wire causes the switch to fail. Replace the switch if it looks damaged or old.
Flickering Lights
Flickering can mean a bad connection or a weak bulb. Tighten the bulb in the socket. If flickering continues, check wiring at the switch. Loose or worn wires may cause flickers. Replace the bulb with a new one if needed.
Loose Connections
Loose wires cause many switch problems. Turn off power before touching wires. Use a screwdriver to tighten all screws. Make sure wires are wrapped tightly around terminals. Secure wire nuts properly on joined wires for safety.
Frequently Asked Questions
How Do I Safely Add A New Light Switch?
Turn off the power at the circuit breaker before starting. Use a voltage tester to ensure no electricity flows. Follow wiring instructions carefully and secure all connections. If unsure, consult a licensed electrician for safety and compliance.
What Tools Are Needed To Install A Light Switch?
You need a screwdriver, wire stripper, voltage tester, wire nuts, and electrical tape. A drill may help for mounting. Having all tools ready ensures a smooth and safe installation process.
Can I Add A Light Switch Without Rewiring?
Yes, if wiring already exists in the wall. Use existing wires to connect the switch. If no wiring is present, installing a new switch requires running new cables, which is more complex.
How To Choose The Right Light Switch Type?
Select based on function: single-pole, three-way, or dimmer switches. Consider the room’s lighting needs and compatibility with your fixtures. Modern smart switches offer remote control and energy saving features.
Conclusion
Adding a light switch is easier than it seems. Follow safety rules and turn off power first. Use the right tools and check connections carefully. Test the switch before closing the wall. Taking your time helps avoid mistakes. A new switch can improve your room’s lighting quickly.
Now, you can enjoy better control of your lights. Give it a try and see the difference!