Are you tired of fumbling around in the dark, wishing your lights would just work the way you want? Learning how to connect a switch light can change that instantly.
Imagine flipping a simple switch and having your room brighten up exactly when you need it—no hassle, no confusion. In this guide, you’ll discover easy steps to connect your switch light safely and quickly. Whether you’re a beginner or just need a refresher, this article is made for you.
Keep reading, and soon you’ll have full control over your lighting, making your space more comfortable and convenient.
Tools And Materials Needed
Preparing to connect a switch light requires the right tools and materials. Having everything ready makes the task smoother and safer. It also saves time and avoids frustration. This section lists the essential tools and helps you pick the best switch light.
Basic Tools Checklist
Gather these tools before starting the work:
- Screwdriver (flathead and Phillips)
- Wire stripper or cutter
- Voltage tester
- Electrical tape
- Wire nuts or connectors
- Flashlight or work light
- Safety gloves
These tools help you handle wires safely and make secure connections.
Choosing The Right Switch Light
Select a switch light that fits your needs and wiring system. Check the switch’s voltage and current rating. Match it with your home’s electrical setup. Decide between single-pole or three-way switches. Consider smart switches for remote control if desired. Pick a style that suits your room’s look. The right switch ensures easy installation and long-lasting use.
Safety Precautions
Safety is the top priority when connecting a switch light. Taking the right precautions helps prevent accidents. It keeps you safe and protects your home wiring.
Follow these key safety steps before starting your work. They reduce the risk of electric shocks and injuries.
Power Off The Circuit
Always switch off the circuit breaker before working on any electrical device. This stops electricity flow to the switch. Double-check with a voltage tester to be sure no power is running. Never assume the circuit is off without testing.
Use Protective Gear
Wear insulated gloves to protect your hands from electric shocks. Safety goggles help shield your eyes from sparks or debris. Use tools with insulated handles. Proper gear reduces the chance of injury during installation.
Identify Wiring Types
Knowing the types of wires is key to connecting a switch light safely. Wires carry electricity in different ways. Each wire has a special role in the circuit.
Understanding the wires helps avoid mistakes and keeps your home safe. It also makes the installation process easier and faster.
Live, Neutral, And Ground Wires
The live wire carries electricity from the power source to the switch. It is the most important wire to handle carefully.
The neutral wire returns electricity back to the power source. It completes the electric circuit.
The ground wire protects you from electric shocks. It sends extra electricity safely into the earth.
Color Codes And Functions
Color codes help identify wires quickly. The live wire is usually red or brown.
The neutral wire is blue or black. The ground wire is green or yellow-green.
These colors show each wire’s function. Always check wire colors before starting work.

Credit: www.youtube.com
Remove Old Switch Light
Removing the old switch light is the first step in installing a new one. This process ensures safety and prepares the wiring for the new switch. Take your time and follow each step carefully.
Turn off the power at the circuit breaker before touching the switch. Safety comes first to avoid electric shock.
Unscrew And Detach
Use a screwdriver to remove the screws holding the switch plate. Keep the screws safe; you will need them later.
Gently pull the switch out from the wall box. Do not force it to avoid damage.
Check for any paint or dirt that might hold the switch in place. Clean it if needed.
Inspect Existing Wiring
Look at the wires connected to the old switch. Note the colors and positions of each wire.
Check the wires for damage or wear. Frayed wires need repair before installing a new switch.
Use a voltage tester to confirm no power flows through the wires. This step is vital for safety.
Connect New Switch Light
Connecting a new switch light is a simple task anyone can do with the right steps. It gives you control over your lighting and can save energy. This guide will help you connect your new switch light safely and correctly.
Follow the instructions carefully. Take your time to avoid mistakes. Safety is important when working with electrical parts.
Attach Wires To Terminals
Start by turning off the power at the circuit breaker. This prevents any shocks while working. Next, strip about half an inch of insulation from each wire. You will see copper wires inside. Connect these wires to the switch terminals. Usually, the black or red wire goes to the brass terminal. The white wire connects to the silver terminal. The green or bare copper wire attaches to the green ground screw. Make sure each wire is wrapped tightly around the terminal. Loose wires can cause problems later.
Secure Connections Properly
After attaching the wires, double-check each connection. Use a screwdriver to tighten the terminal screws firmly. The wires should not move when you gently tug them. Carefully tuck the wires back into the electrical box. Avoid pinching or bending them too much. Finally, screw the switch into the box and attach the cover plate. Turn the power back on and test your new switch light. It should turn on and off smoothly without flickering.

Credit: community.smartthings.com
Test The Installation
Testing the installation is a key step after connecting a switch light. It ensures everything works safely and correctly. This process helps you avoid any future electrical problems. Follow these simple steps to confirm your switch light is ready to use.
Restore Power
Turn the circuit breaker back on or replace the fuse. This restores power to the switch and light. Make sure the power source is active before testing. Use caution and avoid touching wires during this step.
Check Switch Operation
Press the switch to see if the light turns on and off. Test multiple times to confirm consistent performance. Notice any flickering or delays. These could indicate wiring issues or faulty parts. Correct any problems before finalizing the installation.
Troubleshooting Tips
Troubleshooting a connect switch light can save time and effort. Most problems have simple fixes. Understanding common issues helps you solve problems quickly.
Start by checking the power source and connections. Sometimes the switch is not properly connected or the light bulb is faulty. Knowing when to try fixes and when to ask for help is important.
Common Issues And Fixes
The switch does not turn the light on. Check if the bulb is burned out. Replace it with a new one.
Loose wiring can cause the switch to fail. Turn off the power and tighten all wire connections.
The switch feels warm or hot. This could mean a bad connection or overload. Turn off the switch and inspect wiring.
The light flickers. This might be a loose bulb or faulty switch. Try replacing the bulb or switch.
When To Call A Professional
Call an electrician if you smell burning or see sparks. These signs mean a serious problem.
If you are unsure about wiring or safety, get expert help. Electricity is dangerous without proper knowledge.
Complex wiring or repeated switch failures require professional inspection. Avoid trying repairs beyond your skills.

Credit: diy.stackexchange.com
Frequently Asked Questions
How Do I Connect A Switch To A Light?
To connect a switch to a light, first turn off power. Then, connect the switch wires to the power source and the light fixture. Use a wire nut to secure connections. Finally, turn power back on and test the switch.
What Tools Are Needed To Connect A Switch Light?
You need a screwdriver, wire stripper, voltage tester, wire nuts, and electrical tape. These tools ensure safe and proper wiring during installation. Always follow safety guidelines when working with electrical components.
Can I Connect A Switch Light Without Professional Help?
Yes, with basic electrical knowledge and safety precautions, you can connect a switch light yourself. Always turn off power at the breaker before working. If unsure, consult a professional electrician to avoid hazards.
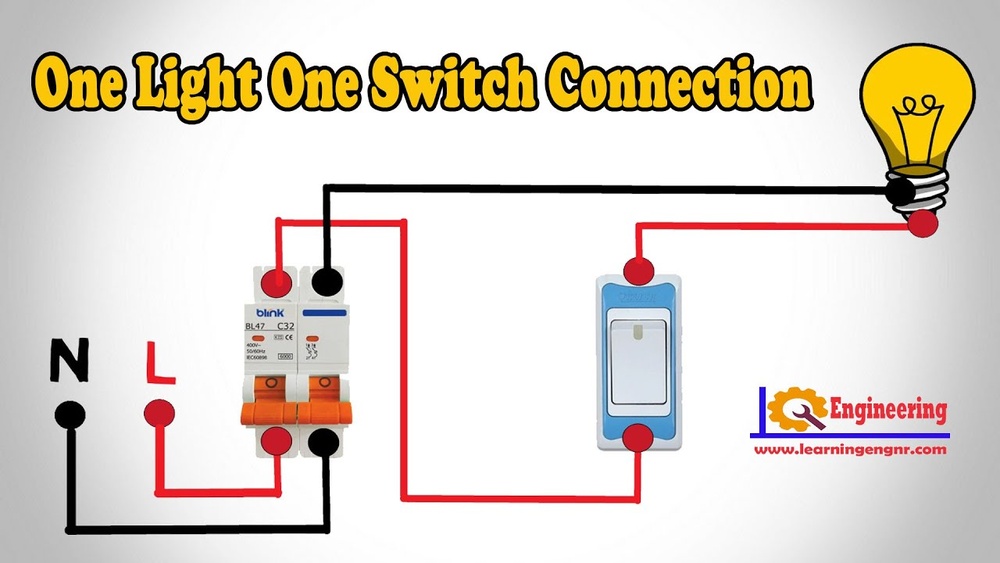
What Is The Wiring Sequence For Switch To Light Connection?
The wiring sequence connects the live wire to the switch input. Then, the switch output connects to the light’s live terminal. The neutral wire bypasses the switch and connects directly to the light fixture.
Conclusion
Connecting a switch light is simpler than it seems. Follow the steps carefully and take your time. Always turn off the power before starting the work. Use the right tools and double-check your connections. Testing the switch after installation ensures everything works well.
This guide helps you save money and avoid mistakes. Now, you can confidently install or fix a switch light at home. Keep safety as your top priority. Good lighting makes your space brighter and more comfortable.

