Imagine never having to fumble for a light switch in the dark again. Installing a motion sensor light switch can make your home smarter, safer, and more energy-efficient.
If you’ve ever wanted to upgrade your lighting without calling a pro or spending a fortune, this guide is made for you. By the end, you’ll know exactly how to install a motion sensor light switch quickly and confidently—no technical jargon, just simple steps you can follow.
Ready to make your lighting work for you? Let’s get started.
Choose The Right Motion Sensor Switch
Choosing the right motion sensor switch is important for a smooth installation. The right switch improves safety and saves energy. It also fits well with your home’s wiring and lighting needs. Understanding different types and uses helps you pick the best option. This guide covers key points to consider before buying.
Types Of Motion Sensor Switches
There are mainly two types of motion sensor switches: passive infrared (PIR) and ultrasonic. PIR switches detect body heat and work well in rooms with clear line of sight. Ultrasonic switches send sound waves that bounce off moving objects, sensing motion even behind obstacles. Some switches combine both technologies for better accuracy. Choose the type that suits your room layout and lighting needs.
Compatibility With Existing Wiring
Check your home’s wiring before buying a motion sensor switch. Most switches need a neutral wire to work correctly. Older homes might not have this wire, limiting your options. Some switches fit simple two-wire setups, but options are fewer. Confirm the voltage and wiring type match your current system. This prevents installation problems and ensures the switch works safely.
Considerations For Indoor Vs Outdoor Use
Motion sensor switches for indoors differ from outdoor models. Indoor switches focus on detecting movement in smaller areas like hallways or bathrooms. Outdoor switches are built to handle weather changes and bigger spaces. Look for switches rated for outdoor use if you install them outside. They resist rain, dust, and extreme temperatures. Pick a switch designed for its environment to last longer.

Credit: www.fourgenerationsoneroof.com
Gather Necessary Tools And Materials
Before installing a motion sensor light switch, gather all necessary tools and materials. This step saves time and avoids interruptions during installation. Having everything ready helps you work safely and efficiently.
Essential Tools List
- Flathead screwdriver
- Phillips screwdriver
- Voltage tester
- Wire stripper
- Electrical tape
- Wire nuts
- Drill (optional)
Safety Equipment
- Insulated gloves
- Safety goggles
- Non-conductive shoes
- Flashlight or headlamp
Replacement Parts
- Motion sensor light switch
- New faceplate (if needed)
- Extra wire (in case of damage)
Turn Off Power Safely
Turning off the power is the first step before installing a motion sensor light switch. It keeps you safe from electric shocks and damage. Follow these simple steps to make sure the power is off.
Locate The Circuit Breaker
Find your home’s circuit breaker panel. It is usually in the basement, garage, or utility room. Open the panel door carefully. Look for the breaker that controls the room where you will install the switch. The breakers are labeled, but labels can be unclear. Flip the correct breaker to the OFF position. This stops electricity from flowing to the switch.
Verify Power Is Off
Check that the power is truly off before starting work. Use a voltage tester or a non-contact tester on the wires. If the tester shows no power, it is safe to continue. Also, try turning the light switch on and off. The light should not turn on. Double-checking prevents accidents and keeps you safe.
Remove Existing Light Switch
Start by turning off the power at the circuit breaker to stay safe. Remove the cover plate, then unscrew and gently pull out the old light switch from the wall. Disconnect the wires carefully before installing the motion sensor switch.
Start by removing the old light switch carefully. This step is important for a smooth installation of your new motion sensor switch. Follow the instructions closely to avoid damage or injury. Make sure the power is off before you begin.
Unscrew The Switch Plate
Use a screwdriver to remove the screws holding the switch plate. Keep the screws safe for later use. Gently pull the plate away from the wall. This exposes the switch and wires behind it. Take your time to avoid cracking the plate or wall.
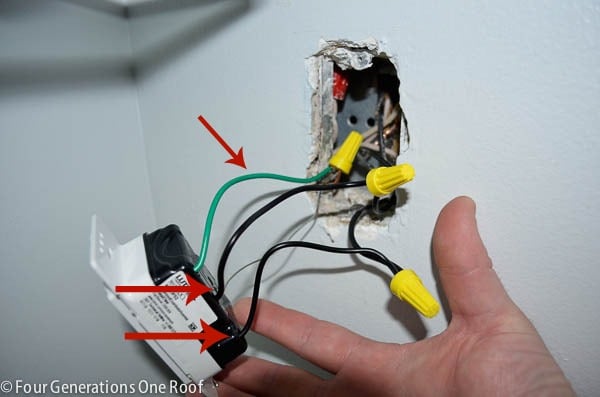
Disconnect Wires Carefully
Note the position of each wire before disconnecting. Use a voltage tester to confirm power is off. Loosen the screws or release clips holding wires to the switch. Pull wires out gently, avoiding any pulls or breaks. Keep track of wire colors and their connections for the next step.
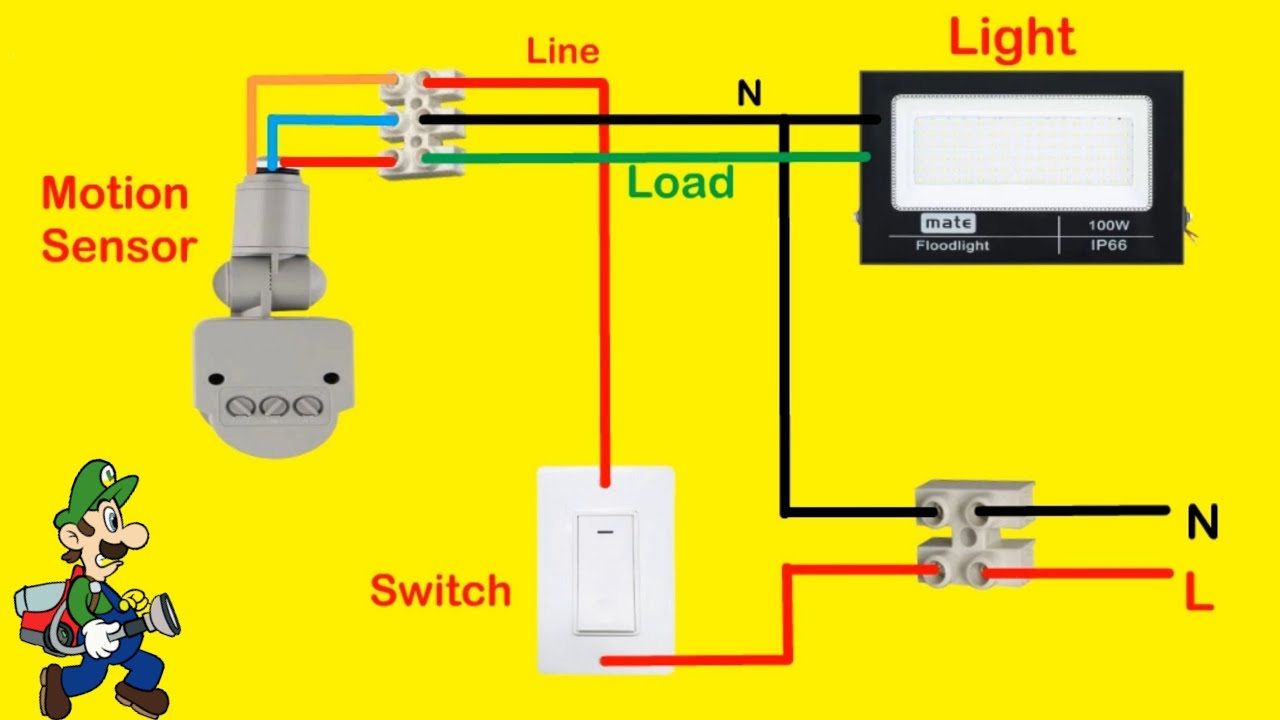
Wire The Motion Sensor Switch
Wiring the motion sensor switch is a key step in installation. Proper wiring ensures the switch works safely and correctly. Take your time and follow each step carefully. Safety first: always turn off the power at the circuit breaker before handling wires.
Identify Wire Types
Find the wires in your wall box. Typically, you will see a black (hot) wire, white (neutral) wire, and a green or bare copper (ground) wire. The motion sensor switch may have similar wires. Check the switch’s instructions to confirm wire colors and purposes. Correct identification avoids mistakes and keeps you safe.
Connect Wires To The New Switch
Match the wires from the wall to the wires on the switch. Connect black to black, white to white, and green or bare copper to ground. Use wire nuts to twist the wires together tightly. Some switches may have a red wire for the load. Connect this to the wire leading to your light fixture.
Secure Wire Connections
After connecting, give each wire nut a gentle tug to confirm tightness. Wrap electrical tape around the wire nuts for extra security. Push the wires carefully back into the electrical box. Make sure no wires are loose or exposed. Loose connections can cause shorts or shocks.
Credit: www.youtube.com
Mount The Motion Sensor Switch
Mounting the motion sensor switch is the next important step. This part secures the device and connects it to your home’s electrical system. Proper mounting ensures the sensor works correctly and safely.
Attach Switch To Electrical Box
First, align the motion sensor switch with the electrical box. The wires should fit inside the box without bending. Use screws to fasten the switch firmly to the box. Tighten the screws but avoid over-tightening. The switch must sit flat against the wall. Check that the sensor is not loose or wobbly.
Replace The Switch Plate
After attaching the switch, place the switch plate over it. The plate covers the electrical box and wires. Use the small screws to secure the plate to the wall. Make sure the plate fits snugly and evenly. Avoid gaps between the plate and wall. The finished look should be clean and smooth.
Restore Power And Test
After installing your motion sensor light switch, restoring power and testing it is crucial. This step ensures the switch works correctly and safely. Follow these simple actions to complete your installation with confidence.
Turn Circuit Breaker On
Locate your home’s electrical panel. Flip the circuit breaker back to the ON position. This action restores electricity to the switch you installed. Double-check that the light switch has power before moving forward.
Check Sensor Activation
Stand in front of the sensor and move slowly. The light should turn on as you approach. Step away to see if the light turns off. This test confirms the motion sensor detects movement properly.
Adjust Sensitivity Settings
Find the sensitivity dial on the switch. Turn the dial to increase or decrease motion detection range. Test the sensor again after each adjustment. Fine-tune until the light activates only when needed.
Troubleshooting Common Issues
Troubleshooting common problems can save time and frustration when installing a motion sensor light switch. Many issues have simple solutions. Knowing what to check helps fix the problem fast.
Switch Not Turning On
Check the power supply first. Make sure the breaker is on and the circuit has power. Confirm the wiring connections are secure and correctly matched. A loose wire can stop the switch from working. Test the switch by pressing the manual override button. If it still does not turn on, the switch may be defective and need replacement.
Lights Staying On Too Long
Adjust the timer setting on the switch. Sometimes the default delay is too long. Turn the dial or press buttons to shorten the time. Clean the sensor lens to remove dirt or dust. A dirty sensor may cause the lights to stay on. Check for objects blocking the sensor’s view. Remove anything that could cause false triggers.
Sensor Not Detecting Motion
Make sure the sensor is aimed properly at the area you want to monitor. Avoid pointing it toward windows or heat sources. Increase the sensor’s sensitivity setting if possible. Clear obstacles like furniture or plants that block motion. Test the sensor by moving within its range. Replace the sensor if it fails to detect motion consistently.
Credit: www.fourgenerationsoneroof.com
Frequently Asked Questions
What Tools Are Needed To Install A Motion Sensor Light Switch?
You need a screwdriver, voltage tester, wire stripper, and electrical tape. These tools ensure safe, accurate installation of the switch in your home.
How Do I Turn Off Power Before Installation?
Switch off the circuit breaker controlling the light switch. Use a voltage tester to confirm no power is flowing before starting work.
Can I Install A Motion Sensor Switch Myself?
Yes, with basic electrical knowledge and safety precautions. Follow the wiring instructions carefully to ensure proper installation and operation.
How Do I Connect Wires To A Motion Sensor Switch?
Match the switch wires to the corresponding house wires: usually line, load, neutral, and ground. Secure connections with wire nuts and electrical tape.
Conclusion
Installing a motion sensor light switch is simple and useful. It saves energy and adds convenience to your home. Follow the steps carefully for safety and success. Double-check your work before turning the power back on. Enjoy automatic lighting that works when you need it.
This small change can make a big difference every day. Try it yourself and see how easy it is.