Are you ready to brighten up your home by installing a new light and switch? Whether you want to upgrade your lighting or replace a faulty switch, doing it yourself can save you time and money.
But if you’re unsure where to start, don’t worry — this guide will walk you through every step in a simple, clear way. By the end, you’ll have the confidence to complete the job safely and efficiently. Keep reading to discover how easy it can be to transform your space with just a few tools and some straightforward instructions.
Tools And Materials Needed
Installing a new light and switch requires the right tools and materials. Having everything ready makes the job easier and safer. This section lists what you need before starting your project.
Essential Tools
Basic tools include a screwdriver set, wire strippers, and a voltage tester. A drill with bits helps make holes for mounting. Pliers and electrical tape are useful for wire handling. A utility knife can cut insulation or wires cleanly.
Choosing The Right Light And Switch
Select a light fixture that fits your room size and style. Check the wattage limit to avoid overload. Pick a switch type that matches your needs. Common types include toggle, dimmer, and rocker switches. Make sure the switch fits your electrical box.
Safety Equipment
Wear safety goggles to protect your eyes from debris. Use insulated gloves to prevent electric shock. Turn off power at the circuit breaker before starting. A non-contact voltage tester confirms no live current. Keep a fire extinguisher nearby, just in case.
Preparing The Work Area
Preparing the work area is an important step before installing a new light and switch. It helps keep you safe and makes the job easier. Organizing your space and checking the power are key actions. Follow these steps to get ready.
Turning Off Power
Start by turning off the power at the circuit breaker. This stops electricity from flowing to the light and switch. It protects you from shocks while working. Confirm the breaker controls the right area.
Clearing The Space
Remove furniture and objects near the work area. Clear the floor to avoid tripping. Have enough room to move and place tools. Good lighting helps you see what you do.
Testing For Electricity
Use a voltage tester to check the wires. Touch the tester to each wire carefully. No light or sound means no electricity. Double-check to ensure safety before starting the installation.
Removing The Old Light And Switch
Removing the old light and switch is the first step in installing new ones. It takes care and attention to avoid damage or injury. Follow each step carefully to ensure safety and success.
Unscrewing Fixtures
Start by turning off the power at the circuit breaker. Use a screwdriver to remove screws holding the light fixture. Gently pull the fixture away from the wall or ceiling. Place screws and fixture parts in a safe spot for later use or disposal.
Disconnecting Wires
Check that the power is off using a voltage tester. Unscrew wire nuts or connectors that join the wires. Carefully separate the wires from the fixture and switch. Take note of wire colors and positions for new installation.
Handling Old Components Safely
Old wires and fixtures may have sharp edges or dust. Handle them with gloves to protect your hands. Dispose of broken or damaged parts properly. Keep the work area clean to avoid accidents.

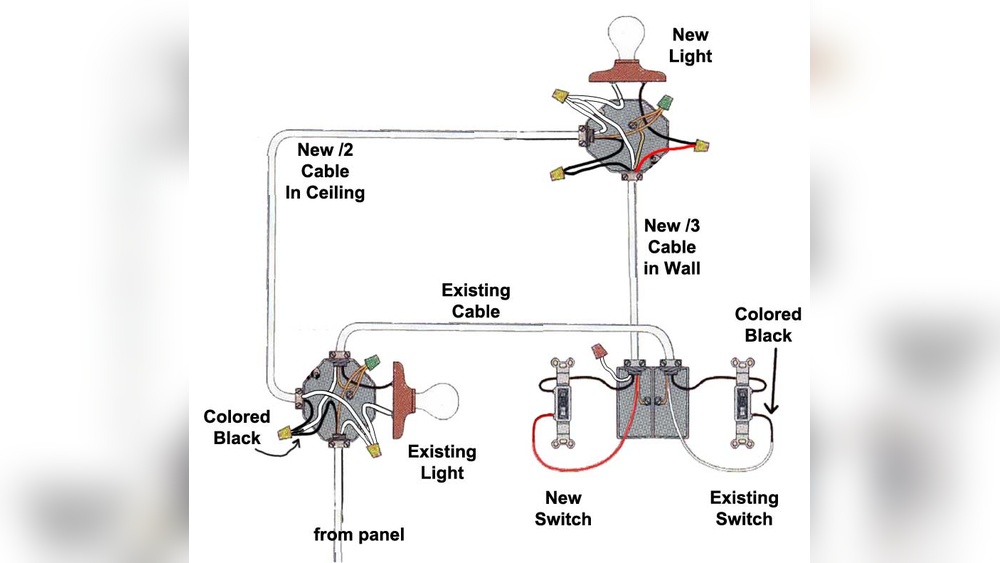
Credit: diy.stackexchange.com
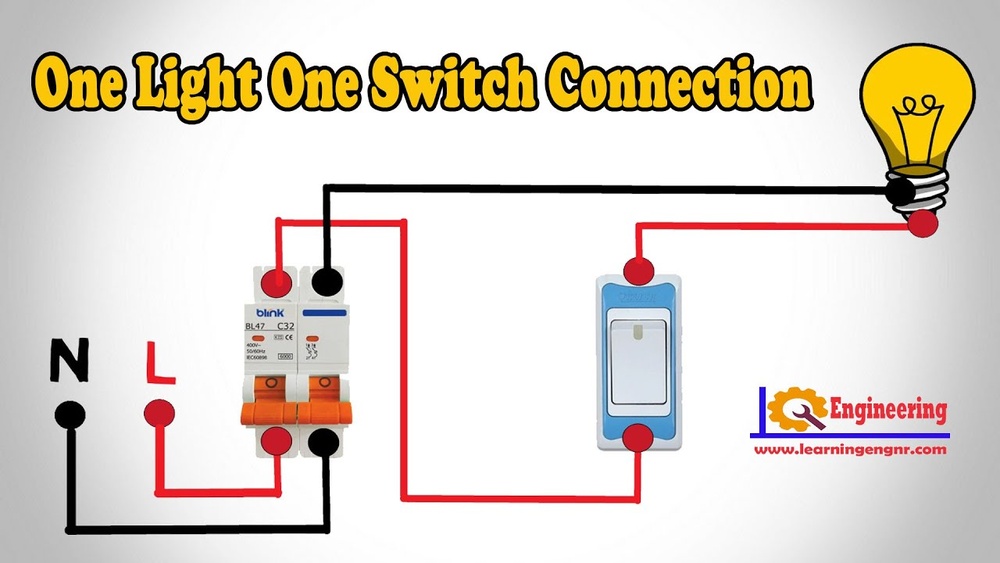
Wiring The New Switch
Wiring the new switch is a key step in installing a light and switch. It involves connecting the right wires to make the switch work safely. Careful wiring ensures the switch controls the light properly. Understanding wire types and connections helps prevent mistakes and hazards.
Identifying Wire Types
First, identify the wires in the switch box. Typically, you will find black, white, and green or bare copper wires. The black wire is the hot wire, carrying electricity to the switch. The white wire is neutral, completing the circuit. The green or bare wire is the ground wire, which protects against electrical shocks. Knowing these wires is important before making connections.
Connecting Wires Correctly
Match the wires from the switch to the house wiring. Connect the black wire from the switch to the black wire in the wall. Attach the white wires together if present, but they usually do not connect to the switch. Connect the green or bare ground wire to the switch’s ground screw or wire. Use wire nuts to twist wires tightly together. Tight connections prevent sparks and ensure the switch works well.
Securing The Switch
Push the connected wires gently back into the electrical box. Align the switch with the screw holes in the box. Use screws to secure the switch firmly. Avoid over-tightening, which can crack the switch or box. Attach the switch cover plate to finish. A secure switch stays in place and looks neat.
Installing The New Light Fixture
Installing a new light fixture can brighten up any room instantly. This process is simple and safe if done carefully. Follow these steps to ensure the fixture is mounted correctly and wires are connected properly.
Mounting The Fixture
First, turn off the power at the circuit breaker. Remove the old fixture carefully. Check the electrical box to make sure it is secure. Attach the mounting bracket that comes with the new fixture. Use screws to fasten it tightly. Align the fixture base with the bracket. Secure the fixture base to the mounting bracket with screws. Ensure the fixture is stable and does not wobble.
Wiring The Light
Identify the wires: black is hot, white is neutral, and green or copper is ground. Connect the black wire from the fixture to the black wire in the electrical box. Twist the wires together and secure with a wire nut. Do the same for the white wires. Connect the ground wire to the grounding screw or wire. Wrap electrical tape around each wire nut for safety. Tuck the wires neatly into the electrical box.
Testing The Connection
Turn the power back on at the circuit breaker. Switch on the light to check if it works. If the light does not turn on, turn off the power and recheck the wiring. Make sure all connections are tight and correct. Once the light turns on, the installation is complete. Enjoy your new fixture lighting up the space.
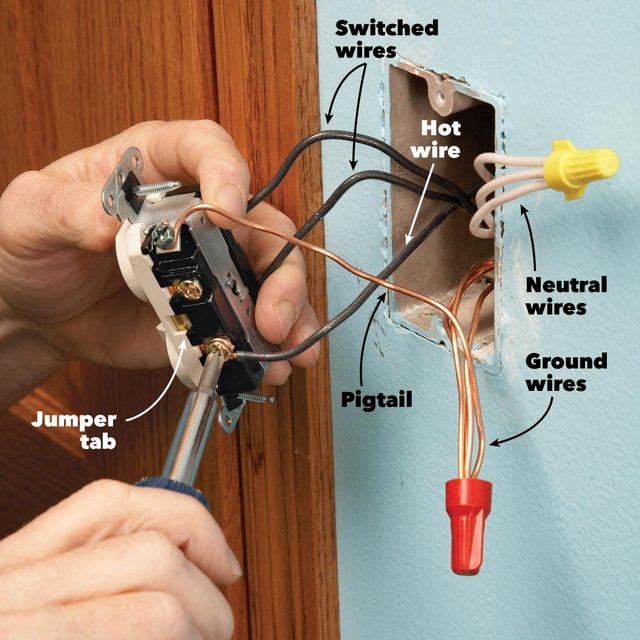
Credit: www.familyhandyman.com
Final Checks And Troubleshooting
After installing a new light and switch, completing final checks is crucial. These steps ensure safety and proper function. Troubleshooting helps fix common issues that may arise. Follow these simple steps to confirm your work is done right.
Restoring Power
Turn the main circuit breaker back on carefully. Make sure the power supply is stable. Do not rush this step. Safety first. Check if the switch and light receive electricity. Use a voltage tester if available. It confirms power flow without risk.
Checking For Proper Operation
Flip the switch to test the light. The light should turn on and off smoothly. Listen for any unusual sounds. Look for flickering or dim light. Try the switch multiple times. This confirms consistent performance. Proper operation means a safe and functional setup.
Common Issues And Fixes
Sometimes, the light may not work right away. Check if the light bulb is correctly installed and not burnt out. Verify all wire connections are tight and secure. Loose wires cause issues often. If the switch feels loose, tighten its screws. A tripped breaker means overloaded circuit or short. Reset the breaker and test again. Persistent problems need a professional electrician’s help.
Safety Tips For Future Projects
Safety is the top priority in all electrical projects. Taking precautions protects you and your home. These tips help keep future light and switch installations safe and smooth. Follow these simple steps to avoid risks and ensure long-lasting results.
Regular Maintenance
Check switches and lights often for signs of wear. Loose wires or flickering lights need attention right away. Clean dust and dirt from fixtures to prevent overheating. Regular checks help spot problems early and keep everything working well.
When To Call A Professional
Complex wiring or frequent electrical issues require expert help. If you feel unsure about any step, stop and call a pro. Professionals have the tools and knowledge to fix problems safely. Avoid risks by trusting experts with difficult tasks.
Avoiding Common Mistakes
Always turn off power before starting any work. Use the right tools and follow instructions carefully. Do not overload circuits or use damaged parts. Avoid shortcuts that can cause shorts or shocks. Small mistakes can lead to big hazards.

Credit: www.dummies.com
Frequently Asked Questions
How Do I Safely Turn Off Power Before Installation?
Always switch off the circuit breaker controlling the light and switch. Use a voltage tester to confirm no electricity flows. This prevents electric shocks and ensures a safe working environment during installation.
What Tools Are Needed To Install Light And Switch?
You need a screwdriver, wire stripper, voltage tester, electrical tape, and wire nuts. These tools help you connect wires securely and test electrical connections safely for proper installation.
How To Identify Live, Neutral, And Ground Wires?
Live wires are usually black or red, neutral wires are white, and ground wires are green or bare copper. Proper identification ensures correct wiring and prevents electrical hazards during installation.
Can I Install A New Switch Without Professional Help?
Yes, if you understand basic electrical safety and wiring. Always turn off power and follow instructions carefully. For complex setups, consult a professional electrician to avoid risks.
Conclusion
Installing a new light and switch can brighten any room quickly. Follow each step carefully for safety and success. Double-check your work before turning the power back on. Take your time and ask for help if unsure. Small tools and clear instructions make the job easier.
With practice, this task becomes simple and rewarding. Enjoy the new light and improved control in your space. Keep learning to handle more home projects confidently. Simple changes can make your home feel fresh and inviting.