Have you ever wished you could control the brightness of your lights with just a simple twist or slide? Adding a dimmer to your light switch can instantly change the mood of any room, save energy, and even extend the life of your bulbs.
If you think installing a dimmer is complicated or expensive, think again. In this guide, you’ll discover easy steps to upgrade your lighting without needing to call an electrician. Ready to transform your space and take full control of your lighting?
Keep reading to learn how you can add a dimmer to your light switch quickly and safely.

Credit: www.youtube.com
Choosing The Right Dimmer
Choosing the right dimmer switch is key for a smooth lighting experience. It controls how bright or dim your lights can be. The right dimmer saves energy and protects your bulbs. This section helps you pick the best dimmer for your needs.
Types Of Dimmers
There are several dimmer types. Leading-edge dimmers work well with incandescent bulbs. Trailing-edge dimmers suit LED and CFL bulbs better. Slide dimmers let you adjust light by sliding a knob. Rotary dimmers use a turn knob. Touch dimmers respond to a tap. Choose the type that fits your room and bulb style.
Compatibility With Bulbs
Not all dimmers work with every bulb type. Incandescent bulbs dim easily with most dimmers. LEDs need dimmers designed for LED use. Using wrong dimmer may cause flickering or buzzing. Check the bulb package for dimmer compatibility. Match your dimmer to your bulbs for smooth dimming.
Wattage And Load Considerations
Every dimmer has a wattage limit. It shows the maximum power it can handle. Add the wattage of all bulbs on the switch. The total must not exceed the dimmer’s limit. Overloading can cause dimmer to fail or overheat. Choose a dimmer with a higher wattage rating if needed.

Credit: www.gelighting.com
Gathering Necessary Tools
Gathering the right tools is the first step to adding a dimmer to your light switch. Having all tools ready makes the process smooth and safe. It helps avoid interruptions and ensures you work efficiently. Below are the basic tools and safety equipment needed for this task.
Basic Tools Required
- Screwdriver (flathead and Phillips)
- Wire stripper
- Voltage tester
- Needle-nose pliers
- Electrical tape
- Wire nuts
These tools help you remove the old switch, prepare wires, and install the dimmer. Each tool plays a vital role in the process. The voltage tester checks for electricity to avoid shocks. Wire stripper and pliers help manage the wires easily.
Safety Equipment
- Insulated gloves
- Safety goggles
- Non-conductive footwear
Safety gear protects you from electrical hazards. Insulated gloves prevent electric shocks. Goggles shield your eyes from dust or sparks. Non-conductive shoes reduce the risk of electrical accidents. Always use safety equipment before starting any electrical work.
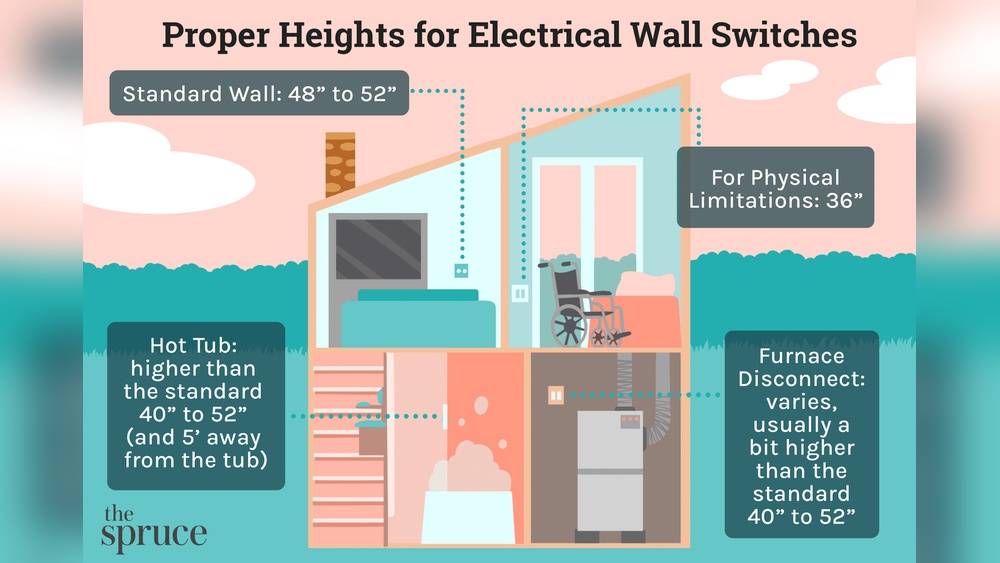
Preparing The Switch Area
Preparing the switch area is the first step in adding a dimmer to your light switch. This part is very important for safety and smooth installation. You need to carefully get ready before handling any electrical parts. This ensures no accidents happen and the job goes well.
Follow each step closely. Take your time and use the right tools. This helps to avoid damage to the switch or wiring. Proper preparation makes the rest of the process easier and safer.
Turning Off Power
Start by turning off the power to the light switch. Find the circuit breaker box in your home. Flip the switch that controls the power to the room where you work. This stops electricity from flowing to the switch.
Use a voltage tester to check the switch. Make sure no electricity is running through it. Never skip this step. It protects you from electric shock while working.
Removing The Existing Switch
After confirming the power is off, remove the switch cover plate. Use a screwdriver to take out the screws. Keep the screws safe for later use.
Next, unscrew the existing switch from the wall box. Gently pull the switch out to see the wires. Do not pull too hard to avoid damaging the wires.
Take note of how the wires connect to the switch. This helps when connecting the dimmer later. Carefully disconnect the wires from the switch terminals.

Credit: diy.stackexchange.com
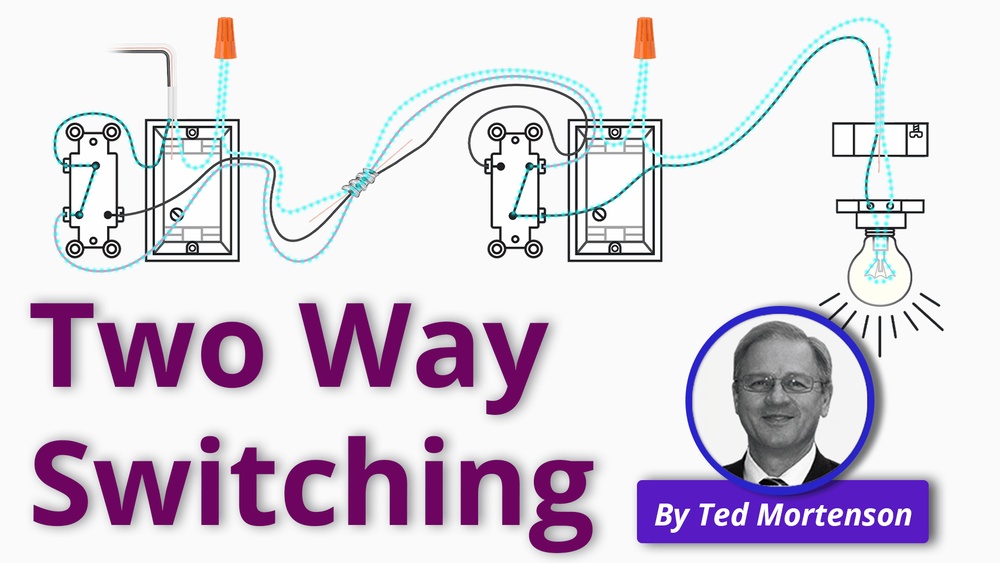
Wiring The Dimmer Switch
Wiring the dimmer switch is a key step in your lighting upgrade. Proper wiring ensures safe and smooth dimmer operation. This section breaks down the wiring process into simple tasks.
Identifying Wires
Start by turning off the power at the breaker. Use a voltage tester to confirm no current flows. Remove the old switch cover to see the wires.
Most light switch wires include a hot wire, a neutral wire, and a ground wire. The hot wire usually carries electricity to the switch. The neutral wire completes the circuit. The ground wire is a safety feature.
Dimmer switches require connecting to these wires correctly for proper function.
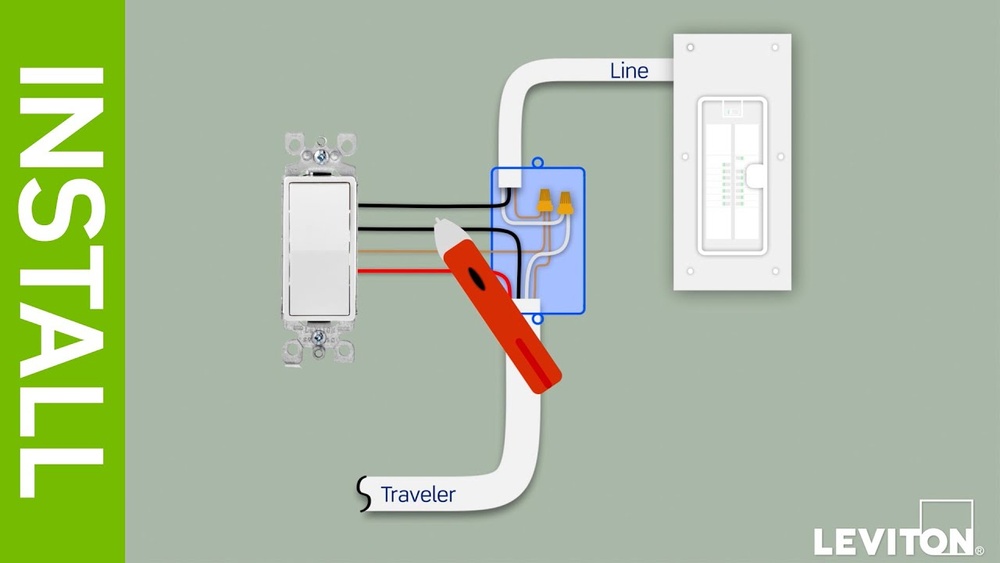
Connecting Wires To Dimmer
Match each wire from the wall to the corresponding wire on the dimmer. Typically, dimmer switches have two black wires and a green ground wire. Connect the black wires to the hot and load wires.
Attach the green or bare copper wire from the dimmer to the ground wire from the wall. Use wire nuts to secure each connection. Twist wires together before placing the wire nut over them.
Securing The Connections
After connecting all wires, gently push them back into the electrical box. Avoid sharp bends or pinching wires. Attach the dimmer switch to the box using screws.
Finally, attach the switch cover plate. Turn the power back on and test the dimmer for proper operation.
Testing The Dimmer
Testing the dimmer is a crucial step after installation. It ensures the switch works correctly and safely. This process confirms the dimmer adjusts light levels smoothly. Follow clear steps for best results and avoid common issues.
Restoring Power
Turn the circuit breaker back on. This restores power to the light switch. Check that the light fixture receives electricity. If the light does not turn on, turn off the breaker again. Double-check all wiring connections before restoring power.
Checking Dimmer Functionality
Use the dimmer switch to adjust the light. Slide or turn the dimmer slowly. Watch the light change brightness smoothly. No flickering or buzzing should occur. The light must turn off completely at the lowest setting. If problems appear, recheck wiring and dimmer compatibility.
Troubleshooting Common Issues
Adding a dimmer switch can improve your lighting experience. Sometimes, issues may arise after installation. Troubleshooting helps fix these common problems fast. This guide covers simple solutions to three frequent dimmer issues.
Dimmer Not Working
Check the power supply first. Make sure the circuit breaker is on. Confirm the dimmer switch is wired correctly. Loose wires can stop it from working. Replace the dimmer if it is faulty. Use a dimmer that matches your bulb type.
Flickering Lights
Flickering often happens with incompatible bulbs. Use dimmable LED or incandescent bulbs. Tighten the bulb in the socket firmly. Loose bulbs cause flickering too. Check if the dimmer supports the bulb wattage. Lower wattage bulbs may flicker with some dimmers.
Buzzing Sounds
Buzzing comes from electrical vibrations. It usually happens with LEDs and compact fluorescents. Try a higher quality dimmer switch. Use bulbs designed for dimming. Tighten the bulb and switch parts. Buzzing can also mean the dimmer is overloaded.
Tips For Perfect Lighting
Perfect lighting sets the mood and saves energy. Dimmer switches help control light levels with ease. Use these tips to get the best results from your dimmer switch.
Adjusting Brightness Levels
Start with low brightness for calm and cozy spaces. Increase brightness for tasks like reading or cooking. Find the right light level for each activity. Avoid setting brightness too high or too low. Smoothly adjust the dimmer to prevent flickering or buzzing.
Choosing Suitable Bulbs
Select bulbs that work with dimmer switches. LED and incandescent bulbs often fit well. Check the bulb package for dimmer compatibility. Use bulbs with the right wattage for your fixture. Wrong bulbs can cause flickering and damage the dimmer.
Maintaining Your Dimmer Switch
Keep your dimmer switch clean and dust-free. Turn off power before cleaning. Use a dry cloth or soft brush. Check the switch for signs of wear or damage. Replace the dimmer if it does not work smoothly. Regular care extends its lifespan and performance.
Frequently Asked Questions
How Do I Add A Dimmer To A Light Switch?
Turn off power, remove the old switch, connect dimmer wires, and secure it. Restore power and test the dimmer. Follow manufacturer instructions for safety and compatibility.
Can I Install A Dimmer Switch Myself?
Yes, with basic electrical knowledge and safety precautions, you can install a dimmer switch yourself. Always turn off power before starting and use a voltage tester to confirm.
What Types Of Dimmer Switches Are Available?
Common types include rotary, slide, and touch dimmers. Choose based on your light bulb type and desired control style for best performance and compatibility.
Will A Dimmer Switch Work With Led Bulbs?
Only if the dimmer is LED-compatible. Standard dimmers may cause flickering or damage. Check packaging or product details for LED compatibility before installing.
Conclusion
Adding a dimmer switch can change your room’s mood easily. It saves energy and extends bulb life too. Installation is simple with the right tools and steps. Take your time and follow safety rules carefully. Enjoy softer light and better control every day.
A small change that makes a big difference. Try it yourself and see how it feels. Brightness just the way you want it.