Are you looking to boost your home’s security with a reliable lock? Installing a Baldwin deadbolt is a smart choice.
It’s strong, stylish, and built to protect. But if you’ve never installed one before, the process might seem tricky. Don’t worry—this guide will walk you through every step clearly and simply. By the end, you’ll have your new deadbolt ready to keep your home safe.
Keep reading, and let’s get started on making your door more secure today.

Credit: level.co
Choosing The Right Baldwin Deadbolt
Choosing the right Baldwin deadbolt is important for home security and ease of use. The right deadbolt fits your door and matches your style. It also offers the features you need for safety and convenience. Understanding your options helps you make the best choice. This guide explains the types, features, and compatibility of Baldwin deadbolts.
Types Of Baldwin Deadbolts
Baldwin offers several deadbolt types. Single-cylinder deadbolts use a key outside and a thumb turn inside. Double-cylinder deadbolts need a key on both sides. This adds security but may slow exit during emergencies. Keyless electronic deadbolts use codes instead of keys. They offer convenience and can be programmed for multiple users.
Features To Consider
Check the lock’s finish to match your door hardware. Look for anti-pick and anti-bump features for better security. Choose a deadbolt with a solid metal construction for durability. Consider if you want a keyless option or traditional key locks. Some models have easy installation kits to save time. Ensure the lock has a smooth turn mechanism for daily use.
Compatibility With Door Types
Measure your door thickness before buying a deadbolt. Baldwin deadbolts usually fit doors 1-3/8 to 2 inches thick. Check if your door is metal, wood, or fiberglass. Some deadbolts work better with specific door materials. Also, make sure the lock fits your door’s backset distance. This is the space from the edge of the door to the center of the lock hole.
Tools And Materials Needed
Before starting to install a Baldwin deadbolt, gather all necessary tools and materials. Having everything ready makes the installation smooth and quick. It also helps avoid interruptions during the process.
Essential Tools
Get a power drill with drill bits for making holes. A screwdriver set is crucial for tightening screws. A tape measure helps check dimensions and placement. Use a pencil to mark spots on the door. A chisel is useful for adjusting the door frame. A hammer assists with the chisel work. Finally, a level ensures the deadbolt installs straight.
Additional Supplies
Keep extra screws on hand in case some get lost. Wood filler helps fix any unwanted holes. Sandpaper smooths rough edges after chiseling. A safety pair of glasses protects your eyes during drilling. Gloves keep your hands safe and clean. A flashlight aids visibility in dark areas around the door.
Preparing The Door
Preparing the door is the first step to install a Baldwin deadbolt. This step helps ensure the lock fits well and works smoothly. Proper preparation makes the installation easier and more secure. Follow these simple tasks carefully before drilling or placing the lock.
Measuring And Marking
Measure the height where you want the deadbolt on the door. Usually, it is about 6 to 12 inches above the door handle. Use a tape measure to get an accurate spot. Mark the center point for the lock hole with a pencil. Also, mark the edge of the door for the latch hole. Make sure marks are clear and level for a neat fit.
Drilling The Holes
Drill the holes based on the marks you made. Use a hole saw drill bit for the large hole on the face of the door. Drill straight to avoid uneven edges. Then drill a smaller hole on the edge of the door for the latch. Clean out any wood chips or splinters. Smooth holes help the deadbolt fit perfectly and work without trouble.
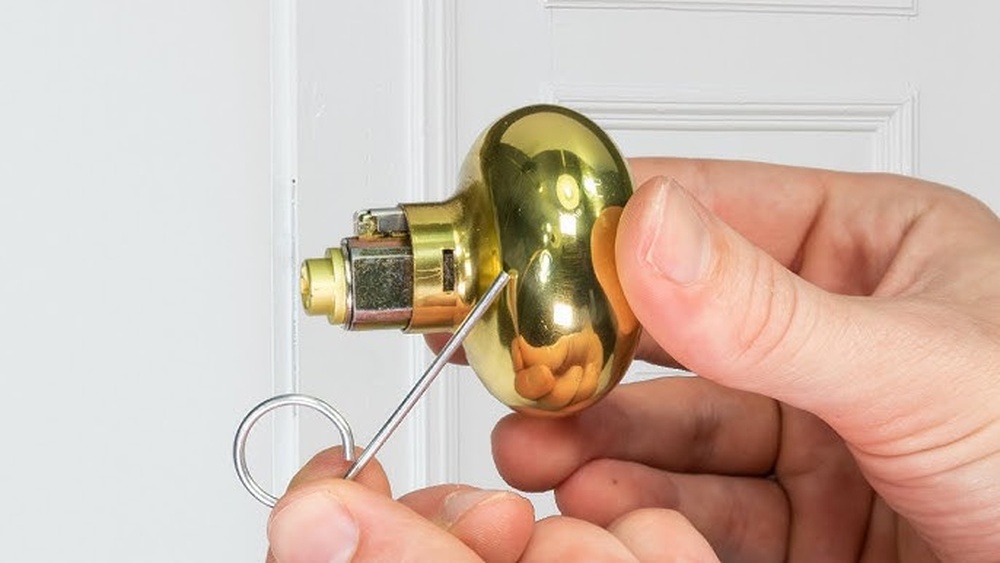
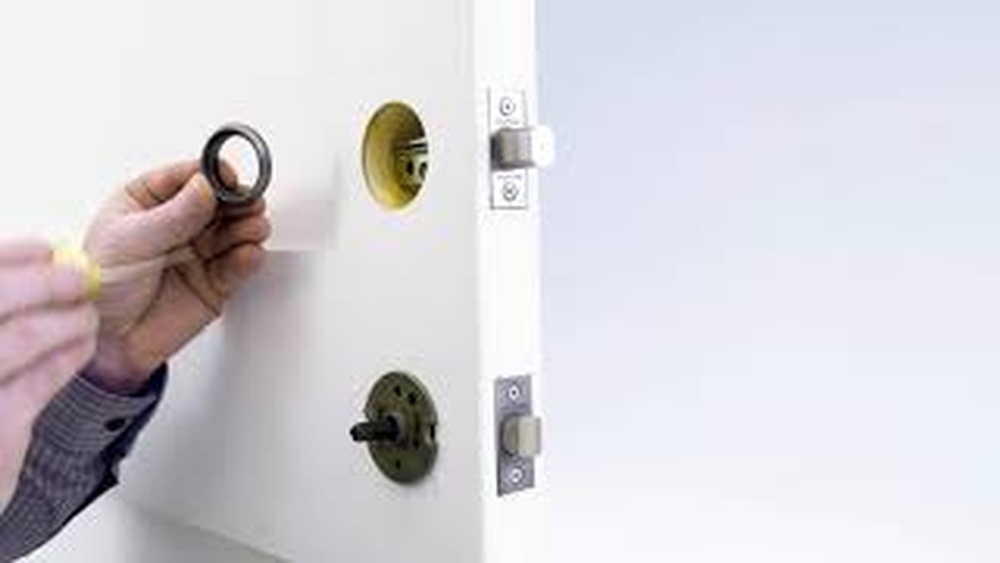
Installing The Deadbolt Components
Installing the deadbolt components is a key step in securing your door. This process involves placing the exterior and interior parts correctly. Each piece must fit well to ensure smooth operation. Follow clear steps for a proper install.
Mounting The Exterior Assembly
Start by placing the exterior assembly on the door’s outside. Align the spindle through the latch hole. Make sure the keyhole faces down or as instructed. Hold the assembly steady while preparing for the interior side.
Attaching The Interior Assembly
Next, fit the interior assembly over the spindle inside the door. Check that the tailpiece slides into the latch mechanism. Press the interior part flush against the door surface. Insert screws to hold both assemblies together.
Securing The Deadbolt
Tighten all screws evenly to secure the deadbolt firmly. Avoid over-tightening to prevent damage. Test the lock by turning the thumb turn and key. Confirm the deadbolt moves smoothly and locks securely.
Testing The Deadbolt
Testing the Baldwin deadbolt is an important step after installation. It ensures the lock works properly and secures your door. A well-functioning deadbolt provides safety and peace of mind. Take time to check and adjust the lock for smooth use.
Checking Lock Operation
Start by turning the key or thumb turn. The deadbolt should move easily without sticking. Test the lock from both sides of the door. Make sure the bolt fully extends into the door frame. Try locking and unlocking several times. The lock should feel firm and secure each time.
Adjusting For Smooth Function
If the deadbolt sticks or is hard to turn, adjust the strike plate. Loosen its screws and move it slightly. This helps the bolt fit better into the frame. Tighten the screws once the bolt slides smoothly. Check the door alignment too. The door should close without resistance or gaps.

Credit: www.youtube.com
Maintenance Tips For Longevity
Keeping your Baldwin deadbolt in good shape helps it work well for years. Simple care steps stop problems before they start. Regular maintenance saves money and keeps your home safe. Follow these tips to extend your deadbolt’s life.
Lubrication
Oiling the lock makes it turn smoothly. Use a graphite or silicone spray for best results. Avoid using oil-based lubricants like WD-40. Apply a small amount inside the keyhole and on moving parts. Turn the key several times to spread the lubricant evenly. Do this every six months to prevent sticking and rust.
Regular Inspection
Check your deadbolt often for signs of wear or damage. Look for loose screws or parts. Tighten any loose screws with a screwdriver. Test the lock by turning the key and knob. Make sure the bolt slides in and out easily. Fix problems early to avoid bigger repairs later.

Credit: mans.io
Frequently Asked Questions
How Do I Install A Baldwin Deadbolt Lock?
Start by measuring and marking the door for the deadbolt. Drill holes for the lock and latch. Insert the latch, attach the lock mechanism, and secure with screws. Test the lock to ensure smooth operation before finalizing installation.
What Tools Are Needed For Baldwin Deadbolt Installation?
You will need a drill, drill bits, screwdriver, measuring tape, pencil, and a chisel. These tools help in drilling holes, marking measurements, and securing the deadbolt components properly to your door.
How Long Does It Take To Install A Baldwin Deadbolt?
Installation typically takes 30 to 45 minutes for someone with basic DIY skills. More complex door setups might take longer. Ensure you follow instructions carefully to avoid mistakes.
Can I Install A Baldwin Deadbolt On Any Door?
Baldwin deadbolts fit most standard wooden and metal doors. Check your door thickness and backset measurements before purchase. This ensures compatibility and proper lock function.
Conclusion
Installing a Baldwin deadbolt is simple with clear steps. Take your time and follow the instructions carefully. Use the right tools to ensure a tight fit. Test the lock to make sure it works smoothly. A well-installed deadbolt adds safety to your home.
Now, you can feel more secure every day. Keep your tools handy for future maintenance. Enjoy the peace of mind that comes with strong locks.