Installing a deadbolt lock can instantly boost your home’s security and give you peace of mind. But if you’re unsure how to drill the perfect hole for it, the process might feel overwhelming.
Don’t worry—you’re about to learn simple, step-by-step instructions that make drilling for a deadbolt easy, even if you’ve never used power tools before. Keep reading, and you’ll gain the confidence and know-how to secure your door like a pro.
Tools And Materials Needed
Before drilling a hole for a deadbolt lock, gather all necessary tools and materials. Having the right items makes the job easier and safer. This section lists the basics needed for the task.
Essential Drilling Tools
A power drill is a must for making precise holes. Use drill bits sized for your deadbolt lock. A hole saw bit usually fits the main lock hole. A spade bit or a smaller drill bit helps with the bolt hole. Tape measure and pencil mark spots for drilling. A chisel may help clean edges after drilling.
Types Of Deadbolt Locks
Know your deadbolt lock type before drilling. Single-cylinder deadbolts need one hole for the lock and one for the bolt. Double-cylinder deadbolts require extra holes for keys on both sides. Choose drill bits that match the lock’s size. Measure carefully to avoid mistakes.
Safety Gear
Wear safety goggles to protect your eyes from dust and debris. Use ear protection to guard against loud drill noise. Gloves keep your hands safe and improve grip. Always work in a well-lit area to see clearly. Keep your workspace clean and free of hazards.
Credit: diy.stackexchange.com
Preparing The Door
Preparing the door correctly makes installing a deadbolt easier and safer. This step ensures the lock fits perfectly and works well. Take your time to get it right. A well-prepared door means a strong, secure lock.
Choosing The Right Spot
Select a spot on the door that is easy to reach and use. Typically, deadbolts go above the handle. Check the door thickness too. It should fit the lock parts comfortably. Avoid areas with wood knots or damage.
Marking Drill Points
Use a pencil and a measuring tape to mark where to drill. Mark the center for the main hole first. Then, mark the side hole for the bolt. Clear marks help avoid mistakes during drilling.
Measuring For Accuracy
Measure twice before drilling. Check the door edge thickness and the distance from the edge to the center hole. Use a level to keep marks straight. Accurate measurements lead to a neat and secure deadbolt fit.
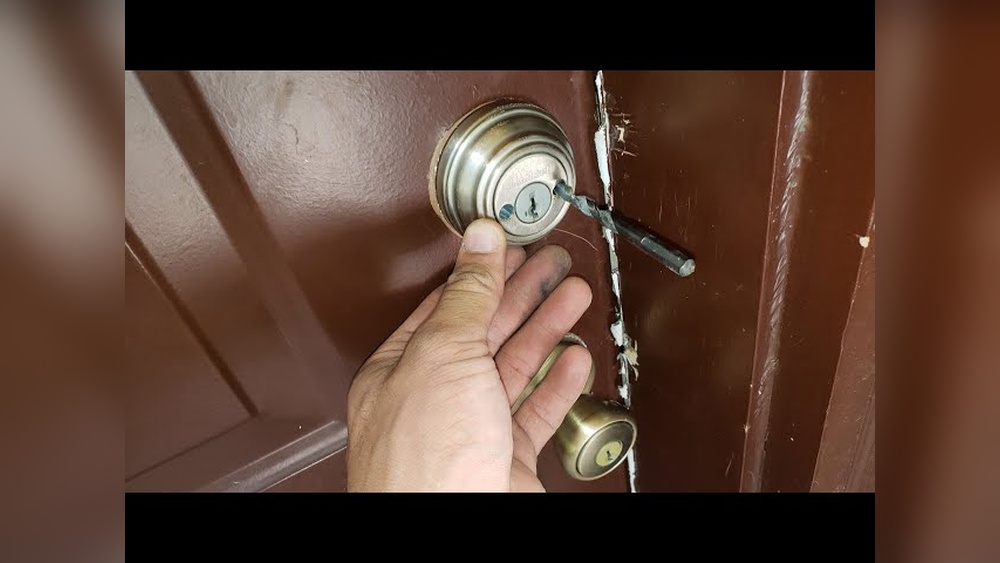
Drilling The Face Hole
Drilling the face hole is a key step when installing a deadbolt lock. This hole goes through the door’s face and holds the lock’s main body. Getting this hole right means your lock fits tightly and works well. Careful drilling prevents damage to your door and ensures security.
Selecting Drill Bits
Pick drill bits made for wood or metal, depending on your door. Most doors need a hole saw bit for a clean, round hole. Check the deadbolt instructions for the correct hole size. Use sharp bits to make smooth cuts and reduce splintering.
Drilling Techniques
Mark the hole spot with a pencil or tape. Start drilling slowly to guide the bit straight. Use steady pressure and let the drill do the work. Drill halfway through from one side, then finish from the other side. This prevents splintering on the door’s surface.
Avoiding Common Mistakes
Don’t rush the drilling process. Avoid pushing too hard or drilling too fast. Never drill at an angle; keep the drill level. Check measurements twice before drilling. Protect the door edges with tape to reduce chipping.

Credit: www.youtube.com
Drilling The Edge Hole
Drilling the edge hole is a key step when installing a deadbolt lock. This hole holds the latch, so it must be precise and clean. A well-drilled edge hole ensures the lock fits tightly and works smoothly. Take your time and follow the right steps for a neat job.
Aligning The Drill
Place the drill bit exactly at the marked spot on the door edge. Hold the drill straight and steady. Keep the drill perpendicular to the door surface. A tilted drill can cause a crooked hole. Check your alignment twice before drilling.
Depth Control Tips
Set a drill stop or tape on the bit to limit depth. This prevents drilling too far through the door. Measure the required depth from the lock instructions. Drill slowly and steadily to avoid splintering. Stop as soon as you reach the depth mark.
Smoothing The Edges
After drilling, the hole edges might be rough. Use sandpaper or a small file to smooth the edges. This helps the latch fit better. Smooth edges also prevent damage to the lock parts. Take your time for a clean finish.
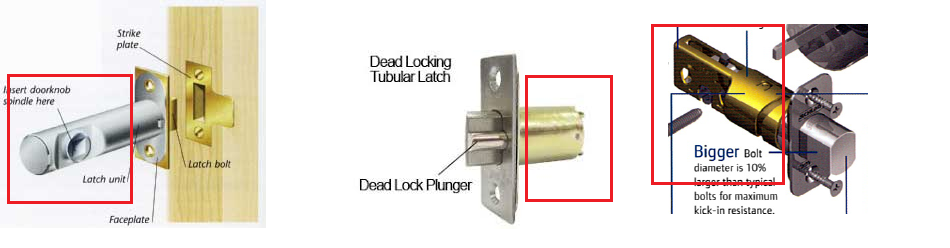
Installing The Deadbolt
Installing the deadbolt is a key step after drilling the hole. It ensures your door locks securely and works smoothly. Follow each part carefully to fit the lock right.
Fitting The Lock Components
Start by placing the latch into the edge of the door. Make sure it fits flush with the door surface. Insert the exterior part of the deadbolt through the large hole. Align the tailpiece with the latch mechanism. Next, attach the interior part of the lock on the other side. Check that both sides line up perfectly.
Securing With Screws
Use the screws provided to hold the lock parts in place. Tighten them evenly to avoid misalignment. Do not over-tighten, or you may damage the lock. Secure the strike plate on the door frame. It should sit flush and cover the hole completely. This helps the bolt slide in and lock firmly.
Testing The Lock Function
Turn the key or thumb turn to test the bolt movement. The deadbolt should extend and retract smoothly. Check for any sticking or resistance. Close the door and try locking it. Make sure the bolt fits fully into the strike plate. Adjust screws if needed for better fit and function.
Troubleshooting And Tips
Troubles can happen when drilling a hole for a deadbolt lock. Knowing how to fix these issues saves time and effort. The right tips help you drill smoothly and install the lock correctly. This section covers common problems and useful advice.
Dealing With Hardwoods
Hardwoods are tough to drill. Use a sharp, high-quality drill bit. Drill slowly to avoid burning the wood. Mark the spot clearly before drilling. Try a pilot hole first to guide the larger bit. Keep the drill steady and straight for best results.
Fixing Misaligned Holes
Misaligned holes cause the lock to fit poorly. Check the alignment before drilling. If holes are off, use wood filler to fix gaps. Sand the area smooth after filling. Drill new holes carefully, using a template for accuracy. Test the lock fit before final installation.
Maintaining Your Lock
Keep your deadbolt lock working well with simple care. Clean the lock regularly with a soft cloth. Lubricate the keyhole with graphite or silicone spray. Avoid oil-based lubricants that attract dirt. Check the screws and tighten if loose. Regular care extends the lock’s life and keeps it secure.

Credit: www.youtube.com
Frequently Asked Questions
What Tools Do I Need To Drill A Deadbolt Hole?
You need a power drill, hole saw bit, spade bit, tape measure, pencil, and safety glasses. These tools ensure precise and safe drilling for your deadbolt installation.
How Do I Measure For A Deadbolt Hole?
Measure 6 to 12 inches above the door handle. Mark the center point on the door edge and face. Accurate measurements ensure the deadbolt fits perfectly and functions properly.
What Is The Standard Hole Size For A Deadbolt?
The standard hole size is 2 1/8 inches in diameter. This size fits most deadbolt locks. Use the appropriate hole saw bit for precise drilling.
How Deep Should I Drill For A Deadbolt Lock?
Drill through the door face completely and 1-inch deep on the edge. This depth secures the lock mechanism and allows smooth bolt operation.
Conclusion
Drilling a hole for a deadbolt lock is simple with the right steps. Measure carefully and use the correct drill bits. Take your time to avoid mistakes and ensure a secure fit. A well-installed deadbolt improves your door’s safety. Practice makes perfect, so don’t rush the process.
Following these tips helps you install your lock with confidence. Your home will feel safer and more secure. Keep your tools ready for future fixes or upgrades. Safety starts with good preparation and careful work.