Are you struggling to remove Closetmaid wall anchors without damaging your walls? You’re not alone.
These anchors hold shelves firmly, but taking them out can be tricky and frustrating. What if you could learn a simple, step-by-step way to get them out cleanly and easily? You’ll discover practical tips and tricks that save you time and protect your walls.
Keep reading, and you’ll master the skill of removing Closetmaid wall anchors like a pro.

Credit: diy.stackexchange.com
Types Of Closetmaid Wall Anchors
Closetmaid wall anchors come in different types. Each type serves a special purpose. Knowing the type helps remove them safely. Here are the common types of Closetmaid wall anchors.
Plastic Expansion Anchors
Plastic expansion anchors are simple and common. They expand when a screw is pushed in. This makes them hold tight in drywall. Removing them often means pulling or pushing the anchor out. Sometimes, the anchor can break inside the wall.
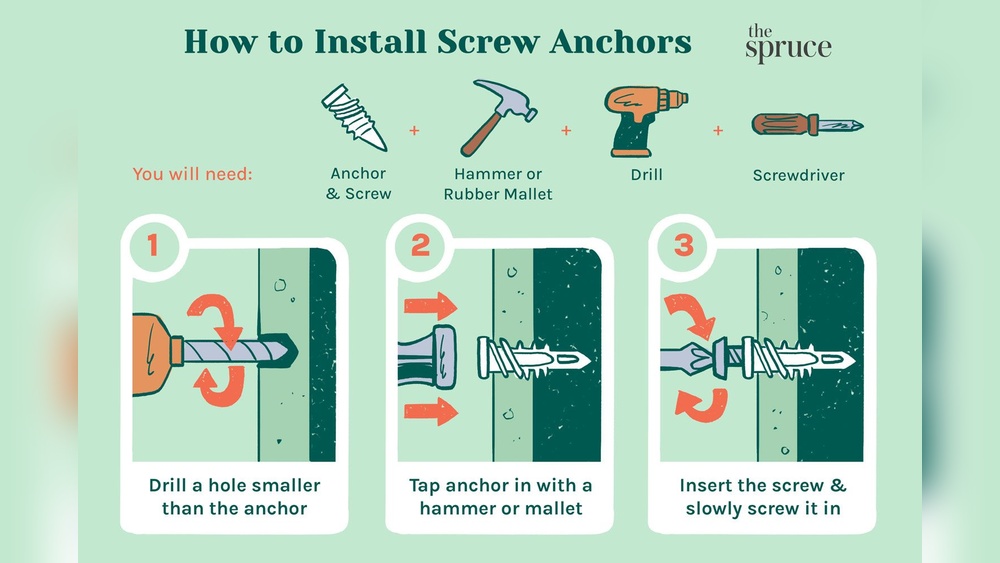
Self-drilling Anchors
Self-drilling anchors have sharp threads. They screw directly into drywall without pre-drilling. Their design gives a strong grip. Removing these anchors can be tricky. Usually, you twist them out with pliers or a screwdriver.
Toggle Bolts
Toggle bolts have wings that open inside the wall. They spread the load over a large area. This makes them very strong. To remove toggle bolts, you must first unscrew the bolt. Then, the wings fall inside the wall and stay there.
Tools Needed For Removal
Removing ClosetMaid wall anchors needs the right tools. Using proper tools makes the job safer and easier. Prepare your tools before starting to save time and avoid frustration.
Basic Hand Tools
Start with basic hand tools. A screwdriver is essential to turn screws or pry anchors out. Needle-nose pliers help to grip and pull small anchors. A utility knife can cut around the anchor if needed. A putty knife helps to loosen the anchor from the wall gently.
Power Tools
Power tools speed up the removal process. A cordless drill with a screwdriver bit can remove screws fast. An oscillating multi-tool can cut through stubborn anchors cleanly. Use these tools carefully to avoid wall damage. Power tools are not always necessary but useful for tough anchors.
Safety Equipment
Safety matters during removal. Wear safety glasses to protect your eyes from dust and debris. Use gloves to protect your hands from sharp edges. A dust mask helps if dust spreads while cutting or drilling. Prepare safety gear before starting work to stay safe.
Removing Plastic Expansion Anchors
Removing plastic expansion anchors from your wall is a simple task with the right steps. These anchors are common in many homes and help secure items to drywall. They expand inside the wall, making them strong but sometimes tricky to take out. Follow these clear steps to remove them without damaging your wall.
Loosening The Anchor
Start by trying to loosen the plastic anchor. Use a screwdriver that fits the anchor’s slot. Turn it gently counterclockwise to loosen. If the anchor spins freely, it means it is not gripping the wall tightly. This makes pulling it out easier.
Pulling Out The Anchor
After loosening, grip the anchor with pliers. Pull it straight out from the wall. Use steady, even force to avoid damage. If the anchor moves slightly, keep pulling gently until it comes free.
Handling Stubborn Anchors
Stubborn anchors may stay stuck. Try pushing the anchor deeper into the wall cavity. Use a screwdriver or a small punch to tap it in gently. This can hide the anchor and allow you to patch the wall smoothly later.

Credit: diy.stackexchange.com
Removing Self-drilling Anchors
Removing self-drilling anchors from your wall requires care and the right steps. These anchors are designed to hold strong, making removal a bit tricky. Understanding how to unscrew and pull them out safely helps protect your wall. Follow these simple steps for a clean removal.
Unscrewing The Anchor
Start by turning the screw counterclockwise. Use a screwdriver that fits well to avoid stripping the head. Turn slowly and steadily. If the screw resists, apply gentle pressure. This loosens the anchor inside the wall. Remove the screw completely before trying to take out the anchor.
Extracting The Anchor
Use needle-nose pliers to grip the anchor firmly. Pull straight out with steady force. Avoid twisting or bending to prevent wall damage. If the anchor is stuck, try rocking it gently side to side. This helps break the hold without harming the drywall. Pull slowly until it comes free.
Preventing Wall Damage
Cover the area with painter’s tape before removal. This keeps the drywall from tearing. Work carefully to avoid making holes larger. Fill small holes with spackle or wall putty afterward. Sand lightly for a smooth finish. Paint over to restore the wall’s look.
Removing Toggle Bolts
Removing toggle bolts from Closetmaid wall anchors requires a careful approach. These bolts hold tightly in the wall. Removing them without damage is important. The process has a few clear steps. Understanding these will make the job easier and safer.
Releasing The Toggle
Start by loosening the bolt with a screwdriver. Turn it counterclockwise slowly. The toggle inside the wall will begin to move. The toggle spreads out behind the drywall. Keep turning until the toggle releases its grip. You may feel less resistance as it frees.
Pulling The Bolt Out
Once the toggle is free, pull the bolt straight out. Use steady force. Avoid wiggling to prevent wall damage. If the bolt moves smoothly, continue pulling until it comes out. This step clears the hole for patching or new anchors.
Dealing With Difficult Cases
Sometimes the toggle stays stuck inside the wall. It may spin or stay tight. Use needle-nose pliers to grab the bolt head. Gently rock the bolt side to side. This can help break the toggle’s hold. If the toggle won’t budge, cut the bolt flush. Push the toggle into the wall cavity. Patch the hole later with drywall compound.
Repairing Wall After Anchor Removal
Removing Closetmaid wall anchors often leaves holes or marks on your wall. Repairing these spots is important to keep your wall looking neat and clean. The process involves filling the holes, sanding the surface smooth, and repainting the area. Follow these steps to restore your wall easily.
Filling Holes
Start by cleaning the holes of any loose debris. Use a putty knife to apply spackling paste or wall filler. Press the filler firmly into the hole to fill it completely. Smooth the surface with the knife and remove any excess. Let the filler dry fully before moving on.
Sanding And Smoothing
Once the filler is dry, sand the area gently. Use fine-grit sandpaper for a smooth finish. Sand until the patch blends with the wall surface. Wipe away dust with a damp cloth. Check the wall for any uneven spots and sand again if needed.
Painting And Finishing
Choose paint that matches your wall color. Apply a thin coat over the repaired area using a brush or roller. Allow the paint to dry, then add a second coat if necessary. Blend the edges carefully to avoid visible lines. Your wall will look as good as new.
Tips To Avoid Wall Damage
Removing Closetmaid wall anchors can damage your wall if done carelessly. Protecting your wall saves time and money on repairs. Follow these tips to keep your wall smooth and clean after removal.
Using The Right Tools
Choose tools that fit the anchor size. A screwdriver or pliers often work best. Avoid large tools that might widen the hole. Proper tools help remove anchors without extra force.
Applying Gentle Pressure
Press gently while pulling or turning the anchor. Too much force can break the wall surface. Gentle pressure helps loosen the anchor safely. Keep control to avoid sudden slips.
Working Slowly And Carefully
Take your time during removal. Slow movements reduce the risk of wall damage. Watch the anchor and adjust your method if needed. Careful work means a cleaner wall after removal.

Credit: www.youtube.com
Frequently Asked Questions
What Tools Are Needed To Remove Closetmaid Wall Anchors?
You need a screwdriver, pliers, and a utility knife. These tools help loosen and pull out the anchor safely. Using the right tools prevents wall damage and makes the process easier and faster.
Can Closetmaid Wall Anchors Damage Drywall?
Yes, improper removal can damage drywall. Removing anchors carefully reduces the risk of holes or cracks. Patch any small holes with spackle for a smooth finish.
How To Remove Closetmaid Anchors Without Wall Damage?
Loosen the anchor gently with a screwdriver. Use pliers to pull it straight out. Avoid twisting or forcing to prevent drywall damage. Patch holes afterward if needed.
Are Closetmaid Anchors Reusable After Removal?
No, Closetmaid wall anchors are typically single-use. They lose their holding strength once removed. Replace them with new anchors for secure reinstallation.
Conclusion
Removing Closetmaid wall anchors can be simple and quick. Use the right tools and follow clear steps. Be gentle to avoid wall damage. Take your time and stay patient. After removal, patch any small holes for a smooth finish. This keeps your walls looking clean and neat.
With care, the job will feel easy and stress-free. Now, you can enjoy your space without those anchors. Simple steps lead to great results every time.