If you’ve ever struggled with a stuck floor jack saddle, you know how frustrating it can be. Removing it the right way saves you time, prevents damage, and keeps your tools working smoothly.
In this guide, you’ll learn simple, step-by-step methods to get that saddle off quickly and safely. Whether you’re a beginner or have some experience, these tips will make the process easier than you thought. Keep reading to master this essential skill and avoid common mistakes that could cost you more later.
Tools Needed
Removing a floor jack saddle requires the right tools. Using proper equipment makes the task easier and safer. Gather all necessary items before starting.
Essential Tools
You need a wrench set to loosen bolts on the saddle. A screwdriver helps remove any screws holding the saddle in place. Use pliers to grip and pull small parts if needed. A clean cloth is handy for wiping dirt and grease from parts. Having a flashlight helps you see in tight or dark spaces.
Safety Gear
Wear safety gloves to protect your hands from sharp edges. Safety glasses shield your eyes from dust and debris. Closed-toe shoes keep your feet safe from heavy parts. Dress in clothes that cover your skin to avoid scrapes. Always keep a first aid kit nearby for small accidents.
Preparing The Jack
Preparing the jack is the first step to safely remove a floor jack saddle. This process helps avoid accidents and damage. You must handle the jack carefully before removing the saddle. Follow clear steps to get the jack ready and keep the vehicle safe.
Lowering The Jack
Start by turning the release valve slowly. This lowers the jack gently. Do not rush this step. Let the saddle come down until it no longer touches the vehicle. Make sure the jack is fully lowered before you move on. This prevents pressure on the saddle and avoids injury.
Securing The Vehicle
Place wheel chocks on the tires opposite the lifted side. This stops the vehicle from rolling. Engage the parking brake firmly. Double-check the vehicle is stable before removing the saddle. Safety is important to prevent accidents during the process.
Locating The Saddle
Locating the floor jack saddle is the first step in removing it safely. The saddle is the part that supports the vehicle during lifting. Knowing where it is helps you handle the jack correctly and avoid damage. This section explains how to find the saddle easily and understand its features.
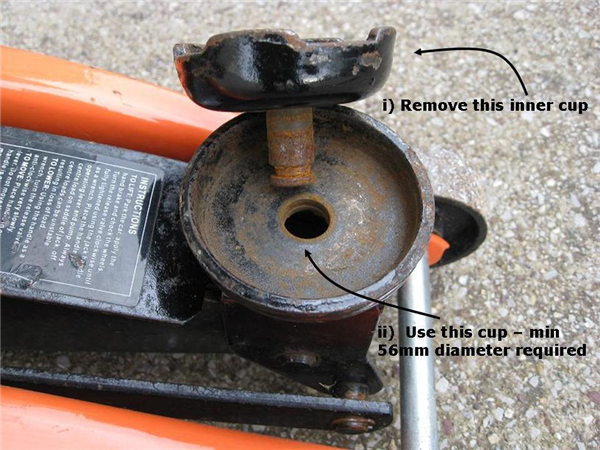
Identifying The Saddle Type
Floor jack saddles come in different shapes and sizes. Some are round with a textured surface. Others have a flat or grooved design. The saddle usually sits at the top of the jack’s lifting arm. It may have rubber or metal padding to protect the vehicle. Look for a part that holds the car’s weight directly.
Common Saddle Attachments
Saddles can attach to the jack in several ways. Some use bolts that you can unscrew. Others have clips or pins that hold the saddle in place. Some saddles slide on or snap off easily. Check the edges of the saddle for any fasteners. This helps you know what tools you need to remove it.

Credit: www.youtube.com
Detaching The Saddle
Detaching the saddle from a floor jack is a key step in maintenance or repair. This part holds the load and needs careful removal. Doing it right ensures the jack works safely and lasts longer.
Follow these steps to detach the saddle easily and safely. Use proper tools and work on a stable surface.
Loosening Bolts And Screws
Start by locating the bolts or screws that hold the saddle. Use a wrench or screwdriver that fits well. Turn the bolts counterclockwise to loosen them. Apply steady force to avoid stripping the heads. Keep the bolts safe for reassembly later.
Removing Clips Or Pins
Check for any clips or pins securing the saddle. Use pliers or a small flat tool to pull them out. Some pins may need tapping with a hammer gently. Remove all clips or pins carefully to free the saddle. Set them aside for reuse or replacement.
Cleaning And Inspecting
Cleaning and inspecting the floor jack saddle is an important step. It helps keep the jack safe and working well. Dirt and damage can cause problems. Taking time to clean and check the saddle makes sure it stays strong and lasts longer.
Removing Dirt And Debris
Start by wiping off loose dirt with a dry cloth. Use a brush to remove stuck debris. Clean all corners and edges carefully. For tough grime, use a damp cloth with mild soap. Avoid soaking the saddle to prevent rust. Dry the saddle completely before moving on.
Checking For Damage
Look closely for cracks, bends, or rust spots. Check the saddle’s surface for worn or weak areas. Test for any loose parts or unusual movement. Damaged saddles can slip or break during use. Replace the saddle if you find serious damage. Keep your floor jack safe by inspecting regularly.
Credit: sanskardhammumbai.com
Reassembling Or Replacing
After removing the floor jack saddle, you need to decide the next step. You can either install a new saddle or reattach the original one. Both options require careful attention to ensure safety and proper function. Follow the right steps to complete the job smoothly.
Installing A New Saddle
Start by selecting a saddle that fits your floor jack model. Check the size and shape to avoid any mismatch. Place the new saddle carefully on the jack’s lifting arm. Align the holes or slots where the saddle will attach. Use the correct bolts or pins to secure it firmly. Tighten all fasteners but avoid over-tightening. Test the saddle by lifting a small load. Make sure it sits stable and does not slip. Replace any worn parts if needed before use.
Reattaching The Original Saddle
Clean the original saddle and the jack’s mounting area. Remove any dirt, rust, or grease. Check the saddle for damage or wear. If it looks good, place it back on the jack. Align the mounting points carefully. Insert the bolts or pins and tighten them securely. Check the saddle’s movement and stability. Adjust if it feels loose or wobbly. Test the jack by lifting a light load. Ensure everything works smoothly before heavy use.
Safety Tips
Always ensure the floor jack is fully lowered before removing the saddle. Use gloves to protect your hands from sharp edges and dirt. Keep the area clear to avoid tripping or accidents during the process.
Avoiding Common Mistakes
Removing a floor jack saddle requires care. Avoid rushing the process. Always check that the vehicle is stable before starting. Never work under a vehicle supported only by a jack. Use jack stands to secure the load. Be sure the jack handle is in the down position before detaching the saddle. This prevents sudden drops. Keep hands and fingers clear of pinch points. Double-check the saddle is completely lowered before removal.
Proper Jack Storage
Store the floor jack in a clean, dry place. Dirt and moisture can damage the jack. Clean the saddle and jack after each use. Lubricate moving parts to prevent rust. Keep the jack handle in the lowered position to avoid pressure on internal parts. Store the jack on a flat surface to maintain its shape. Regular maintenance extends the jack’s life and keeps it safe to use.

Credit: www.youtube.com
Frequently Asked Questions
How Do You Safely Remove A Floor Jack Saddle?
First, ensure the jack is lowered fully. Then, release any locking mechanisms. Gently pull or unscrew the saddle from the jack arm. Always follow the manufacturer’s instructions to avoid damage or injury.
What Tools Are Needed To Remove A Floor Jack Saddle?
Typically, you need basic tools like a wrench or screwdriver. Some jacks may require specific tools mentioned in the manual. Having gloves helps for a better grip and safety during removal.
Can I Replace A Damaged Floor Jack Saddle Myself?
Yes, replacing a damaged saddle is usually straightforward. Remove the old saddle carefully and install the new one securely. Always check compatibility with your floor jack model before purchasing a replacement.
Why Would I Need To Remove The Floor Jack Saddle?
Removing the saddle is necessary for cleaning, maintenance, or replacing a worn or damaged part. It also helps when adjusting the jack for different lifting needs or troubleshooting issues.
Conclusion
Removing a floor jack saddle is easier than it seems. Follow the steps carefully for safe and smooth removal. Take your time and use the right tools. Keep the jack stable and avoid rushing the process. Regular maintenance helps your jack last longer.
Now, you can handle this task with confidence. Stay safe and keep your tools in good shape. Simple steps lead to great results.