Are you ready to upgrade your home security without calling a locksmith? Installing a Kwikset Smart Key Deadbolt is easier than you might think.
With just a few simple steps, you can have a strong, reliable lock that you control. Imagine the peace of mind knowing your door is secure and you can rekey it yourself anytime. Keep reading, and you’ll learn exactly how to install your new deadbolt quickly and confidently—no special tools or skills needed.
Let’s get started!

Credit: www.homedepot.com
Tools And Materials Needed
Installing a Kwikset Smart Key Deadbolt requires some basic tools and materials. Having everything ready makes the process smooth and quick. This section lists the essential tools and the Kwikset Smart Key components you need.
Essential Tools
- Phillips screwdriver
- Flathead screwdriver
- Drill with drill bits
- Tape measure
- Pencil for marking
- Chisel (optional, for door adjustments)
- Hammer (optional, for chisel work)
These tools help you remove the old lock and install the new deadbolt securely. A drill is important for making new holes or enlarging existing ones. Measuring tape and pencil ensure accurate placement.
Kwikset Smart Key Components
- Exterior deadbolt assembly
- Interior thumbturn assembly
- Latch mechanism
- Strike plate
- Screws for mounting
- Smart Key tool for rekeying
- Installation instructions
These parts come with the Kwikset Smart Key Deadbolt kit. Each component fits together to lock your door safely. The Smart Key tool lets you rekey the lock without removing it.
Preparing The Door
Preparing the door is the first step to install a Kwikset Smart Key Deadbolt. This step ensures the new lock fits well and works smoothly. Proper preparation avoids problems during installation. Follow these simple tasks to get the door ready.
Remove Existing Deadbolt
Start by removing the old deadbolt from the door. Use a screwdriver to take out the screws on the inside plate. Pull off the thumb turn and the exterior lock parts gently. Remove the latch from the door edge by unscrewing it. Keep the screws; you might need them later.
Check Door And Frame Alignment
After removing the old deadbolt, check if the door and frame line up well. Close the door slowly to see if the latch fits into the strike plate easily. Look for any gaps or misalignment. If the door does not close smoothly, adjust the strike plate or hinges. Proper alignment helps the new deadbolt lock securely and work without trouble.
Installing The New Deadbolt
Installing the new Kwikset Smart Key deadbolt is a simple process. It involves three main steps. These steps ensure your door locks securely and works smoothly. Follow each step carefully for best results.
Insert The Latch
Start by placing the latch into the door edge. Make sure the slanted side faces the door frame. Push it in until it sits flush with the door. Secure it by tightening the screws. This keeps the latch firmly in place.
Attach The Exterior Assembly
Next, take the exterior part of the lock. Align it with the latch and door holes. Insert the tailpiece through the latch mechanism. Hold the exterior assembly steady while moving to the next step.
Install The Interior Assembly
Now, position the interior part of the deadbolt. Connect it to the tailpiece from the exterior side. Fasten the screws to hold both parts together. Test the lock to ensure it turns smoothly and locks properly.
Setting The Smart Key
Setting the Smart Key on your Kwikset Smart Key Deadbolt is a key step in customizing your lock. This process allows you to change the lock’s key code without replacing the entire lock. It saves time and adds convenience when you want to use a new key.
Follow the instructions carefully to set your Smart Key. It ensures your lock works smoothly with your chosen key. The process is simple and takes just a few minutes.
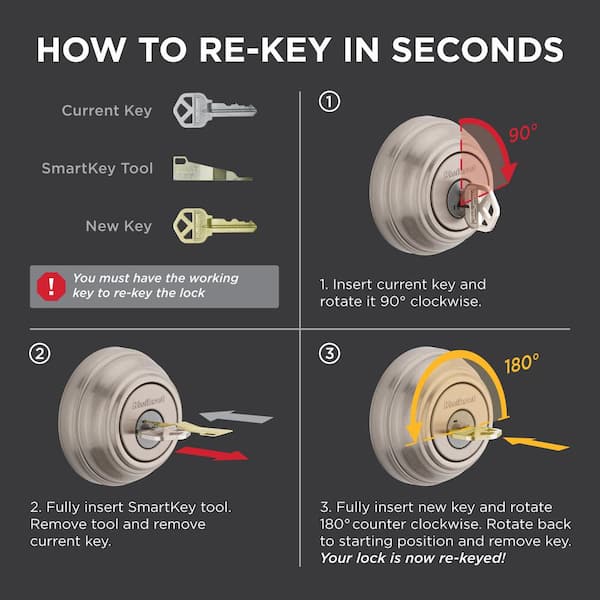
Rekeying Process
Start by inserting your current key into the lock. Turn the key 90 degrees clockwise and keep it in that position. Press the Smart Key tool into the hole above the keyhole. Hold it for a few seconds until it clicks.
Remove the original key and Smart Key tool. Insert your new key and turn it 90 degrees counterclockwise. Remove the new key, and the lock is now rekeyed.
Testing The Lock Functionality
Insert your new key into the lock. Turn it fully to check if it unlocks and locks smoothly. Test the lock several times to confirm it works well. If it sticks or doesn’t turn, repeat the rekeying process carefully.
Make sure the deadbolt extends and retracts without force. A well-set Smart Key ensures your home stays secure and easy to access.
Troubleshooting Tips
Troubleshooting your Kwikset Smart Key Deadbolt can save time and stress. Small problems can stop your lock from working right. Knowing common issues helps fix them fast. Some fixes are easy, but others need expert care.
Common Installation Issues
The deadbolt might not fit the door hole correctly. Check if the lock is aligned with the strike plate. Screws that are too tight or loose can cause problems. The key may not turn smoothly if the lock is not level. Battery issues can stop electronic functions. Always use fresh batteries and insert them properly. If the lock jams, clean the latch and keyhole gently.
When To Seek Professional Help
Call a locksmith if the deadbolt still won’t work. Professionals handle complex problems safely and quickly. Don’t force parts that seem stuck. Wrong attempts can damage the lock or door. A technician can also check if the door frame is strong enough. Choose help when you feel unsure or if the lock is new and under warranty.
Credit: www.homedepot.com

Credit: www.youtube.com
Frequently Asked Questions
How Do I Install A Kwikset Smart Key Deadbolt?
To install a Kwikset Smart Key Deadbolt, first remove the old lock. Align the new deadbolt with the door holes. Secure it with screws and test the lock. Follow the included instructions carefully for best results.
Can I Install Kwikset Smart Key Without A Professional?
Yes, Kwikset Smart Key Deadbolts are designed for DIY installation. Basic tools like a screwdriver are needed. The process is straightforward, with clear instructions included. Many users install it successfully without professional help.
What Tools Are Needed For Kwikset Smart Key Installation?
You will need a Phillips screwdriver, a tape measure, and possibly a drill. These tools help remove the old lock and secure the new deadbolt. Having these tools ready makes installation faster and easier.
How Long Does It Take To Install This Deadbolt?
Installation typically takes about 15 to 30 minutes. Time varies based on your experience and door type. Following the instructions step-by-step speeds up the process.
Conclusion
Installing a Kwikset Smart Key Deadbolt is simple and quick. Follow the steps carefully for a secure fit. You can improve home safety with this easy upgrade. No special tools or skills are needed. Take your time and double-check each step.
Enjoy the peace of mind a smart lock provides. Keep your keys safe and your home protected. This small change makes a big difference in security.