Are you tired of struggling with weak wall anchors that just won’t hold your heavy shelves or decorations? Installing Toggler wall anchors can be the game-changer you need to secure your items firmly and safely.
In this guide, you’ll learn simple, step-by-step instructions to install these powerful anchors like a pro—no special tools or skills required. Keep reading, and you’ll soon have the confidence to tackle any hanging project with ease and peace of mind.
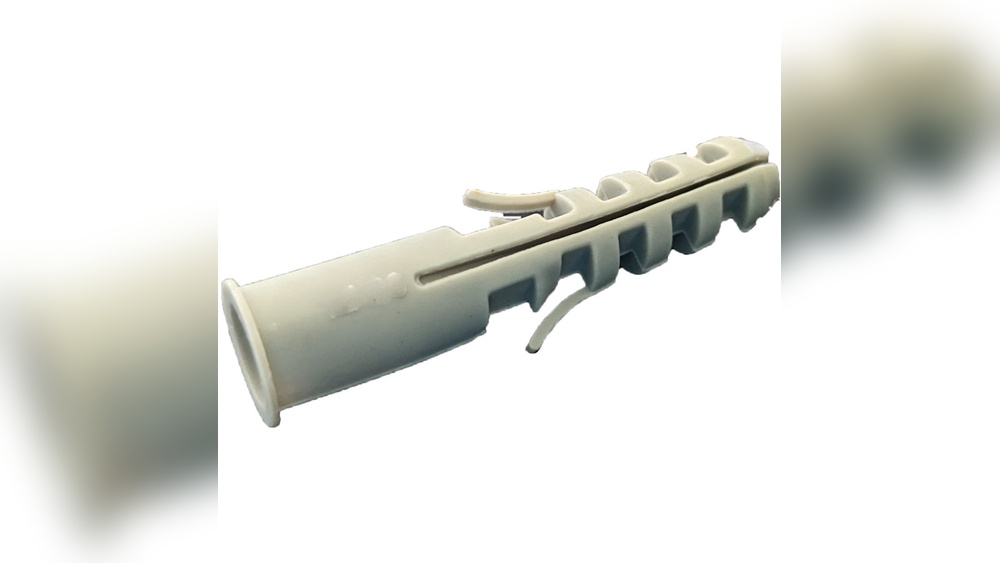
Choosing The Right Toggler Anchors
Choosing the right toggler anchors is key for a secure hold. Different projects need different types of anchors. Knowing which anchor fits your wall and weight needs saves time and effort. This guide helps you pick the best toggler anchors for your job.
Types Of Toggler Anchors
Toggler anchors come in various styles. Some have wings that open behind the wall for strong support. Others use a spring mechanism for easy installation. Plastic and metal togglers are common. Each type suits different wall thicknesses and materials.
Weight Capacity Considerations
Check the weight the toggler anchor can hold. Light anchors work for small items like picture frames. Heavy anchors support shelves or cabinets. Always pick anchors with a higher weight rating than your item’s weight. Safety matters.
Matching Anchors To Wall Material
Walls vary: drywall, plaster, concrete, or brick. Drywall needs anchors that spread weight wide. Concrete and brick require strong, metal togglers. Using the wrong anchor weakens the hold. Choose togglers designed for your wall type.
Credit: www.do-it-yourself-help.com
Tools And Materials Needed
Preparing the right tools and materials makes installing toggler wall anchors easier. Having everything ready saves time and avoids frustration. Below is a list of must-have items and some extras that help the job.
Essential Tools
- Drill with a drill bit matching anchor size
- Screwdriver or a drill driver
- Measuring tape for precise placement
- Level to keep anchors straight
- Pencil to mark drill spots
- Toggler wall anchors and compatible screws
Optional Accessories
- Stud finder for extra support
- Vacuum or brush to clean drill dust
- Protective goggles for safety
- Work gloves to protect hands
Preparing The Wall
Preparing the wall is the first step before installing toggler wall anchors. It ensures a secure hold and avoids damage. Proper preparation makes the installation process smooth and safe.
Locating The Studs
Studs are vertical wooden or metal supports inside the wall. They provide strong support for heavy items. Use a stud finder to locate these studs accurately. Move the stud finder slowly across the wall surface. Mark the edges of each stud with a pencil. Avoid drilling directly on a stud for toggler anchors. Toggler anchors work best in drywall areas without studs.
Marking Drill Points
Measure the exact spots where you want to install the anchors. Use a pencil to mark these drill points clearly. Double-check the marks to ensure they are level and spaced correctly. Use a level tool for straight alignment. Drill points must be clean and visible before starting the drilling process. Proper marking prevents mistakes and makes installation easier.

Credit: www.lowes.com
Drilling The Hole
Drilling the hole is a key step in installing toggler wall anchors. It creates the perfect opening for the anchor to fit securely. The hole must be the right size and clean for the toggler to work well. A poorly drilled hole can make the anchor loose or weak. Taking time to drill correctly ensures a strong hold for your wall fixture.
Choosing The Right Drill Bit
Select a drill bit that matches the size of the toggler anchor. Check the anchor package for the recommended drill bit size. Using a bit that is too small makes the hole tight and difficult to insert the anchor. A bit that is too large causes the anchor to wobble and fail. For drywall, use a standard twist bit. For plaster or masonry, choose a masonry bit. Always use a sharp drill bit for clean cuts.
Drilling Techniques For Clean Holes
Mark the drilling spot clearly with a pencil. Hold the drill steady and start at low speed. Drill straight into the wall to avoid angled holes. Pause occasionally to clear dust from the hole. Avoid pushing too hard to prevent wall damage. Drill until the hole depth matches the anchor length. Clean the hole with a brush or air blower before inserting the toggler.
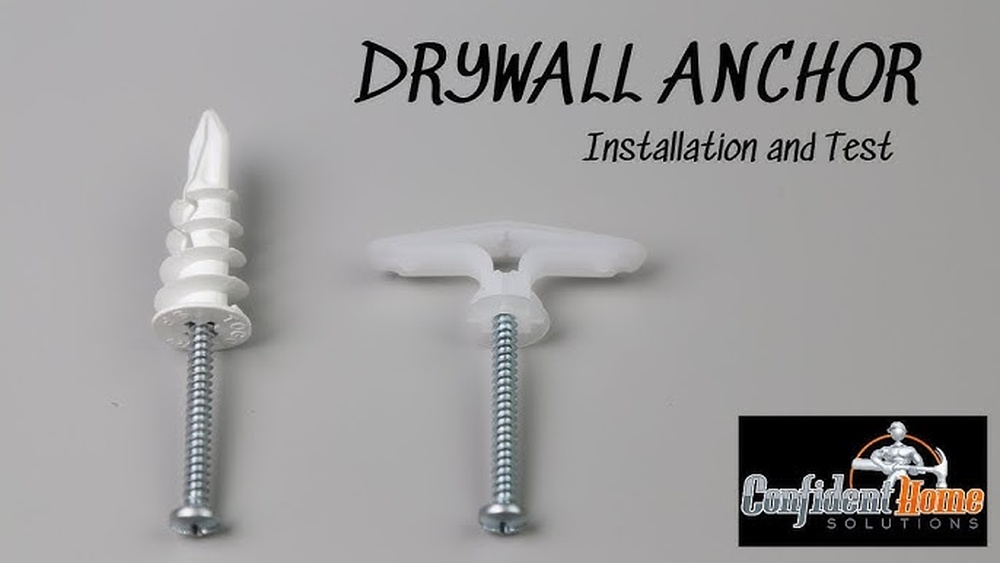
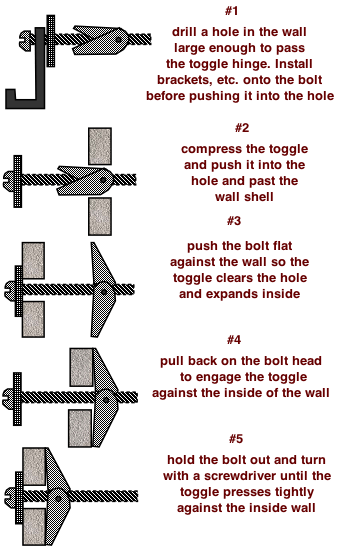
Installing The Toggler Anchor
Installing the Toggler anchor is a simple process that ensures strong support for your wall hangings. This type of anchor is perfect for drywall and hollow walls. It spreads the load behind the wall for better grip. Follow these easy steps to install it correctly.
Inserting The Anchor
First, drill a hole in the wall using the size recommended on the Toggler package. Make sure the hole is clean and free of dust. Take the Toggler anchor and fold its wings to fit inside the hole. Push the anchor gently into the hole until the wings disappear inside the wall cavity.
Securing The Anchor In Place
Next, pull the anchor slightly out to let the wings expand fully behind the wall. Tighten the screw or bolt slowly. This action locks the wings in place, securing the anchor firmly. Avoid over-tightening to prevent damage to the wall or anchor. The anchor is now ready to hold your fixture safely.

Credit: www.amazon.com
Mounting Your Fixture
Mounting your fixture with toggler wall anchors creates a strong hold in drywall. This step ensures your item stays secure and safe on the wall. Follow clear steps to align and tighten for best results.
Aligning The Fixture
Hold the fixture up to the wall over the toggler anchors. Match the holes on the fixture with the anchors. Check that it sits flat and straight. Adjust the position slightly if needed. Proper alignment prevents damage and keeps the fixture stable.
Tightening The Screws
Insert screws through the fixture holes into the toggler anchors. Turn the screws slowly using a screwdriver. Tighten until the fixture feels firm and does not move. Avoid overtightening, which can damage the wall or anchor. Secure screws keep the fixture in place for long-term use.
Testing The Installation
Testing the installation of toggler wall anchors is a key step to ensure safety and durability. This process confirms that the anchors hold firmly and can support the weight intended. Take your time with this step. Proper testing prevents future damage and saves effort later.
Checking Stability
Start by gently pulling on the mounted item. Use light force at first. Check for any movement or wobbling. The anchor should feel solid with no shift. If it moves, the installation needs review. Push and pull lightly in different directions. This tests how well the anchor grips inside the wall. A steady hold means the anchor is secure.
Troubleshooting Common Issues
If the anchor feels loose, try these fixes. First, remove the anchor carefully. Check if the hole is too big. Use a larger anchor size for bigger holes. If the wall material is soft, use special anchors made for it. Make sure the anchor is fully expanded inside the wall. Sometimes, tapping the anchor gently helps it set better. Repeat the stability check after adjustments. A firm hold means success.
Safety Tips And Best Practices
Installing toggler wall anchors requires care and attention. Following safety tips and best practices ensures a strong hold and protects your walls. It also keeps you safe during installation. Learn how to avoid damage and keep anchor strength.
Avoiding Wall Damage
Mark the spot clearly before drilling. Use a drill bit size that fits the anchor. Drill slowly to avoid cracks or holes that are too big. Never force the anchor if it feels stuck. Check for wires or pipes behind the wall before drilling. Use a stud finder or scanner to avoid hitting them. Keep the wall clean of dust and debris for a secure fit.
Maintaining Anchor Strength
Choose the right anchor size for your load. Tighten screws carefully; do not overtighten. Overtightening can weaken the anchor or wall. Use anchors designed for the wall type—drywall, plaster, or concrete. Test the anchor by gently pulling after installation. Replace any anchors that show signs of wear or damage. Regularly check anchors in heavy-use areas to keep them strong.
Frequently Asked Questions
What Tools Are Needed To Install Toggler Wall Anchors?
You need a drill, drill bit, screwdriver, and the toggler wall anchors. These tools help create holes and secure anchors properly.
How Do Toggler Wall Anchors Support Heavy Loads?
Toggler anchors expand behind the wall, distributing weight evenly. This design allows them to hold heavier items securely compared to regular anchors.
Can Toggler Wall Anchors Be Used On Drywall?
Yes, toggler anchors work well on drywall. They provide strong support by spreading load across a larger area inside the wall.
How Deep Should I Drill For Toggler Wall Anchors?
Drill a hole slightly larger than the anchor’s diameter. This ensures the toggler fits and functions correctly behind the wall.
Conclusion
Toggler wall anchors provide strong support for your projects. You can install them quickly with the right steps. Drill a hole, insert the anchor, and tighten the screw carefully. These anchors hold heavy items firmly on drywall. Using them correctly prevents damage and keeps your walls safe.
Practice once or twice to build confidence. Soon, hanging shelves or pictures will feel easy. Trust the process and enjoy sturdy results every time.