Are you ready to upgrade your home security with a Brinks Digital Deadbolt but unsure where to start? Installing this smart lock might seem tricky, but with the right steps, you can do it yourself quickly and confidently.
In this guide, you’ll find simple instructions that break down the process, so you avoid common mistakes and get your new lock working perfectly. Keep reading to discover how easy it can be to boost your home’s safety and enjoy keyless convenience every day.

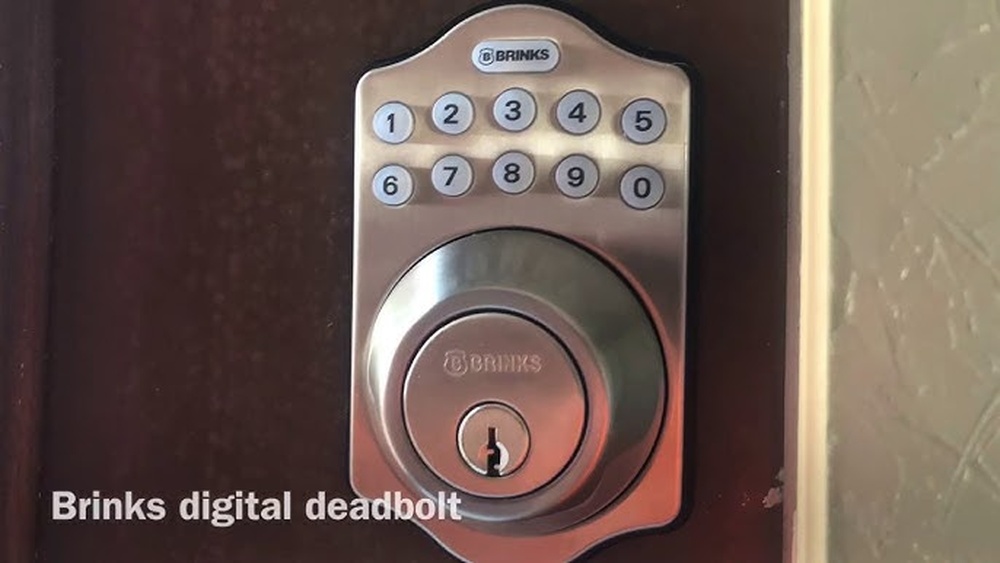
Credit: brinkslocks.com
Choosing The Right Brinks Deadbolt
Choosing the right Brinks digital deadbolt is important for your home security. The right model fits your needs and door perfectly. It also offers features that match your lifestyle. Understanding the options helps you make a good choice.
Types Of Brinks Digital Deadbolts
Brinks offers several types of digital deadbolts. Some use keypads for code entry. Others combine keypad and key for extra security. You can find models with fingerprint scanners. Each type has benefits depending on your security needs.
Key Features To Consider
Look for features like easy installation and battery life. Some deadbolts have auto-locking functions. Others include remote control via smartphone apps. Check if the model has backup keys. These features add convenience and safety.
Compatibility With Your Door
Measure your door thickness before choosing a deadbolt. Most Brinks deadbolts fit standard doors. Some models work better with metal or wooden doors. Check the door’s edge for space to install the lock. Proper fit ensures better security and performance.

Credit: www.youtube.com
Tools And Materials Needed
Installing a Brinks digital deadbolt requires specific tools and materials. Having everything ready makes the process smooth and fast. This section lists the essential tools and extra supplies you might need.
Essential Tools List
- Screwdriver (Phillips and flathead)
- Power drill with drill bits
- Measuring tape
- Pencil or marker
- Level
- Chisel
- Hammer
Additional Supplies
- Extra screws (in case some get lost or stripped)
- Battery (usually AA or AAA for the lock)
- Masking tape (to mark drill points)
- Wood filler (for fixing old holes)
- Safety glasses
Preparing Your Door
Preparing your door is the first step in installing the Brinks Digital Deadbolt. This step ensures the lock fits perfectly and works smoothly. Careful preparation saves time and avoids mistakes during installation.
Removing Old Deadbolt
Start by removing the old deadbolt from your door. Use a screwdriver to take out the screws on the inside part of the lock. Pull out the deadbolt and latch carefully. Keep the screws for later use or replacement.
Measuring And Marking
Measure the door thickness and backset to match the new lock. Use a tape measure for accuracy. Mark the spots for the new holes with a pencil. Double-check your marks before drilling.
Drilling Holes
Drill holes where you marked on the door. Choose the correct drill bit size based on the instructions. Drill slowly to avoid splintering the wood. Clean any dust or debris after drilling.
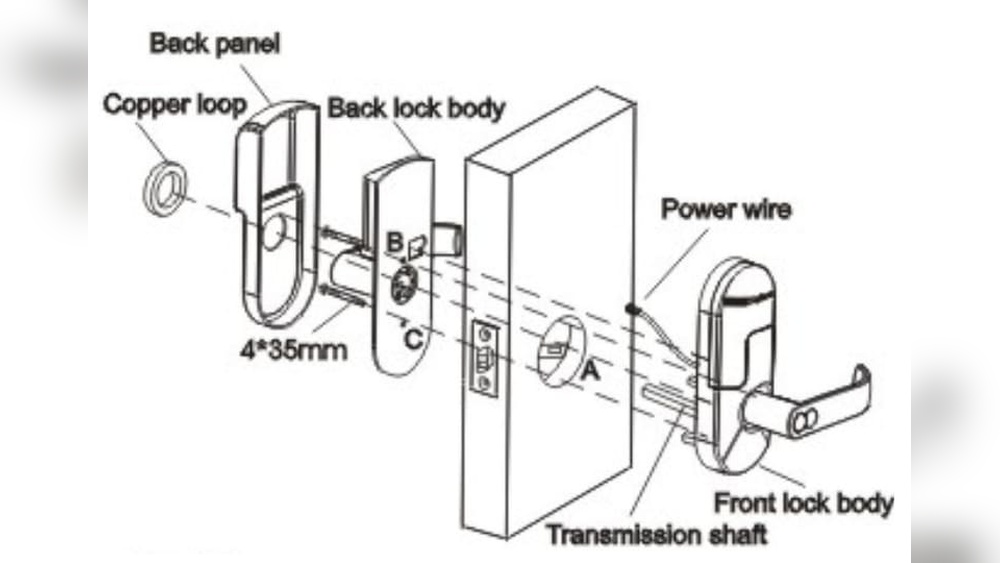
Installing The Deadbolt Components
Installing the deadbolt components is the key step in securing your door with the Brinks Digital Deadbolt. Follow each part carefully to ensure a strong, working lock. The process involves mounting the exterior assembly, attaching the interior assembly, and securing the deadbolt in place.
Mounting The Exterior Assembly
Start by placing the exterior assembly on the outside of your door. Align it with the pre-drilled holes. Make sure the keypad faces outward. Insert the tailpiece through the latch hole. Hold it steady and prepare for the next step.
Attaching The Interior Assembly
On the inside of the door, line up the interior assembly with the tailpiece. Connect the wiring harness carefully between both assemblies. Secure the interior plate with screws. Check that everything fits tight and does not move.
Securing The Deadbolt
Finally, tighten all screws on both sides. Test the deadbolt by turning the thumbturn. The bolt should slide smoothly into the door frame. Make sure the lock responds to the keypad. Your digital deadbolt is now installed and ready to use.
Setting Up The Digital Features
Setting up the digital features of your Brinks Digital Deadbolt makes your home more secure and convenient. This step lets you control access without using traditional keys. You can easily manage who enters your home and monitor the lock’s activity.
The process includes programming the keypad, adding user codes, and connecting the lock to smart devices. Each feature works together to give you full control of your lock.
Programming The Keypad
Start by activating the keypad. Press the programming button inside the lock. Enter a master code to secure your lock settings. Follow the instructions in the manual to complete this step. The keypad is now ready for use.
Adding User Codes
Give access to family or trusted friends by adding user codes. Enter the master code on the keypad. Choose the option to add a new user code. Type in a unique code for each person. Confirm the code and save it. Each user can now unlock the door with their code.
Connecting To Smart Devices
Link your Brinks lock to a smart home system. Download the official Brinks app on your phone. Follow the app’s guide to connect via Bluetooth or Wi-Fi. This allows remote control and notifications. Control the lock from anywhere using your smartphone.

Credit: www.walmart.com
Testing And Troubleshooting
After installing your Brinks Digital Deadbolt, testing and troubleshooting are key steps. These steps ensure your lock works properly and keeps your home safe. Testing helps catch any problems early. Troubleshooting guides you to fix common issues fast.
Checking Lock Functionality
Start by locking and unlocking the deadbolt several times. Use both the keypad and physical key. Check if the bolt moves smoothly without sticking. Make sure the lock responds quickly when you enter your code.
Test the battery level on the keypad display. Low battery can cause problems. Replace batteries if the display is dim or the lock acts slow. Verify the lock connects well with any smart home system.
Common Issues And Fixes
The lock not turning is a frequent issue. This often happens if the bolt is misaligned. Adjust the strike plate or reposition the lock slightly. If the keypad does not respond, check the batteries first.
Sometimes, the lock fails to register the code. Reset the lock and reprogram your code carefully. For wireless connection problems, restart your router or move the lock closer to it.
Maintenance Tips
Maintaining your Brinks Digital Deadbolt helps it work smoothly and last longer. Simple care steps keep your lock secure and reliable. Follow these easy maintenance tips to avoid problems and enjoy peace of mind.
Battery Replacement
Check the battery level regularly. Low batteries can cause lock failures. Replace batteries as soon as the low battery alert appears. Use fresh, high-quality batteries for best results. Always remove old batteries to prevent damage from leaks.
Regular Cleaning
Clean the lock’s exterior with a soft cloth. Avoid harsh chemicals that can damage the finish. Keep the keypad free from dirt and dust. Clean the keyhole gently to prevent jams. Regular cleaning helps maintain smooth operation.
Software Updates
Check for firmware updates often. Updates fix bugs and add new features. Use the Brinks app to download updates easily. Keep your lock connected to Wi-Fi for faster updates. Staying updated ensures your lock stays secure and efficient.
Frequently Asked Questions
How Do I Prepare For Brinks Digital Deadbolt Installation?
First, gather all tools and parts. Read the manual carefully. Remove the old lock and clean the door surface for easy installation.
What Are The Basic Steps To Install Brinks Digital Deadbolt?
Align the deadbolt with the door holes. Secure it with screws. Connect the keypad and battery. Test the lock operation before finalizing.
Can I Install Brinks Digital Deadbolt Without Professional Help?
Yes, the lock is designed for easy DIY installation. Follow the instruction manual carefully and use basic tools. Watch tutorial videos if needed.
How Do I Program The Brinks Digital Deadbolt After Installation?
Enter programming mode using the master code. Follow prompts to add or delete user codes. Test each code to ensure proper function.
Conclusion
Installing the Brinks Digital Deadbolt is simple and quick. Follow each step carefully and take your time. Check all parts before starting to avoid mistakes. Test the lock after installation to ensure it works well. This lock adds safety and convenience to any door.
Enjoy the peace of mind from a secure home. Keep the manual handy for future reference or troubleshooting. This guide helps you complete the job with confidence. Your door is now stronger and smarter.