Are you struggling to hang heavy items on your hollow walls without worrying about them falling? Installing hollow wall drive anchors is the solution you need.
These anchors provide strong support and make sure your shelves, mirrors, or decorations stay securely in place. In this guide, you’ll learn simple, step-by-step instructions to install hollow wall drive anchors quickly and correctly. By the end, you’ll have the confidence to tackle your wall projects like a pro.
Keep reading to discover how easy it is to get the job done right!

Credit: www.youtube.com
Choosing The Right Anchor
Choosing the right hollow wall anchor is important for a secure hold. The anchor must fit the wall type and the weight of the object. Picking the wrong anchor can cause damage or failure.
Understanding the types, materials, and tools needed helps make the right choice easier. This guide covers what you need to know before installation.
Types Of Hollow Wall Anchors
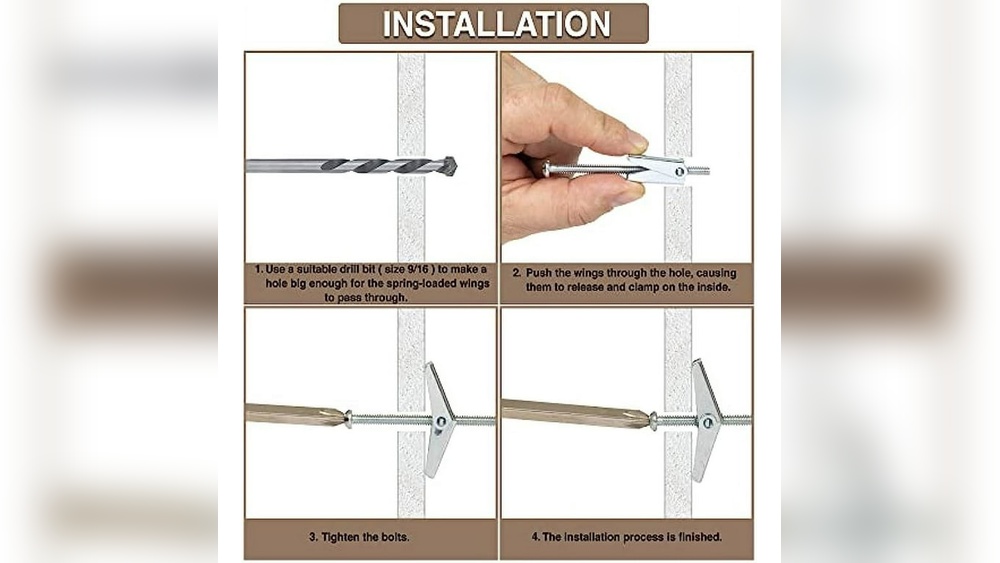
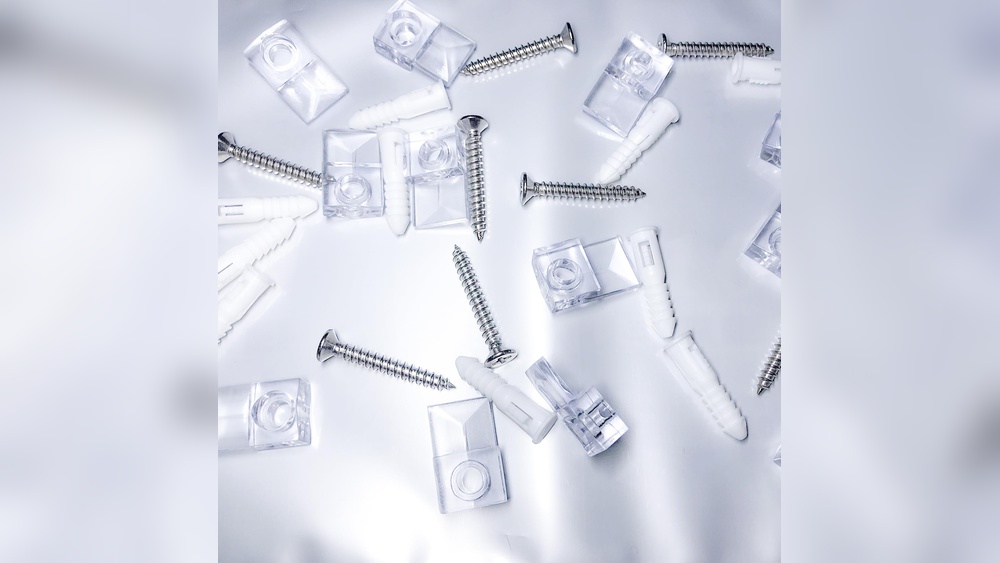
There are several types of hollow wall anchors. Toggle bolts use a spring-loaded wing to grip behind the wall. Molly bolts expand inside the wall for a strong hold. Plastic anchors are simple and best for light loads. Each type suits different wall materials and weight needs.
Materials And Load Capacity
Anchors come in metal or plastic. Metal anchors hold heavier items and last longer. Plastic anchors work well for light objects. Check the load capacity on the packaging. Choose an anchor that supports more than the object’s weight. This ensures safety and durability.
Tools Needed
You need a drill and the correct drill bit size. A screwdriver or a wrench helps tighten the anchor. A measuring tape and pencil mark the drill spots. Having the right tools makes the installation smooth and precise.
Preparing The Wall
Preparing the wall is a key step before installing hollow wall drive anchors. It ensures the anchors hold firmly and the installation goes smoothly. Proper preparation avoids damage and unsafe mounting.
Locating The Studs
Find the studs behind the wall first. Studs give strong support for heavy items. Use a stud finder tool for accuracy. Move it slowly across the wall surface. Mark the edges of each stud.
Knowing stud locations helps place anchors in hollow areas. Anchors work best away from studs. This keeps the wall stable and prevents cracking.
Marking The Drill Points
Mark exact drill points before drilling. Use a pencil to make small dots. Measure carefully to keep the marks level. This prevents crooked holes and uneven mounting.
Check measurements twice. Consistent spacing between holes ensures a neat finish. Clear marks save time and reduce mistakes.
Checking For Obstructions
Look for pipes, wires, or other hidden obstacles. These can cause damage if drilled into. Use a multi-purpose detector to scan the wall.
Move the tool slowly across marked points. If you detect obstructions, adjust the drill position. Safe drilling avoids costly repairs and hazards.
Drilling The Hole
Drilling the hole is the first and most important step when installing hollow wall drive anchors. The hole must be the right size and clean for the anchor to hold firmly. Taking your time here will make sure your anchor stays strong and safe.
Selecting The Drill Bit Size
Choose a drill bit that matches the anchor size exactly. Too small, and the anchor won’t fit. Too big, and the anchor will be loose. Check the anchor package for the recommended drill bit size. Using the correct size ensures a tight and secure fit.
Drilling Techniques
Mark the spot where you want the anchor. Hold the drill steady and start drilling slowly. Drill straight into the wall to avoid angled holes. Push gently but firmly, so the drill bit cuts cleanly. Stop once you reach the right depth for the anchor.
Cleaning The Hole
Clear out dust and debris from the hole. Use a vacuum or blow air inside to remove loose particles. A clean hole helps the anchor grip the wall better. Avoid leaving any dirt that can weaken the anchor hold.
Installing The Anchor
Installing hollow wall drive anchors is a simple process. These anchors hold items securely on drywall or hollow walls. Follow clear steps to ensure the anchor fits right and holds firm. Proper installation prevents damage and keeps your fixtures steady.
Inserting The Anchor
Start by drilling a hole in the wall. The hole size should match the anchor’s diameter. Gently push the anchor into the hole. Use your fingers or a hammer to tap it in. The anchor must sit flush with the wall surface. Avoid forcing it too deep or leaving it sticking out.
Setting The Anchor Properly
Use a screwdriver to drive the screw into the anchor. This expands the anchor behind the wall. Stop turning when the anchor feels tight. Do not overtighten, or the anchor may break. The screw should hold firmly without wobbling.
Testing The Anchor
Pull gently on the fixture to check strength. The anchor should not move or loosen. If it feels weak, remove and try a new anchor. Secure anchors support shelves, hooks, and other items safely. Testing ensures your installation lasts long and stays safe.
Securing The Fixture
Securing the fixture to hollow wall drive anchors is a key step. It ensures your item stays firmly attached to the wall. Proper securing prevents damage and keeps your fixture safe. Follow each step carefully for the best results.
Aligning The Fixture
Place the fixture over the anchor carefully. Make sure the holes on the fixture line up with the anchor. Check that the fixture sits flat against the wall. Proper alignment helps the screw go in smoothly.
Tightening The Screw
Insert the screw into the anchor through the fixture. Turn the screw gently at first to catch the threads. Use a screwdriver to tighten it slowly. Stop tightening once the fixture feels firm and secure. Avoid over-tightening to prevent damage.
Final Checks
Check if the fixture is steady and does not move. Give it a slight pull to test the hold. Look for any gaps between the fixture and the wall. Ensure the screw head sits flush or slightly recessed. Your fixture is now properly secured to the hollow wall.

Credit: www.do-it-yourself-help.com
Troubleshooting Common Issues
Troubleshooting common issues during hollow wall drive anchor installation helps ensure a secure hold. Problems can arise, but most have simple fixes. Identifying the cause early saves time and effort. Here are solutions to typical challenges you may face.
Anchor Spins Or Loosens
An anchor that spins or loosens often means the hole is too big. The anchor cannot grip the wall properly. Remove the anchor and fill the hole with a wall repair compound. Let it dry fully. Drill a smaller hole and insert a new anchor. Tighten screws slowly to avoid spinning.
Wall Damage
Wall damage occurs when the drill bit is too large or pressure is too high. Use a drill bit size matching the anchor instructions. Drill carefully to avoid cracking or breaking the wall. Patch minor damage with spackling paste. For larger holes, use a wall repair patch before installing anchors.
Insufficient Holding Power
Insufficient holding power means the anchor cannot support the load. Check if the anchor type suits the wall material and weight. Use heavy-duty anchors for heavier items. Make sure the anchor expands fully behind the wall. Tighten screws firmly but avoid over-tightening, which weakens the hold.
Safety Tips
Safety is the top priority when installing hollow wall drive anchors. Following basic safety rules helps prevent injuries and mistakes. Simple safety steps protect your hands, eyes, and body. They also keep your work area safe and organized.
Using Protective Gear
Wear safety glasses to shield your eyes from dust and debris. Use gloves to protect your hands from sharp tools and rough materials. A dust mask helps avoid breathing in fine particles. Dress in clothes that cover your arms and legs.
Handling Tools Safely
Use tools only for their intended purpose. Hold drills and screwdrivers firmly to avoid slips. Keep your work area clean to prevent tripping. Unplug power tools when changing bits or making adjustments. Store sharp tools safely when not in use.
Avoiding Electrical Hazards
Check for wires behind the wall using a detector. Turn off power to the area before drilling. Avoid drilling near electrical outlets and switches. Use insulated tools if working close to electrical sources. Stay alert to signs of hidden wires or pipes.

Credit: www.triangleophthalmology.com
Frequently Asked Questions
What Tools Are Needed To Install Hollow Wall Drive Anchors?
You need a drill, drill bit, hammer, screwdriver, and the hollow wall drive anchors. These tools help ensure a secure and precise installation. Use the right drill bit size matching the anchor diameter for best results.
How Do Hollow Wall Drive Anchors Work?
They expand behind the wall when driven in, creating a strong hold. This expansion grips the wall cavity, providing firm support for hanging objects on drywall or hollow surfaces.
Can Hollow Wall Drive Anchors Support Heavy Items?
Yes, they can support medium-weight items like shelves and pictures. However, check the anchor’s weight rating to avoid overloading and ensure safe, secure mounting.
How Do I Choose The Right Size Anchor?
Select an anchor size based on wall thickness and item weight. Use larger anchors for heavier loads and thicker walls to maximize support and stability.
Conclusion
Installing hollow wall drive anchors is simple with the right steps. Start by choosing the correct anchor size for your wall. Drill a hole carefully, then insert the anchor firmly. Tighten the screw to secure it in place. This method holds items safely on hollow walls.
Practice a few times to gain confidence. Now, you can hang shelves, pictures, or mirrors easily. These anchors provide strong support without damaging your wall. Try this technique for your next home project and see the difference it makes.