Are you looking to control two lights with just one switch? It might sound tricky, but it’s easier than you think.
Imagine turning on both lights with a single flick—no more running back and forth or installing extra switches. In this guide, you’ll discover simple steps to connect two lights to one switch safely and effectively. By the end, you’ll have the confidence to upgrade your lighting setup and make your space more convenient.
Ready to get started? Let’s dive in.
Tools And Materials Needed
Before starting to connect two lights to one switch, gather all necessary tools and materials. Having everything ready makes the job easier and safer. This list includes common items you will need for the project. Some tools help with wiring, while others ensure safety.
Basic Tools For Electrical Work
A screwdriver set is essential for removing switch plates and securing wires. Wire strippers help remove insulation without damaging the wire. Needle-nose pliers assist in bending and positioning wires. A voltage tester checks if the power is off before working. Electrical tape insulates wire connections for safety.
Materials Required For Wiring
You need electrical wire, usually 14 or 12 gauge, to connect lights and the switch. Wire connectors or wire nuts join wires safely. The switch itself can be a single-pole switch designed to handle two lights. Light fixtures with compatible sockets are also needed. A junction box may be required to house the connections.
Safety Equipment
Turn off the power at the circuit breaker before starting. Wear insulated gloves to protect against shocks. Safety glasses protect your eyes from debris. A flashlight or portable light helps when working in dark areas.
Safety Precautions
Turn off the power before starting to avoid electric shock. Use a voltage tester to check wires are not live. Follow wiring rules carefully for a safe connection.
Turn Off The Power
Always switch off the main power before starting any electrical work. This stops electric shocks and accidents. Use a voltage tester to confirm the power is off. Never rely on the switch position alone.
Wear Protective Gear
Wear rubber gloves and safety goggles to protect yourself. Gloves prevent shocks, and goggles shield your eyes from sparks. Use tools with insulated handles for extra safety.
Use Proper Tools
Use the right tools designed for electrical work. Avoid using damaged or worn-out tools. Proper tools make the job easier and safer.
Check Wiring Codes
Follow your local electrical codes and standards strictly. Incorrect wiring can cause fires or damage to devices. Make sure all connections meet safety rules.
Work In A Dry Area
Make sure the work area is dry and free of water. Wet conditions increase the risk of electric shock. Avoid working near sinks, bathrooms, or outdoors in rain.
Label Wires Correctly
Label wires before disconnecting them to avoid confusion. Proper labeling helps you reconnect wires safely and correctly. It also makes future repairs easier.
Double Check Connections
Check all wire connections twice before turning the power on. Loose or wrong connections can cause short circuits. Tighten screws firmly and ensure wires are secure.
Types Of Switches For Two Lights
Choosing the right switch is important to control two lights from one point. Different switches offer various ways to manage lighting. Understanding the types helps pick the best option for your needs.
Single-pole Switch
A single-pole switch controls two lights together. Both lights turn on or off at the same time. It has two terminals and works with one power source. This switch is simple and common in homes.
Double-pole Switch
A double-pole switch controls two lights separately. It has two sets of terminals. Each light can turn on or off independently. This switch needs a higher voltage and is useful for complex wiring.
Three-way Switch
A three-way switch controls two lights from two locations. It uses three terminals to connect with another switch. This setup is perfect for long hallways or big rooms. You can turn lights on or off from different points.

Credit: www.reddit.com
Wiring Basics
Wiring two lights to one switch requires understanding the basics of electrical wiring. This knowledge helps you work safely and get the lights working correctly. Learning about wires and circuit diagrams is the first step. These basics make the whole process easier and clearer.
Understanding Electrical Wires
Electrical wires come in different colors and types. Each color has a special job. Black or red wires carry power to the switch or light. White wires are neutral and complete the circuit. Green or bare wires are for grounding. Ground wires protect you from shocks. Knowing these colors helps you connect wires correctly.
Wires also have different thicknesses. Thicker wires carry more electricity. Choose the right wire size for your lights. Use tools like wire strippers to remove insulation carefully. Never cut too much wire or damage it. Proper wire handling keeps your setup safe and strong.
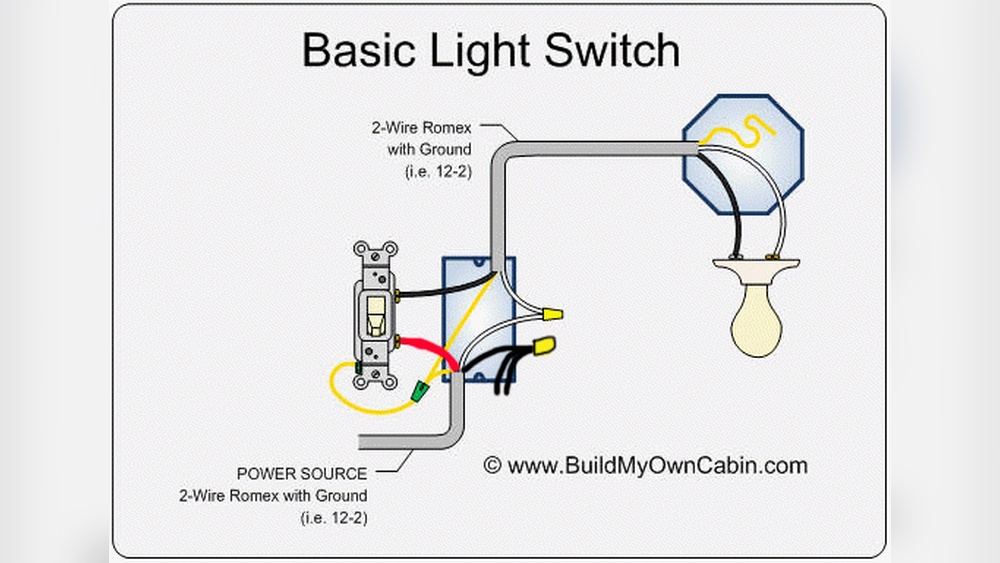
Circuit Diagrams
Circuit diagrams show how wires connect to switches and lights. They use symbols to represent parts. A switch is shown as a break in the line. Lights are shown as circles with a cross inside. These diagrams help you plan your wiring before starting work.
Look at the diagram to know where each wire goes. It shows the power source, switch, and lights. Following the diagram reduces mistakes and saves time. Keep the diagram handy during wiring for quick reference. This way, you avoid confusion and ensure a safe connection.
Step-by-step Wiring Process
Connecting two lights to one switch is a practical way to control multiple lights together. The process requires careful wiring but is easy to follow. This guide explains the step-by-step wiring process to help you do it safely and correctly.
Turn Off Power
First, switch off the power at the circuit breaker. This step stops any electric current flowing through the wires. Use a voltage tester to confirm power is off. Safety comes first in any electrical work.
Remove Existing Switch
Remove the switch cover plate with a screwdriver. Unscrew the switch from the box and pull it out gently. Take note of the wires connected to the switch. Label the wires if needed for easy reinstallation.
Connect Wires To Switch
Identify the common wire and the two wires leading to each light. Connect the common wire to the switch’s common terminal. Attach the wires from the lights to the switch terminals. Tighten the screws firmly to hold the wires.
Wire The Two Lights
Connect the neutral wires from both lights together. Join the ground wires to the switch’s ground screw or grounding wire. Ensure all wire connections are secure and properly insulated. Use wire nuts to cover exposed wire ends.
Secure Connections
Check all wire connections for tightness and safety. Push the switch back into the electrical box carefully. Screw the switch in place and reattach the cover plate. Proper securing prevents loose connections and hazards.
Test The Setup
Turn the power back on at the breaker. Flip the switch to check if both lights turn on. If the lights work correctly, the wiring is successful. If not, turn off power and recheck all connections.

Credit: diy.stackexchange.com
Troubleshooting Common Issues
Troubleshooting common issues is important when connecting two lights to one switch. Problems can happen even with simple wiring. Knowing how to find and fix these issues saves time and frustration.
Some problems are easy to spot. Others need careful checking of wires and connections. Safety is key. Always turn off power before working on electrical parts.
Check For Loose Or Wrong Connections
Loose wires often cause lights to not work properly. Make sure all wire nuts are tight. Look for wires connected to the wrong terminals. A small mistake can stop the lights from turning on.
Test The Switch Function
The switch itself might be faulty. Use a tester or multimeter to check if power flows through when flipped. Replace the switch if it does not work correctly.
Inspect The Light Fixtures
Sometimes the problem is with the light bulbs or fixtures. Check bulbs to see if they are burned out. Test the fixture by connecting it to another working switch.
Verify The Circuit Breaker
The circuit breaker might have tripped. Check your breaker box to ensure the correct breaker is on. Reset it if needed. A tripped breaker stops power to the lights.
Tips For Efficient Installation
Connecting two lights to one switch can save space and add convenience. Doing this right needs careful planning and attention. Follow these simple tips to make your installation smooth and safe.
Proper preparation and clear steps help avoid mistakes and save time. Use the right tools and understand the wiring basics before starting. This way, the job will be easier and the result will last long.
Turn Off Power Before Starting
Always switch off the main power before touching any wires. This prevents electric shocks and keeps you safe. Double-check with a tester to confirm no current flows.
Use The Correct Wire Types
Select wires that match your home’s electrical system. Use wires rated for lighting circuits and proper thickness. This ensures safe and efficient current flow.
Label Each Wire Clearly
Mark wires with tape or labels before disconnecting them. This helps you connect each wire correctly later. Clear labels avoid confusion and wiring errors.
Secure All Connections Firmly
Tighten all wire nuts and screws well. Loose connections can cause flickering lights or sparks. Make sure no bare wire is exposed outside the connectors.
Test The Setup Before Closing
Turn power back on and check if both lights work. Test the switch multiple times to confirm reliable operation. Fix any issues before finishing the installation.

Credit: www.youtube.com
Frequently Asked Questions
How Do I Wire Two Lights To One Switch Safely?
Turn off power before wiring. Connect the switch’s live wire to both light fixtures’ live wires. Use wire connectors and follow electrical codes for safety.
Can I Control Two Lights With One Switch Simultaneously?
Yes, one switch can control two lights at once. Both lights share the same live wire linked to the switch. This setup saves space and wiring.
What Tools Do I Need To Connect Two Lights To One Switch?
You need wire strippers, screwdrivers, electrical tape, wire connectors, and a voltage tester. These tools ensure safe and effective installation of two lights on one switch.
Is It Possible To Add A Dimmer Switch For Two Lights?
Yes, a dimmer switch can control two lights if compatible. Ensure the dimmer matches the light type and wattage for proper function.
Conclusion
Connecting two lights to one switch is simple with the right steps. Always turn off power before starting to stay safe. Use proper tools and follow wiring rules carefully. Double-check connections to avoid problems later. This setup can save space and make your lighting easier to control.
Take your time and work patiently. Soon, your room will have better lighting with just one switch. Enjoy the convenience and simple upgrade you created yourself.