You want your home to feel safe and secure, right? Installing a deadbolt is one of the best ways to protect your front door from unwanted visitors.
But if you’ve never done it before, the idea of drilling holes and fitting hardware might seem tricky. Don’t worry—this guide will walk you through each step clearly and simply. By the end, you’ll have a strong, reliable deadbolt installed that gives you real peace of mind.
Ready to take control of your home’s security? Let’s get started!

Credit: www.youtube.com
Choosing The Right Deadbolt
Choosing the right deadbolt is the first step to secure your home effectively. The right deadbolt fits your door, meets your security needs, and is easy to use. It also depends on your budget and style preferences. Understanding different deadbolt types and what tools you need makes installation easier.
Types Of Deadbolts
There are three main types of deadbolts: single cylinder, double cylinder, and lockable thumbturn. Single cylinder deadbolts use a key outside and a thumbturn inside. Double cylinder deadbolts require a key on both sides. Lockable thumbturn deadbolts let you lock or unlock the inside thumbturn with a key.
Considerations For Home Security
Choose a deadbolt with a strong metal bolt at least one inch long. Check if the lock has a grade rating; Grade 1 is the strongest. Consider if you want a keyless option or smart lock features. Think about the door material and frame strength to ensure a good fit.
Tools Needed For Installation
You will need a drill, screwdriver, tape measure, pencil, and chisel. A hole saw may be necessary for drilling the bolt hole. Safety glasses protect your eyes during drilling. Make sure to have all tools ready before starting the installation.
Preparing The Door
Preparing the door is the first step to install a deadbolt correctly. This step ensures the lock fits perfectly and works smoothly. Careful preparation saves time and avoids mistakes.
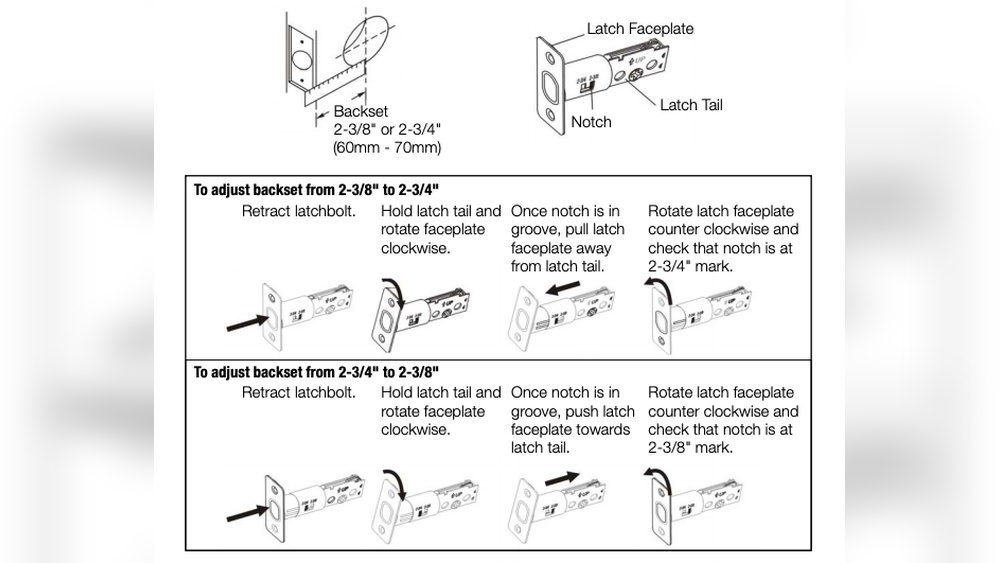
Measuring And Marking
Measure the door thickness and the backset. The backset is the distance from the edge to the center of the hole. Use a tape measure for accuracy. Mark the spots for the holes with a pencil. Check the height matches your existing lock or standard height. Precise marks guide where to drill.
Drilling Holes
Choose the right drill bit size for the deadbolt kit. Drill the main hole through the door face at the marked spot. Drill the edge hole for the latch carefully. Keep the drill straight to avoid angled holes. Clean any splinters or debris from the holes before installing parts.
Ensuring Proper Alignment
Check that holes line up perfectly. The latch should fit into the edge hole without forcing. Insert the deadbolt and test the movement. Adjust the marks if the lock parts don’t fit well. Proper alignment ensures smooth locking and unlocking.
Installing The Deadbolt
Installing the deadbolt is a key step in securing your door. This process involves fitting the internal parts, attaching the outside and inside pieces, and tightening everything with screws. Follow these steps carefully to ensure your deadbolt works smoothly and protects your home.
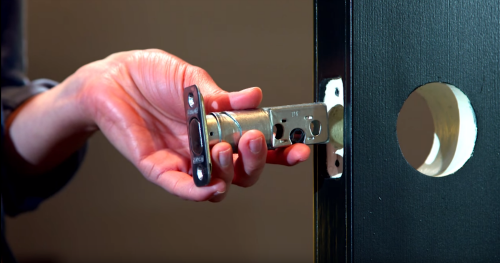
Fitting The Deadbolt Mechanism
Start by placing the deadbolt mechanism into the hole on the door’s edge. The bolt should slide in easily without forcing it. Make sure the bolt faces the right direction, usually with the angled side pointing toward the door frame. Check that the mechanism sits flush with the door edge.
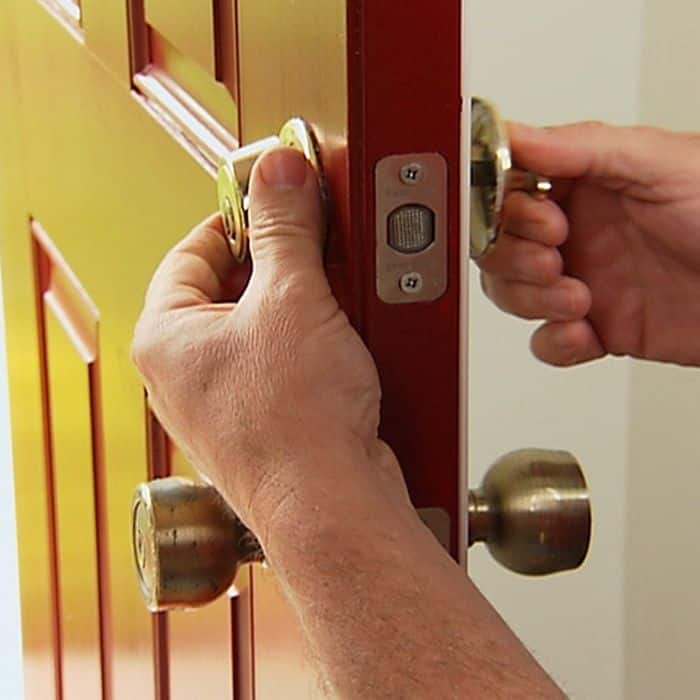
Attaching The Exterior And Interior Components
Next, align the exterior part of the lock with the holes on the door’s outside. The keyhole or keypad goes here. Inside, position the thumb turn or interior lock piece to match the exterior. Ensure the spindle or connecting bar fits through the mechanism properly to link both sides.
Securing With Screws
Finally, use the screws provided to fasten the lock parts securely. Tighten them evenly to avoid misalignment. Avoid over-tightening, which can damage the lock or door. Check the lock’s operation by turning the key or thumb turn. The bolt should move smoothly in and out.
Testing The Deadbolt
Testing the deadbolt is a key step after installation. It ensures your lock works well and keeps your home safe. Take time to check the lock carefully. This helps find any problems early. Proper testing means your deadbolt will operate smoothly every time.
Checking Lock Functionality
Start by turning the key or thumb turn. The bolt should move easily into the door frame. Check both locking and unlocking actions. The deadbolt must slide fully in and out without sticking. Test the lock from inside and outside the door. Make sure the key turns without resistance or jamming.
Adjusting For Smooth Operation
If the deadbolt feels tight or hard to turn, adjustments are needed. Loosen the screws on the lock faceplate slightly. Move the strike plate on the door frame if the bolt does not align. Tighten screws once the bolt slides freely. Repeat testing after each adjustment. Aim for a smooth, effortless lock and unlock motion.
Enhancing Deadbolt Security
Enhancing the security of your deadbolt is essential for protecting your home. A strong deadbolt alone is not enough. The door and its frame must also be prepared to resist force. Small upgrades can make a big difference. These steps help prevent break-ins and give you peace of mind.
Reinforcing The Door Frame
The door frame holds the deadbolt in place. Weak frames can break easily under pressure. Use solid wood or metal to strengthen it. Installing longer screws into the frame helps secure the lock better. Check for cracks or damage. Repair any weak spots to improve safety.
Adding Strike Plates
Strike plates cover the area where the deadbolt meets the door frame. A heavy-duty strike plate spreads force over a larger area. Choose one made of metal, at least 3 inches long. Use long screws to attach it firmly to the wall stud. This makes it harder to kick the door open.
Using Additional Security Features
Extra features increase deadbolt security. Door reinforcement kits add metal plates around the lock. Security bars or door jammers block forced entry. Smart locks offer alerts and remote control options. These tools make your door tougher and your home safer.
Credit: www.schlage.com
Maintenance Tips
Maintaining your deadbolt ensures it works smoothly and lasts longer. Small care efforts keep your lock secure and reliable. Regular maintenance helps avoid costly repairs and lockouts.
Regular Cleaning
Dust and dirt can build up inside the deadbolt. Clean the outside of the lock with a soft cloth. Use a small brush to remove dirt from crevices. Avoid harsh chemicals that can damage the finish.
Lubrication
Lubricate the deadbolt to keep it turning smoothly. Use a graphite or silicone-based lubricant. Spray a small amount into the keyhole and bolt mechanism. Avoid using oil-based lubricants as they attract dust.
Inspecting For Wear And Tear
Check the deadbolt regularly for signs of damage. Look for loose screws, rust, or parts that do not move well. Tighten screws and replace worn parts immediately. Early fixes prevent bigger problems later.
Credit: www.lowes.com
Frequently Asked Questions
What Tools Do I Need To Install A Deadbolt?
You need a drill, screwdriver, measuring tape, pencil, chisel, and the deadbolt kit. These tools ensure precise installation and secure fitting.
How Long Does It Take To Install A Deadbolt?
Installing a deadbolt typically takes 30 to 60 minutes. The time depends on your experience and door type.
Can I Install A Deadbolt On Any Door?
Deadbolts work best on solid wood or metal doors. Hollow or glass doors may need special locks or reinforcement.
How Do I Align The Deadbolt With The Strike Plate?
Measure carefully and mark the door frame before drilling. Proper alignment ensures smooth locking and prevents damage.
Conclusion
Installing a deadbolt adds extra safety to your home. Follow each step carefully for best results. Take your time to measure and drill correctly. Tighten screws firmly to keep the lock secure. Test the deadbolt to make sure it works smoothly.
A well-installed deadbolt gives peace of mind. Enjoy the feeling of a safer front door. Keep your home protected with this simple upgrade.