Are you setting up your home or office network and wondering how to hook up a Cat5 wall plate? Getting this right can make a huge difference in your internet speed and connection reliability.
Don’t worry if you’re not a tech expert—this guide will walk you through each step clearly and simply. By the end, you’ll have a solid connection ready to handle all your online needs without frustration. Keep reading to learn the easy way to connect your Cat5 wall plate like a pro.
Tools And Materials Needed
Before hooking up a Cat5 wall plate, gather the right tools and materials. Having everything ready makes the process smoother and faster. This guide covers the key components, tools, and cable types you will need.
Cat5 Wall Plate Components
A Cat5 wall plate has several parts. The main plate covers the wall opening. Inside, there is a keystone jack for the cable. The jack connects the wires to the network. Screws hold the plate in place. Some plates include labels for easy identification.
Required Tools
You will need a few basic tools. A punch-down tool helps insert wires into the jack. A wire stripper removes the cable’s outer jacket. A screwdriver secures the wall plate. Cable testers check if the connection works. Keep scissors or cutters handy to trim wires.
Cable Types To Use
Use Cat5 or Cat5e cables for best results. These cables support speeds up to 1 Gbps. They have four twisted pairs of wires inside. Avoid using damaged or old cables. Check the cable length to avoid signal loss. Using the right cable ensures a strong network connection.

Credit: www.youtube.com
Preparing The Cable
Preparing the cable is the first step to hook up a Cat5 wall plate correctly. It ensures a clean, strong connection for your network. Proper preparation helps avoid signal loss and interference. Follow these simple steps to get the cable ready.
Measuring And Cutting
Measure the cable length needed to reach the wall plate. Leave a few extra inches to work with comfortably. Use sharp wire cutters for a clean, straight cut. Avoid crushing or bending the cable while cutting.
Stripping The Outer Jacket
Remove about 1 to 2 inches of the outer jacket from the cut end. Use a cable stripper tool for a neat job. Do not nick or damage the inner wires. Expose the twisted pairs without cutting their insulation.
Untwisting Wire Pairs
Untwist each pair of wires gently, about half an inch. Keep the wires as straight as possible for easier insertion. Do not untwist too far to maintain signal quality. Arrange wires by color codes following the wall plate instructions.
Wiring The Wall Plate
Wiring the Cat5 wall plate is a key step to get a strong network connection. It needs care and attention to details. The wires inside the cable must connect correctly to the wall plate. This part explains the wiring process in simple steps.
Identifying Wire Colors
Cat5 cables have eight small wires inside. Each wire has a color or a stripe. The common colors are orange, green, blue, and brown, with each having a solid and striped version. Knowing these colors helps place each wire in the right spot.
Following Wiring Standards
Two wiring standards exist: T568A and T568B. Both organize the wire colors differently. T568B is more common in homes. Pick one standard and use it for all connections. This keeps your network working well.
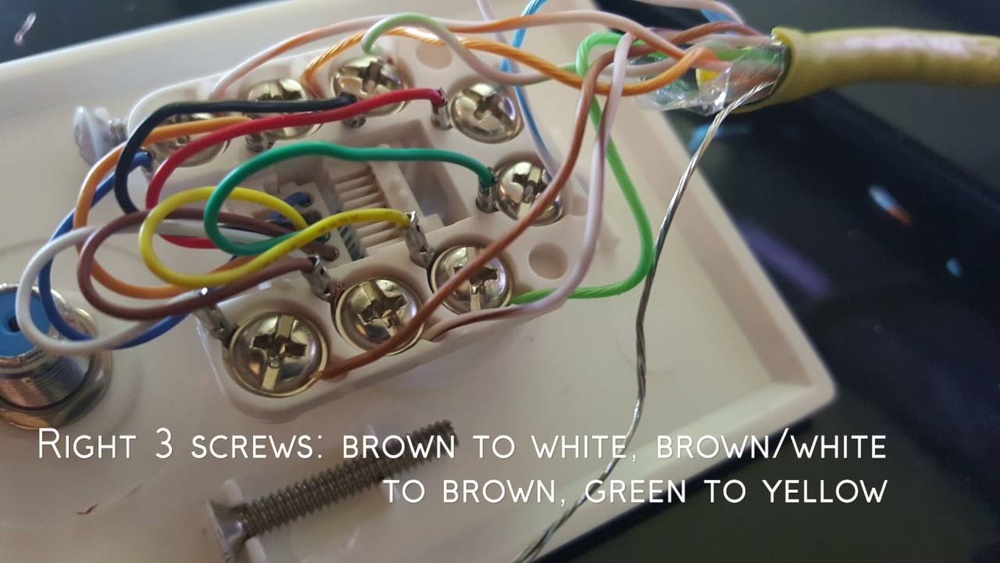
Punching Down The Wires
Use a punch-down tool to press wires into the wall plate slots. Push each wire firmly to make a good connection. Trim extra wire after punching down. Double-check the colors match the chosen wiring standard.

Credit: www.wikihow.com
Securing The Wall Plate
Securing the Cat5 wall plate is a key step in your network setup. It holds the cable connections safely and keeps the installation tidy. A firmly attached wall plate prevents damage and signal loss. Take time to fasten it correctly for a stable network connection.
Attaching The Plate To The Wall
Start by aligning the wall plate with the outlet box. Use a screwdriver to fasten the screws into the wall anchors or box. Tighten the screws evenly to avoid cracking the plate. Check that the plate sits flush against the wall without gaps. A snug fit protects the cables behind it.
Testing The Connection
Once secured, test the cable connection to confirm proper function. Plug a device into the wall plate or use a network tester. Look for a strong signal and stable connection. Confirm the device connects to the internet or network correctly. Testing early saves time on fixing issues later.
Troubleshooting Common Issues
If the connection is weak or fails, inspect the wiring first. Make sure all wires are fully inserted and match the correct order. Loose or damaged wires cause poor performance. Check the screws holding the plate; loose screws can disrupt connections. Retest after adjustments until the connection is stable.
Tips For Faster Setup
Setting up a Cat5 wall plate can seem tricky. Simple tips can make the process faster and smoother. Planning and using the right tools help you avoid delays. Small steps save time and reduce errors.
Organizing Wires Beforehand
Sort the wires by color and type before starting. Untangle and straighten each cable carefully. Label each wire if possible. This makes identifying wires easier and faster during setup.
Using The Right Tools
Use a cable stripper to remove the outer jacket cleanly. A punch-down tool helps push wires into the wall plate slots quickly. Keep scissors and a wire tester handy. These tools speed up the work and improve results.
Avoiding Common Mistakes
Do not rush the wiring order. Follow the T568A or T568B standard consistently. Avoid leaving wires loose or untwisted at the connection point. Test connections before fixing the plate to the wall. This prevents rework and saves time.

Credit: www.wikihow.com
Frequently Asked Questions
What Tools Are Needed To Hook Up A Cat5 Wall Plate?
You need a punch-down tool, wire stripper, and a screwdriver. These tools help connect wires securely and mount the wall plate properly. Having these ensures a clean, professional installation and reliable network performance.
How Do I Identify Wire Colors For Cat5 Wiring?
Cat5 cables have four twisted pairs with color codes. Use the T568A or T568B wiring standard to match colors. Proper color matching ensures correct network connectivity and prevents signal loss or interference.
Can I Use A Cat5 Wall Plate For Cat6 Cables?
Yes, Cat5 wall plates can work with Cat6 cables physically. However, Cat6 supports higher speeds and frequencies. For best performance, use wall plates rated for Cat6 cables to avoid network issues.
How To Test A Cat5 Wall Plate Connection?
Use a network cable tester to check continuity and wiring. It helps verify proper connections and detects faults. Testing ensures your network runs smoothly without interruptions or data loss.
Conclusion
Hooking up a Cat5 wall plate is simple with clear steps. Start by preparing the cables carefully to avoid mistakes. Match each wire color to the right slot on the plate. Use a punch-down tool for secure and neat connections.
Test the connection before closing the wall plate cover. This saves time and prevents problems later. Following these tips helps you set up your network quickly and correctly. A good connection means better internet and fewer issues. Give it a try and enjoy a stable network in your home or office.