Have you ever wondered how to connect a one way light switch quickly and safely? Whether you’re updating your home or fixing a simple lighting issue, knowing the right steps can save you time and frustration.
In this guide, you’ll discover easy-to-follow instructions that anyone can use, even if you’re not an expert. By the end, you’ll feel confident handling your light switch like a pro. Ready to make your lighting work just the way you want?
Let’s get started!

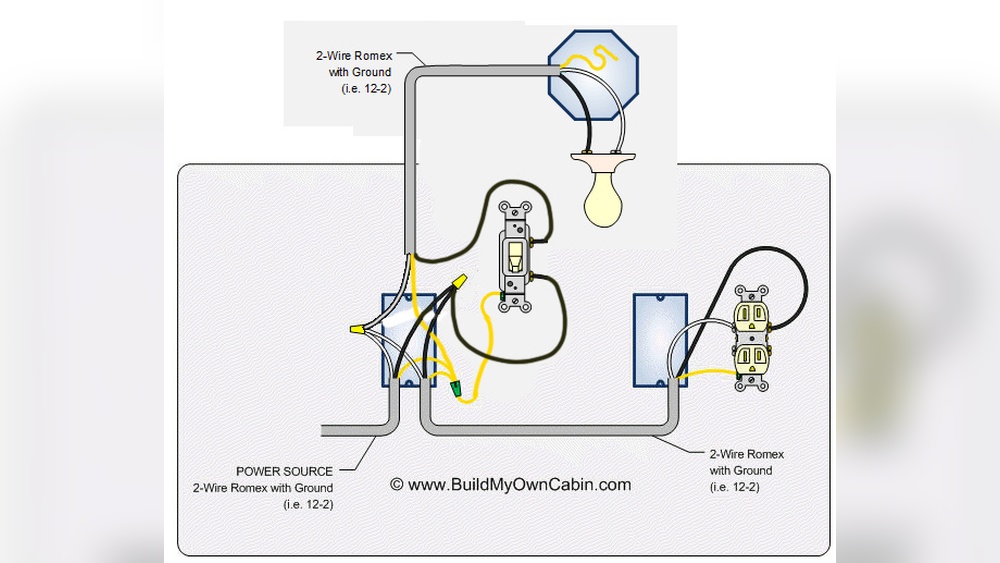
Credit: www.diynot.com
Tools And Materials Needed
Before starting to connect a one way light switch, gather all the necessary tools and materials. Having everything ready makes the work easier and safer. It saves time and avoids interruptions during the installation.
Use tools designed for electrical work. Choose materials that fit your switch and wiring type. Prepare a clean, dry workspace to keep everything organized.
Essential Tools
- Screwdriver set – flathead and Phillips
- Wire stripper
- Voltage tester
- Needle-nose pliers
- Electrical tape
- Wire cutter
- Drill (optional for mounting)
Required Materials
- One way light switch
- Electrical wires (live, neutral, earth)
- Wire connectors or terminal blocks
- Switch box or mounting plate
- Insulating sleeves
Safety Equipment
- Insulated gloves
- Safety goggles
- Non-conductive footwear
Safety Precautions
Safety is the top priority when connecting a one way light switch. Electricity can cause serious harm. Taking the right precautions protects you and your home.
Follow safety steps carefully. Avoid rushing or skipping any part. Use the right tools and wear protective gear. Always work with power turned off.
Turn Off The Power Supply
Locate the main circuit breaker or fuse box. Switch off the power to the light circuit. Use a tester to confirm no electricity flows.
Use Insulated Tools
Select tools with insulated handles. These prevent accidental electric shocks. Avoid metal or damaged tools during wiring.
Wear Protective Gear
Put on rubber gloves and safety glasses. Gloves protect your hands from shocks. Glasses shield your eyes from sparks or debris.
Double-check Wiring Connections
Ensure wires are connected properly and tightly. Loose wires can cause sparks or short circuits. Follow the wiring diagram carefully.
Work In A Dry Environment
Keep the workspace dry and clean. Water and electricity create dangerous conditions. Do not work in wet or damp areas.
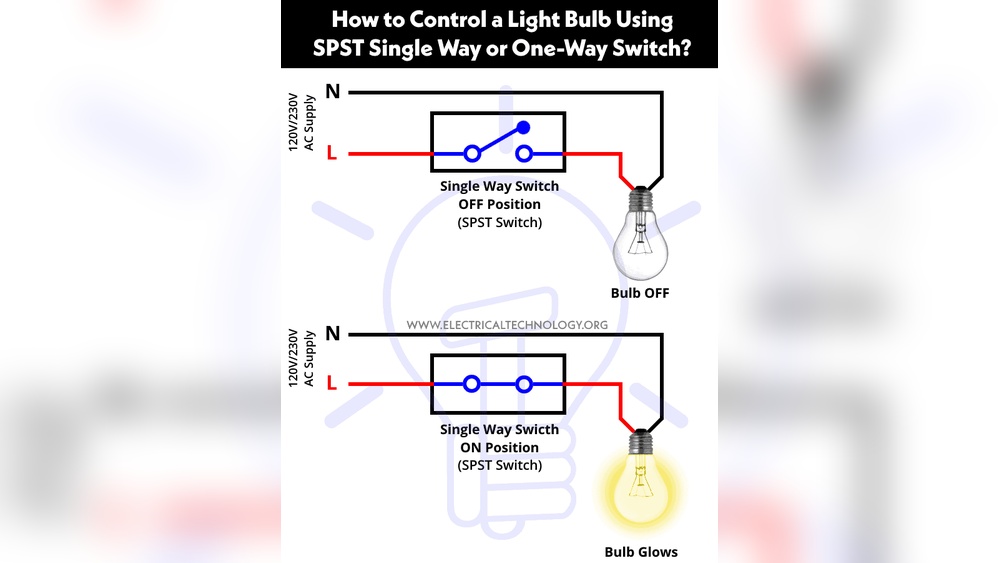
Types Of One Way Switches
One way switches are simple devices used to control a light or appliance from a single location. They come in different styles and types. Knowing the types helps you pick the right switch for your needs. Each type has a unique design and function. This section explains the main types of one way switches.
Standard Toggle Switch
The standard toggle switch is the most common type. It has a small lever that flips up or down. It is easy to install and use. This switch fits most wall plates and boxes. It works well for basic light control.
Rocker Switch
The rocker switch has a flat, wide panel that rocks back and forth. It looks modern and is simple to operate. Rocker switches often have a larger surface for easier use. They are popular in new homes and offices.
Push Button Switch
Push button switches use a button you press to turn lights on or off. They can be momentary or latching types. These switches offer a unique style and function. They work well for decorative or specialty lighting.
Touch Switch
Touch switches activate with a simple touch. They do not have moving parts like toggles or rockers. These switches use sensors and are very easy to use. They add a modern touch to any room.
Dimmer Switch
Dimmer switches control the brightness of lights. They can be rotary or slider types. Dimmers offer more control over lighting mood and energy use. They are a popular upgrade from basic switches.
Locating The Wiring
Start by turning off the power at the main breaker for safety. Find the switch box and open it to see the wires inside. Identify the live wire, neutral wire, and the wire going to the light fixture.
Understanding The Basics Of Wiring
Locating the wiring is the first step in connecting a one way light switch. You need to know which wires control the light. Usually, two or three wires run into the switch box. These include the live wire, the load wire, and sometimes a neutral wire.
The live wire brings power from the electrical panel. The load wire sends power to the light fixture. The neutral wire completes the circuit and returns the current.
Safety comes first. Turn off the power from the main circuit breaker. This stops electricity flow and prevents shocks. Use a voltage tester to check if wires still have power. Never work on live wires.
Opening The Switch Box
Remove the switch cover plate using a screwdriver. Then, unscrew the switch from the box carefully. Pull the switch out slowly to see the wires behind. Keep the wires visible and organized for easy access.
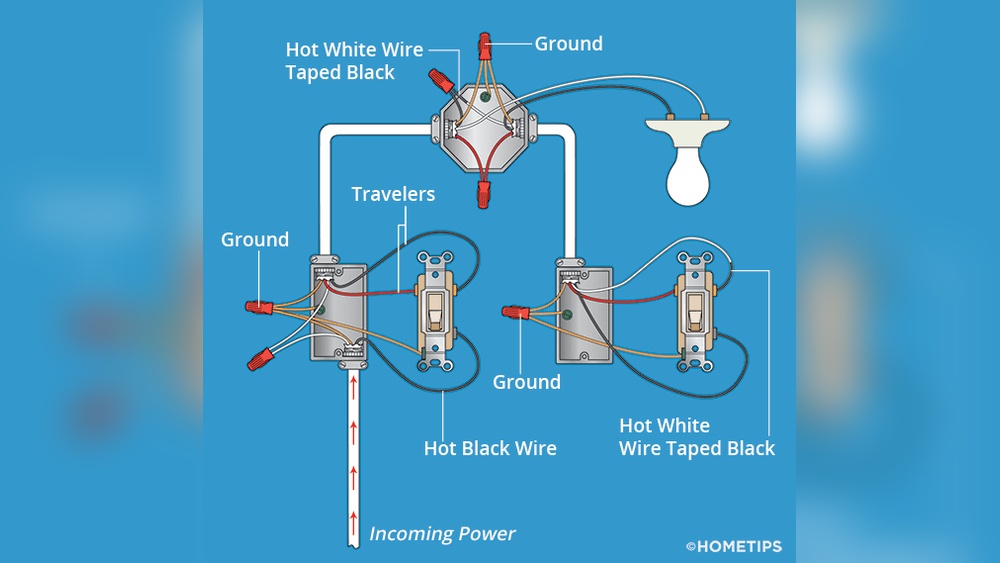
Identifying Wires By Color
Wire colors help you find the right wires. The live wire is often black or red. The load wire also can be black or red. The neutral wire is usually white. Ground wires are green or bare copper.
Check local codes as colors may vary. Use a voltage tester to confirm wire function if unsure.
Turning Off The Power
Turning off the power is the first and most important step before connecting a one way light switch. It keeps you safe from electric shocks. Always treat electricity with respect. Safety comes first.
Before starting any work, find the circuit breaker or fuse box. This box controls the electricity flow to your home. Switch off the breaker that powers the light switch you want to connect. This stops electricity from reaching the wires.
Never skip this step. Even a small shock can cause serious injury. Use a voltage tester to double-check if the power is off. Touch the tester to the wires. No light or beep means the power is off.
Locate Your Circuit Breaker
Find the main electrical panel in your home. It is often in the basement, garage, or a storage room. Open the panel door carefully. Look for a label or switch that controls the light circuit.
Switch Off The Correct Breaker
Turn the breaker handle to the off position. This stops the flow of electricity to the light switch. Do not guess. Double-check the label to avoid turning off the wrong circuit.
Use A Voltage Tester
Test the wires with a voltage tester before touching them. Place the tester on each wire connected to the switch. No signal means no electricity. This confirms it is safe to work.
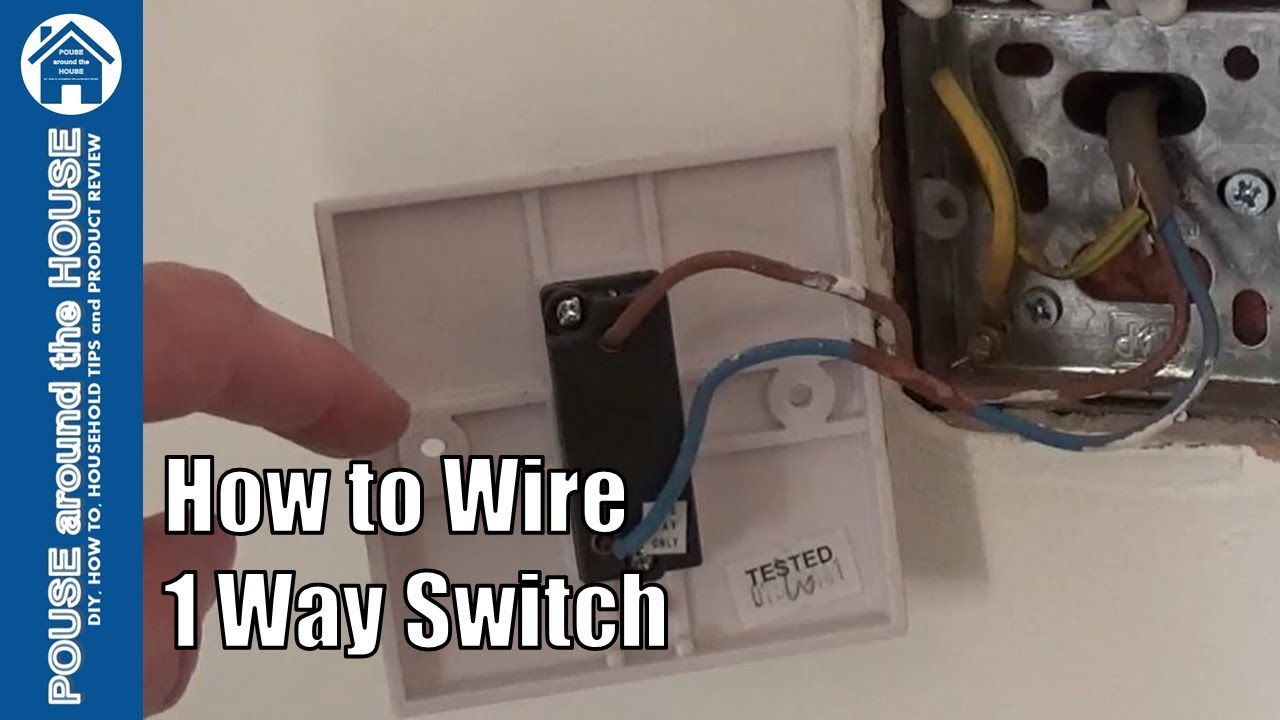
Credit: www.youtube.com
Removing The Old Switch
Removing the old light switch is the first step in connecting a new one-way switch. It requires care and attention to avoid electrical hazards. Always make sure the power is off before starting. This step helps you safely access the wiring behind the switch.
Follow clear steps to remove the old switch. This makes the process easier and safer. Keep track of the wires and screws. These parts are important for installing the new switch.
Turn Off The Power
Find the circuit breaker for the light switch. Switch it off to cut the power. Use a voltage tester to check the wires. Make sure there is no electricity flowing.
Remove The Switch Cover Plate
Use a screwdriver to take off the cover plate. This exposes the switch and wires. Keep the screws safe for later use.
Unscrew The Old Switch
Loosen the screws holding the switch to the wall box. Pull the switch gently out to see the wires. Do not force it to avoid damage.
Note Wire Connections
Look carefully at how the wires connect to the switch. Take a photo or write down the wire positions. This helps connect the new switch correctly.
Disconnect The Wires
Use a screwdriver to loosen the terminal screws. Carefully detach the wires from the old switch. Keep the wires straight and untangled for easy handling.
Connecting The New Switch
Connecting the new one way light switch is a key step in the installation process. It requires careful handling of wires and correct placement on the terminals. This ensures the switch works safely and properly. Follow these clear steps to connect your switch with confidence.
Identifying Live And Load Wires
First, find the live wire. It carries electricity from the power source. Usually, it is red or brown. Next, locate the load wire. It runs from the switch to the light fixture. This wire is often black or blue. Use a voltage tester to confirm which wire is live. Mark the wires to avoid confusion later.
Wiring The Switch Terminals
Attach the live wire to the terminal marked “L” or “Live.” Connect the load wire to the terminal marked “Load” or “L1.” Push the wire ends fully into the terminals. Tighten the screws firmly but do not over-tighten. Loose connections can cause flickering or failure.
Securing The Connections
Check each wire to ensure it is tight and secure. Tug gently on the wires to test their hold. Use electrical tape around terminals for extra safety. Make sure no copper wire is exposed. Place the switch back into the wall box carefully. Screw it in firmly without damaging the wires.
Testing The Switch
Testing the switch is a key step after wiring a one-way light switch. It ensures the switch works correctly and safely. Proper testing helps avoid electrical issues and saves time.
Follow simple steps to check if the switch controls the light as expected. Testing confirms that wiring is done right before finalizing the installation.
Turn Off The Power
First, switch off the power from the main circuit breaker. This step prevents electric shocks during testing. Always double-check that the power is off before handling wires.
Use A Voltage Tester
Use a voltage tester to check if the wires are live. Touch the tester to the switch terminals carefully. The tester will show if electricity is present or not.
Switch On The Power
Turn the power back on at the main breaker. Stand clear of any exposed wires. Now the switch is ready for its first test with electricity flowing.
Operate The Switch
Flip the switch up and down. Watch if the connected light turns on and off smoothly. The light should respond instantly without flickering.
Check For Loose Connections
If the light does not work, turn off the power again. Tighten any loose wires on the switch terminals. Loose connections often cause the switch to fail.
Final Safety Check
After testing, ensure all wires are secure and covered. Replace the switch cover plate. Restore power and test the switch one more time for safety.
Mounting The Switch And Finishing Up
Mounting the switch and finishing up are the last steps in connecting a one way light switch. This stage secures the switch and prepares it for use. Taking care here ensures safety and a clean look.
Mount The Switch Into The Wall Box
Place the switch carefully into the wall box. Make sure wires are not pinched. Push the switch back gently until it sits flush. Align the screw holes with the box holes. Use screws to fix the switch firmly. Do not overtighten to avoid damage.
Attach The Switch Cover Plate
Pick the correct cover plate for your switch. Position it over the switch and screw it in place. The cover protects wires and gives a neat finish. Check if the plate sits flat against the wall.
Test The Switch
Turn the power back on at the circuit breaker. Flip the switch to check if the light turns on. Try switching it off and on a few times. The switch should work smoothly without sparks or noise.
Final Safety Checks
Look for loose wires or screws. Tighten any that feel weak. Ensure no wires touch each other. Clean up the area from dust or debris. Your one way switch is ready for everyday use.
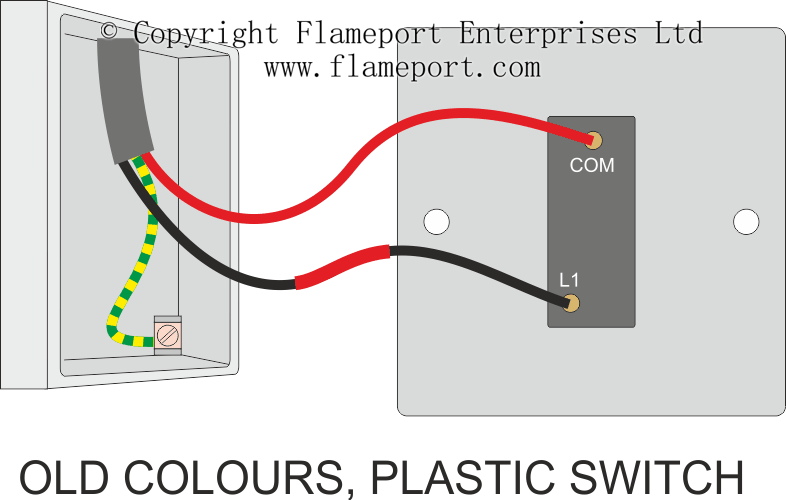
Credit: flameport.com
Troubleshooting Common Issues
Troubleshooting common issues with a one-way light switch is important. It helps to fix problems quickly. This saves time and keeps your light working well.
Many problems happen due to simple mistakes. Checking the wiring and connections can solve most issues. Let’s explore some frequent problems and their solutions.
Check For Loose Connections
Loose wires cause the light switch to fail. Turn off the power first. Then, open the switch box carefully. Tighten any loose screws on wires. Make sure wires are connected to the right terminals.
Test The Switch For Faults
A faulty switch will not work properly. Use a voltage tester or multimeter to check it. Replace the switch if it shows no continuity. This step ensures your light switch functions correctly.
Verify Power Supply
No power means the switch cannot work. Check the circuit breaker or fuse box. Reset any tripped breakers or replace blown fuses. Confirm power reaches the switch using a tester.
Inspect The Light Bulb
A burnt-out bulb is a common problem. Remove the bulb and try a new one. This simple step can fix the issue fast. Always use the correct bulb type for your fixture.
Look For Damaged Wiring
Damaged wires can cause shorts or no power. Look for frayed or burnt wires inside the box. Replace any damaged wiring carefully. If unsure, contact a professional electrician for help.
Frequently Asked Questions
How Do I Wire A One Way Light Switch Safely?
Turn off the power before starting. Connect the live wire to the switch’s common terminal. Attach the load wire to the switched terminal. Ensure the earth wire is grounded. Use insulated tools and check connections securely. Always follow local electrical codes.
What Tools Are Needed To Connect A One Way Switch?
You need a screwdriver, wire stripper, voltage tester, electrical tape, and insulated pliers. These tools help ensure safe and accurate wiring. A voltage tester confirms the power is off before working. Proper tools make the process easier and safer.
Can I Install A One Way Switch Myself?
Yes, if you have basic electrical knowledge and follow safety precautions. Always switch off the power at the circuit breaker first. Use proper tools and follow wiring instructions carefully. If unsure, consult a licensed electrician to avoid hazards.
What Type Of Wire Is Used For One Way Switches?
Typically, 1. 5mm² twin and earth cable is used for light switches. The live (brown or red) and neutral (blue or black) wires connect through the switch. Earth wire (green/yellow) is for grounding and safety. Always check your local wiring standards.
Conclusion
Connecting a one way light switch is simple with the right steps. Always turn off power before starting work. Follow the wiring guide carefully to avoid mistakes. Test the switch after installation to ensure it works well. Taking safety seriously makes the job easier and safer.
Now, you can control your lights with confidence and ease. Keep practicing, and electrical tasks will become less daunting. Small projects build your skills bit by bit. Light up your space the right way every time.