Have you ever wished you could control the same light from two different spots in your home? Installing a three-way light switch makes that possible, giving you convenience and better control over your lighting.
If you’re thinking this sounds complicated, don’t worry—you can do it yourself with a little guidance. In this post, you’ll discover simple, step-by-step instructions that will help you install a three-way switch safely and confidently. Keep reading, and by the end, you’ll have the power to brighten your space exactly how you want.
Tools And Materials Needed
Before starting the installation of a three way light switch, gather the right tools and materials. This preparation saves time and makes the job safer and easier. Having everything ready helps avoid interruptions during the work.
Essential Tools
A few basic tools are necessary for this project. A screwdriver set is key, including both flathead and Phillips screwdrivers. Wire strippers help remove insulation without damaging the wires. A voltage tester ensures power is off before touching wires. Needle-nose pliers make bending and holding wires easier. A drill can speed up mounting the switch boxes, but it is optional.
Required Materials
You need the correct type of three way switch for the setup. Electrical wires must be the right gauge for safety and code compliance. Wire nuts secure wire connections and prevent shorts. Electrical tape adds extra protection to connections. Mounting screws and switch boxes hold the switches firmly in place.
Safety Gear
Safety gear protects you during the installation. Insulated gloves reduce the risk of electric shock. Safety glasses shield your eyes from debris or sparks. A flashlight or headlamp helps if the work area is dimly lit.

Credit: nassaunationalcable.com
How Three Way Switches Work
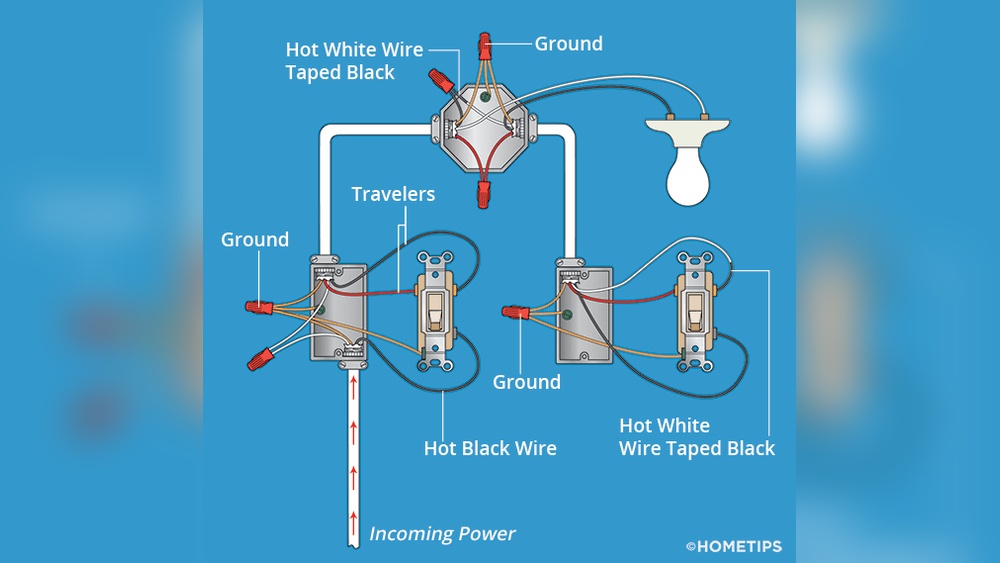
Three way switches let you control one light from two places. Wires connect both switches and the light, allowing easy on/off from either switch. Installing involves wiring carefully to link power, switches, and the light correctly.
Three way switches let you control one light from two spots. They are common in hallways and stairs. This setup adds convenience and safety.
Each switch has three terminals. Two traveler wires connect the switches. A common wire links to the power source or the light.
Flipping either switch changes the light’s state. On or off. The traveler wires carry the current between switches. This lets either switch control the light.
Understanding The Traveler Wires
Traveler wires are the key to three way switches. They carry current back and forth. Two traveler wires run between the two switches.
When one switch flips, it changes the current path. This either turns the light on or off. The traveler wires make this possible.
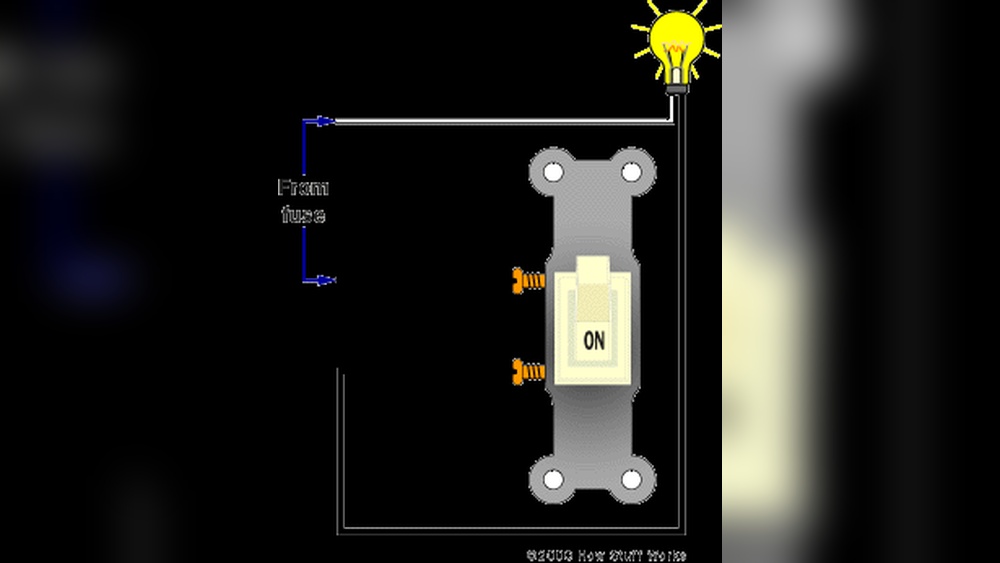
The Role Of The Common Terminal
The common terminal connects to the power source or light. It is different from traveler terminals. This terminal controls the main flow of electricity.
One switch’s common terminal links to the power. The other switch’s common connects to the light fixture. This setup completes the circuit.
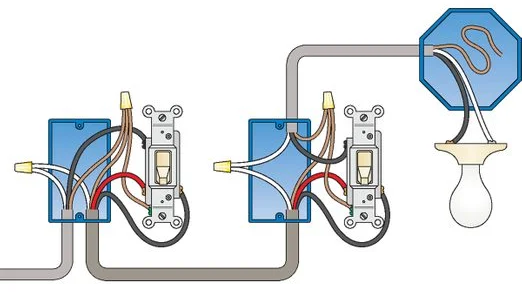
How Switching Changes The Circuit
Each switch toggles the connection of traveler wires. Flipping a switch changes which traveler wire is active. This changes the current path.
When the circuit is complete, the light turns on. If the circuit breaks, the light goes off. This simple action controls the light from two places.
Safety Precautions
Safety is the top priority before installing a three way light switch. Electricity can be dangerous without proper care. Taking the right precautions protects you and your home from harm.
Follow safety steps carefully. Work in a clear, dry area. Use tools that are in good condition. Stay alert and focused during the installation process.
Turn Off The Power
Switch off the power at the circuit breaker. Do not rely on the wall switch alone. Use a voltage tester to confirm power is off. This prevents electric shock during work.
Use Proper Tools And Equipment
Choose insulated tools designed for electrical work. Avoid using damaged or worn-out tools. Wear rubber-soled shoes to reduce shock risk. Have a flashlight ready for better visibility.
Understand Wiring And Labels
Label wires before disconnecting them. Take clear photos for reference. Know the difference between traveler, common, and ground wires. Correct wiring prevents short circuits and switch failure.
Avoid Working Alone
Have someone nearby in case of emergency. They can help if you get injured. Never rush the job. Take breaks if you feel tired or distracted.
Credit: www.kennethballard.com
Turning Off Power
Turning off power is the first and most important step before installing a three way light switch. It keeps you safe from electric shocks. Never skip this step. Always double-check to protect yourself and your home.
Locate The Circuit Breaker
Find the main electrical panel in your home. It is usually in the basement, garage, or utility room. Open the panel door carefully. Look for the circuit breaker that controls the lights you want to work on.
Switch Off The Correct Breaker
Flip the breaker switch to the OFF position. This stops the flow of electricity to the switch. Sometimes breakers are labeled. Use the label to find the right one. If not, turn off the main breaker to cut power to the whole house.
Test For Power
Use a voltage tester or a non-contact voltage detector. Hold it near the wires or switch box. If the tester shows no power, it is safe to proceed. If it shows power, switch off the correct breaker again. Never assume power is off without testing.
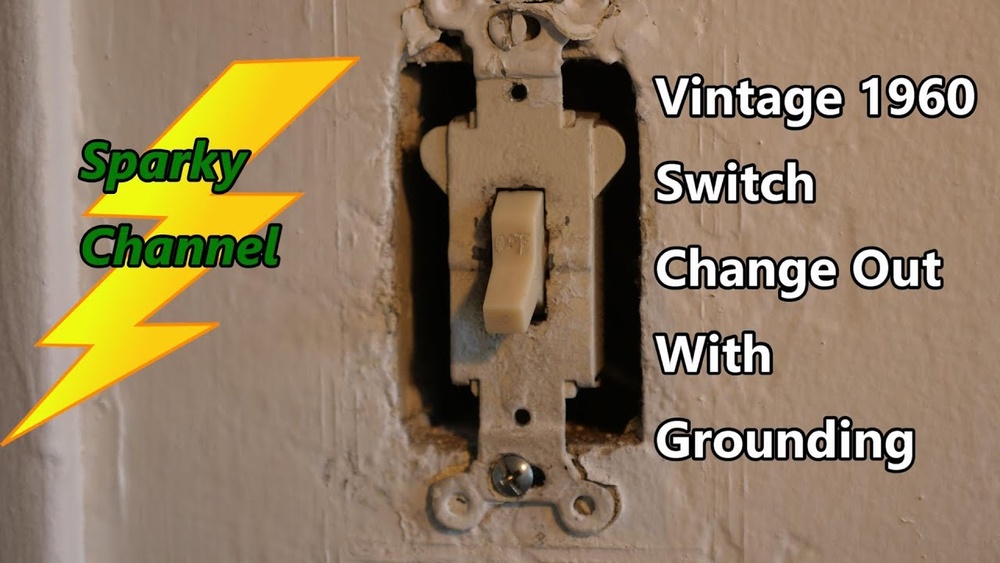
Removing The Old Switch
Removing the old switch is the first step to install a new three way light switch. This task needs care and attention. Safety is very important. Turn off the power before you start. Use a voltage tester to make sure no electricity flows to the switch.
Turn Off The Power At The Circuit Breaker
Go to your home’s circuit breaker panel. Find the switch that controls the light circuit. Flip it off to cut power. Double-check that the lights turn off. This step prevents electric shock while working.
Remove The Switch Cover Plate
Use a screwdriver to remove the screws holding the cover plate. Take the plate off gently. Set it aside where it won’t get lost. This exposes the switch and wiring behind it.
Unscrew And Pull Out The Old Switch
Remove screws that hold the switch to the wall box. Pull the switch out slowly. Avoid pulling on the wires. Look closely at how the wires are connected. Take note or take a photo for reference.
Disconnect The Wires Safely
Loosen the screws holding the wires on the switch. Carefully remove each wire. Do not let wires touch each other. Keep the wires separated and secure. This keeps the work safe and organized for the next step.
Identifying Wires
Identifying wires is a key step when installing a three-way light switch. It helps to know which wire does what. This makes the installation safer and easier. You must understand the role of each wire before connecting anything.
Three-way switches use several wires. Each has a specific function. Knowing their colors and positions is important. It prevents mistakes that could cause shorts or failure.
Understanding Wire Colors
Most homes follow a color code for wiring. Black wires usually carry power. White wires are neutral and carry current back. Red wires are often travelers between switches. Ground wires are green or bare copper. They protect against electrical shock.
Using A Voltage Tester
A voltage tester shows which wires have power. Test each wire before touching it. This tool helps avoid shocks and errors. Turn off the main power before testing. Then, turn it on briefly to check wires.
Labeling Each Wire
Mark each wire with tape or labels. Write down the color and function if known. This keeps track of wires during installation. It stops confusion when connecting switches. Clear labels save time and prevent mistakes.
Wiring The New Switch
Wiring the new three way switch is an important step. It controls lights from two places. This part explains how to connect the wires safely and correctly.
Connecting Common Terminal
Locate the common terminal on the switch. This terminal is usually darker than the others. Attach the black wire from the power source or light fixture here. Tighten the screw firmly to hold the wire in place.
Connecting Traveler Wires
Two traveler wires run between the two switches. These wires connect to the traveler terminals. These terminals are usually brass-colored. Attach each traveler wire to one of these screws. Make sure the wires do not touch each other or other terminals.
Securing Ground Wire
Find the green or bare copper ground wire. Attach it to the green ground screw on the switch. This wire improves safety by preventing shocks. Tighten the screw to secure the ground wire firmly.
Mounting The Switch
Mounting the switch is a key step in installing a three way light switch. This part ensures the switch stays in place and works safely. A steady mount avoids loose connections and switch problems later.
Take your time and follow each step carefully. Proper mounting gives your switch a clean, professional look. It also helps prevent electric shocks or faults.
Preparing The Switch Box
Start by checking the switch box. Make sure it is clean and free of dust. Remove any old wires or debris. Use a voltage tester to ensure the power is off before touching wires. A tidy box fits the switch better and keeps wires safe.
Aligning The Switch
Hold the switch in the box. Line up the screw holes with the box holes. The switch should sit flat against the wall. Check that the switch lever moves easily without obstruction. Proper alignment makes the switch easier to use and install.
Securing The Switch With Screws
Insert the screws into the holes. Tighten them gently but firmly. Avoid over-tightening, which can crack the switch or box. The switch should not wiggle or move. A secure mount protects wiring and improves switch lifespan.
Attaching The Wall Plate
Place the wall plate over the mounted switch. Line up the screw holes of the plate and switch. Use a screwdriver to fix the plate in place. The plate covers wires and adds a finished look. Make sure the plate fits snugly without gaps.
Restoring Power And Testing
Restoring power and testing your new three-way light switch is an important final step. It ensures the switch works correctly and safely controls your lights. Take your time and follow each step carefully. This prevents damage and keeps you safe.
Restoring Power Safely
First, go back to your circuit breaker. Turn on the power to the switch’s circuit. Make sure your hands are dry and you stand on a dry surface. This helps avoid electric shocks. Check that all wires are tucked in properly inside the switch box before restoring power.
Testing The Switch Operation
Now, test your three-way switch. Flip one switch and watch the light. It should turn on or off. Then flip the other switch. The light must change its state again. Test both switches several times. This confirms they work together as designed.
Troubleshooting Common Issues
If the light does not work, check your wiring again. Make sure all connections are tight and correct. Look for loose or wrong wires. Use a voltage tester to check power at the switch. Fix any wiring mistakes and test again. Safety first.
Troubleshooting Tips
Troubleshooting a three-way light switch can be tricky. Small wiring mistakes often cause problems. Knowing how to check wiring and connections saves time and effort.
Below are some simple tips to help find and fix common issues. These tips guide you through easy steps to ensure your switches work correctly.
Check The Power Supply
Start by turning off the power at the breaker. Use a voltage tester to confirm power is off. Then, check if power reaches the switches. No power means a breaker or fuse issue.
Inspect The Wiring Connections
Loose or wrong wiring can stop the switch from working. Remove the switch covers and look carefully. Make sure all wires are tight and in the right terminal. Follow the wiring diagram for your switch.
Test The Switches
Use a continuity tester or multimeter to check each switch. Switches should show continuity when on and none when off. Replace any switch that does not work properly.
Look For Damaged Wires
Check wires for breaks, cuts, or burns. Damaged wires can cause shorts or open circuits. Replace any damaged wire sections to avoid problems.
Verify The Traveler Wires
Three-way switches use traveler wires to connect both switches. Make sure traveler wires are connected to the correct terminals. Swap traveler wires if the switch does not work as expected.

Credit: community.smartthings.com
Frequently Asked Questions
What Tools Do I Need To Install A Three Way Switch?
You need a screwdriver, wire stripper, voltage tester, electrical tape, and pliers. These tools help safely connect and secure wires.
How Do Three Way Switches Control One Light?
They use two switches connected by traveler wires. Either switch can turn the light on or off.
Can I Install A Three Way Switch Myself Safely?
Yes, with basic electrical knowledge and precautions. Always turn off power and use a voltage tester before starting.
What Wiring Colors Are Used In Three Way Switch Installation?
Typically, black is hot, white is neutral, and red is the traveler wire between switches. Proper identification is crucial.
Conclusion
Installing a three way light switch can feel tricky at first. Step-by-step, the process becomes clear and doable. Always turn off power before starting work. Take your time to connect wires carefully. Testing the switch after installation ensures it works well.
With patience and care, anyone can complete this task. Brighten your home with confidence and safety. Keep this guide handy for future electrical projects. Simple tools and clear steps make a big difference. Your lighting control will be easier and more flexible now.