Are you staring at those stubborn gorilla hooks stuck in your wall and wondering how to get them out without causing damage? You’re not alone.
Removing these heavy-duty hooks can feel tricky, but with the right steps, you can do it quickly and safely. Keep reading, and you’ll discover simple, effective methods to free your wall from those hooks—no stress, no mess. Let’s make your wall look as good as new!

Credit: www.reddit.com
Tools Needed
Removing Gorilla Hooks from your wall needs the right tools. Using proper tools makes the job easier and keeps your wall safe. Gather these items before you start to avoid interruptions.
Flathead Screwdriver
A flathead screwdriver helps pry the hook gently from the wall. It fits under the hook’s edges to loosen it without damage.
Putty Knife
A putty knife slides between the hook and wall for careful removal. It spreads out the pressure to avoid holes or scratches.
Needle-nose Pliers
Needle-nose pliers grip small parts of the hook firmly. They help pull out stubborn hooks with control and precision.
Utility Knife
A utility knife cuts around the hook’s base if paint or adhesive sticks. It helps separate the hook cleanly from the wall surface.
Cleaning Cloth
A soft cloth wipes away dust and debris after hook removal. It keeps the wall clean and ready for repair or new decoration.

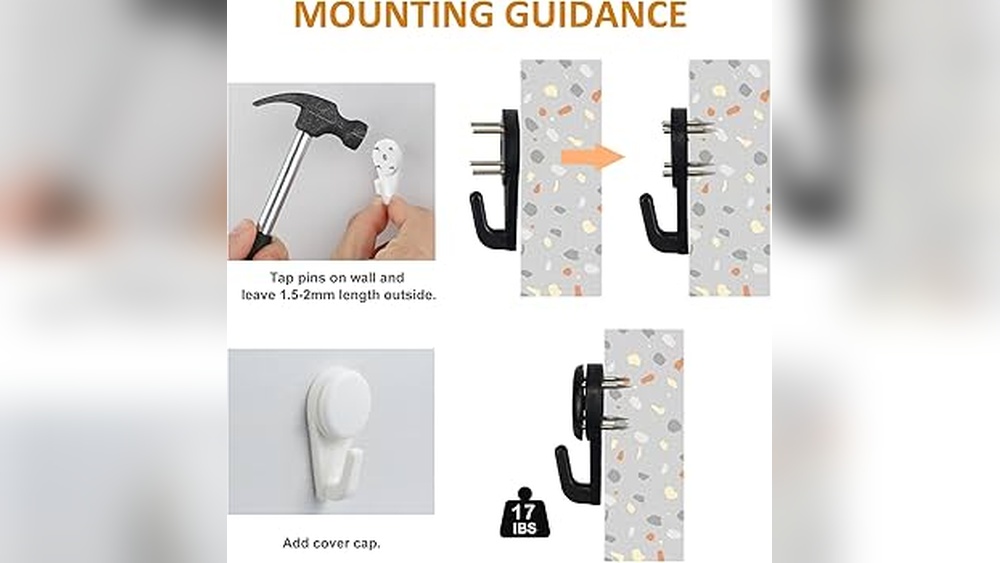
Credit: gorillagrip.com
Preparing The Wall
Start by clearing the wall surface around the Gorilla Hook. Gently remove any dirt or dust to avoid damage. This helps the wall stay smooth after hook removal.
Clean The Wall Surface
Start by removing dust and dirt around the Gorilla Hook. Use a damp cloth to wipe the area gently. Clean walls help tools work better. Avoid soaking the wall. Just a little moisture is enough to clear debris.
Gather Necessary Tools
Prepare tools like a putty knife, rubbing alcohol, and a sponge. Keep a plastic scraper nearby to avoid damage. Having tools ready saves time and effort during removal.
Protect The Surrounding Area
Cover the floor and nearby furniture with a drop cloth or old towel. This step stops mess and protects surfaces from scratches or stains. Small preparations prevent bigger cleanup later.
Removing Gorilla Hooks Safely
Removing Gorilla Hooks from your wall requires care to avoid damage. Doing it safely protects your paint and drywall. Simple steps help you take the hook off without hassle. Follow these easy tips for a smooth removal.
Loosen The Hook
Start by gently loosening the hook from the wall. Use your fingers to wiggle the hook side to side. This action weakens the grip of the adhesive. Avoid pulling hard at first to prevent wall damage.
Pull Out Slowly
Next, pull the hook slowly away from the wall. Keep your hand steady and pull straight out. Quick or sharp tugs can peel paint or tear drywall. Slow and steady ensures the hook comes off cleanly.
Use Heat For Adhesive
Apply gentle heat to soften the glue behind the hook. A hair dryer on low heat works well for this. Warm the adhesive for a minute or two before pulling. Heat helps the glue lose its hold, easing removal.
Cleaning Wall Residue
After removing Gorilla Hooks, sticky residue often stays on the wall. This residue can catch dust and dirt, making the wall look dirty. Cleaning the wall residue is important to restore a smooth, clean surface. Simple methods can remove the sticky parts without harming the paint or wallpaper.
Remove Sticky Residue
Use your fingers or a plastic scraper to lift the sticky residue gently. Avoid sharp tools that can scratch the wall. Dab a soft cloth in warm, soapy water and rub the area carefully. This helps loosen the glue without damage. Repeat as needed until the residue fades.
Use Mild Solvents
For tougher residue, mild solvents work well. Rubbing alcohol or vinegar can dissolve sticky glue safely. Apply a small amount on a cloth and test a hidden spot first. Rub the residue gently until it dissolves. Wipe the wall with a damp cloth afterward to remove solvent traces.
Repairing Wall Damage
Removing Gorilla hooks often leaves small holes and marks on the wall. Repairing these damages helps restore the wall’s smooth and clean look. This process is simple and needs only a few basic tools. Follow these steps to fix your wall quickly and effectively.
Fill Small Holes
Start by cleaning the holes and removing loose debris. Use a putty knife to apply spackle or wall filler. Press the filler into the holes and smooth the surface. Let it dry fully according to the product instructions. This step makes the wall ready for sanding.
Sand And Smooth Surface
Take fine-grit sandpaper to gently smooth the filled areas. Sand until the surface is even with the rest of the wall. Wipe off dust with a damp cloth. A smooth surface ensures the paint will stick well and look uniform. Avoid sanding too hard to prevent new damage.
Repaint Wall
Choose paint that matches your wall color. Use a small brush or roller to cover the repaired spots. Apply thin coats for better coverage and let each coat dry. Painting hides the repairs and refreshes the wall’s appearance. This final step completes the wall restoration.
Preventing Damage Next Time
Preventing damage to your walls is key after removing Gorilla Hooks. Small mistakes can cause big holes or peeling paint. Taking simple steps before hanging anything can save you time and money. Protect your walls by choosing the right tools and following the right steps carefully.
Choose The Right Hooks
Select hooks that match the weight of your items. Use hooks designed for your wall type. Lightweight hooks for light frames, stronger hooks for heavy objects. Avoid using hooks that require nails or screws if you want less damage. Test the hook’s hold before hanging anything valuable. Proper hook choice keeps walls safe and secure.
Follow Manufacturer’s Instructions
Read the instructions that come with Gorilla Hooks fully. Use the recommended tools and methods exactly as described. Skip guessing or quick fixes that can harm your wall. Apply the hook at the right height and angle. Remove hooks slowly and gently to avoid tearing paint. Following instructions reduces damage and improves results.
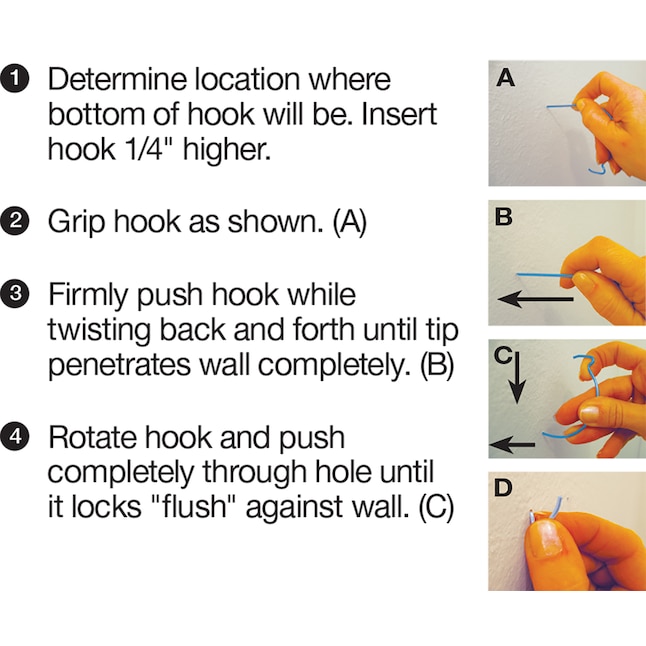
Credit: www.lowes.com
Frequently Asked Questions
How Do I Safely Remove Gorilla Hooks From Walls?
To remove Gorilla hooks safely, gently pull the tab downward. Avoid force to prevent wall damage. Use a hairdryer to warm the adhesive for easier removal if needed.
Can I Reuse Gorilla Hooks After Removal?
No, Gorilla hooks lose adhesive strength after removal. It’s best to use new hooks for secure holding. Reusing may cause hooks to fall or damage surfaces.
Will Removing Gorilla Hooks Damage My Wall?
If removed carefully by pulling the tab slowly, Gorilla hooks usually don’t damage walls. Heating the adhesive can help prevent paint peeling. Avoid forcing the hook off abruptly.
What Tools Help In Removing Gorilla Hooks Cleanly?
A hairdryer to warm adhesive and a plastic scraper help remove Gorilla hooks cleanly. Avoid metal tools to prevent wall scratches. Use gentle pressure for best results.
Conclusion
Removing Gorilla Hooks from your wall does not have to be hard. Use gentle tools and take your time. Avoid damaging the wall by pulling slowly. Clean the area after removal for the best look. Small holes can be filled with putty or spackle.
Paint over the patched spots to match the wall color. This simple process helps keep your walls neat and ready for new hooks or decorations. A little patience goes a long way. Now your wall looks clean and smooth again.