Have you ever wanted to control one light from two different switches? Whether it’s for convenience or safety, knowing how to double switch a light can make your home more functional.
Imagine turning on your hallway light from both the top and bottom of the stairs without getting up twice. It’s easier than you think, and by the end of this article, you’ll have the confidence to do it yourself. Keep reading to discover simple steps that will save you time and effort while brightening your space exactly when and where you need it.

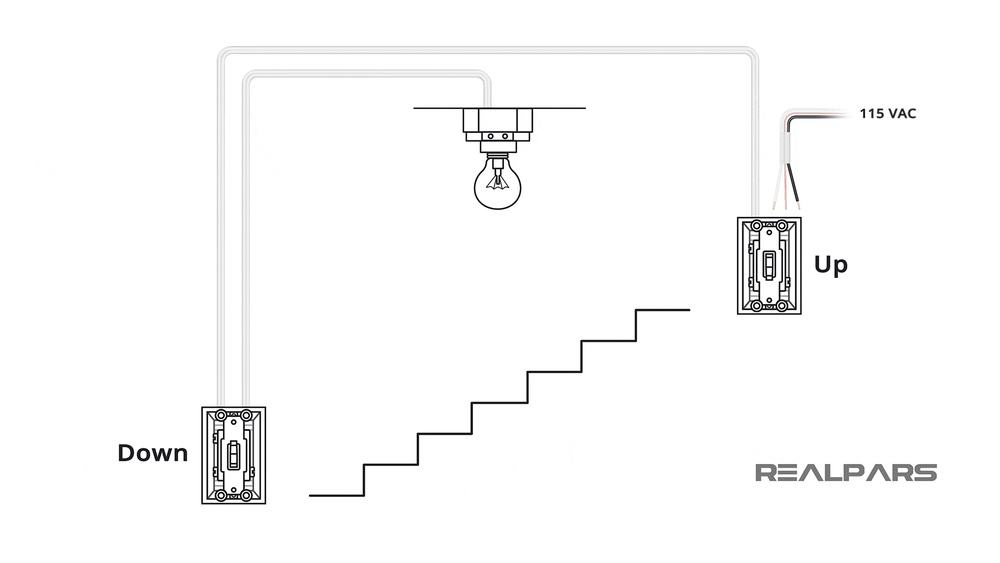
Credit: www.realpars.com
What Is A Double Switch
A double switch controls one light from two different places. It lets you turn the light on or off from either switch. This setup is common in long hallways, stairs, or large rooms.
Using a double switch adds convenience. You do not need to walk back to one switch to control the light. It saves time and effort, making daily tasks easier.
What Does A Double Switch Look Like?
A double switch has two toggle switches side by side. Each switch works independently to control the same light. It looks like one device but controls one light from two spots.
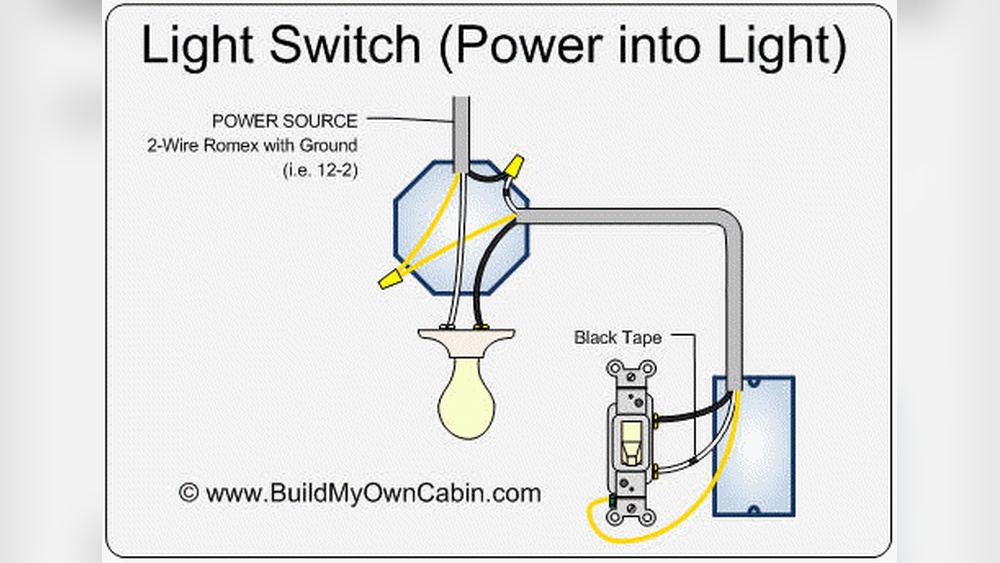
How Does A Double Switch Work?
Wiring connects both switches to the same light. Each switch can open or close the electrical circuit. This action turns the light on or off from either switch.
Where Can You Use A Double Switch?
Double switches are useful in hallways, staircases, and big rooms. They help control lights from two points for safety and ease. Many homes use them for better lighting control.
Tools And Materials Needed
Knowing the right tools and materials makes double switching a light easier. Having everything ready saves time and avoids frustration. Safety is important, so use proper tools and parts. This section lists what you need for the job.
Basic Tools
Start with a screwdriver set. Both flathead and Phillips types are useful. A voltage tester is essential to check power. Wire strippers help remove insulation without damage. Needle-nose pliers allow precise wire bending and holding.
Electrical Materials
Use a double switch, also called a two-way switch. Choose electrical wires rated for home use. Wire connectors, or wire nuts, join wires safely. Electrical tape provides extra insulation and security. A junction box holds and protects wire connections.
Safety Equipment
Wear insulated gloves to prevent electric shock. Safety goggles protect your eyes from sparks or debris. Turn off the power at the breaker before starting. Use a sturdy ladder to reach high switch boxes. Work in a well-lit area to see clearly.
Safety Precautions
Safety is the top priority when you double switch a light. Working with electricity can be risky. Taking the right safety steps protects you from shocks and accidents. Follow these important safety tips to keep the process safe and smooth.
Turn Off The Power At The Circuit Breaker
Always switch off the power before starting. Find the correct circuit breaker and turn it off. Double check by testing the light or using a voltage tester. No power means safer work.
Use A Voltage Tester To Confirm Power Is Off
A voltage tester shows if wires carry electricity. Test all wires in the switch box. Never rely on just turning off the breaker. Testing ensures no hidden current remains.
Wear Insulated Gloves And Safety Glasses
Wear gloves made for electrical work. They stop shocks from reaching your skin. Safety glasses protect your eyes from sparks or debris. Always use these simple protections.
Work In A Dry Environment
Keep your hands and tools dry. Water conducts electricity and increases risk. Avoid working in damp or wet areas. Dry conditions help keep you safe.
Follow Local Electrical Codes And Regulations
Check local rules about electrical work. Codes ensure safe and proper installation. Follow them closely. If unsure, ask a licensed electrician for help.
Credit: www.downlights.co.uk
Identifying Existing Wiring
Identifying the existing wiring is the first step to double switch a light. It helps to know what wires are in the switch box. This knowledge ensures a safe and correct installation. You avoid mistakes and save time by knowing the wiring setup.
Many homes have different wiring styles. Some use two-wire cables, while others use three-wire cables. Each type needs a different approach. Check the wires carefully before starting the work.
Turn Off Power And Remove Switch Cover
Safety is the top priority. Turn off the power at the circuit breaker. Use a voltage tester to confirm no current flows. Remove the switch cover to see the wires inside. This step gives clear access to the wiring setup.
Identify Wire Colors And Functions
Look at the wire colors. Black wires usually carry power. White wires are neutral. Red wires often act as travelers in double switches. Ground wires are green or bare copper. Knowing these colors helps to map the wiring correctly.
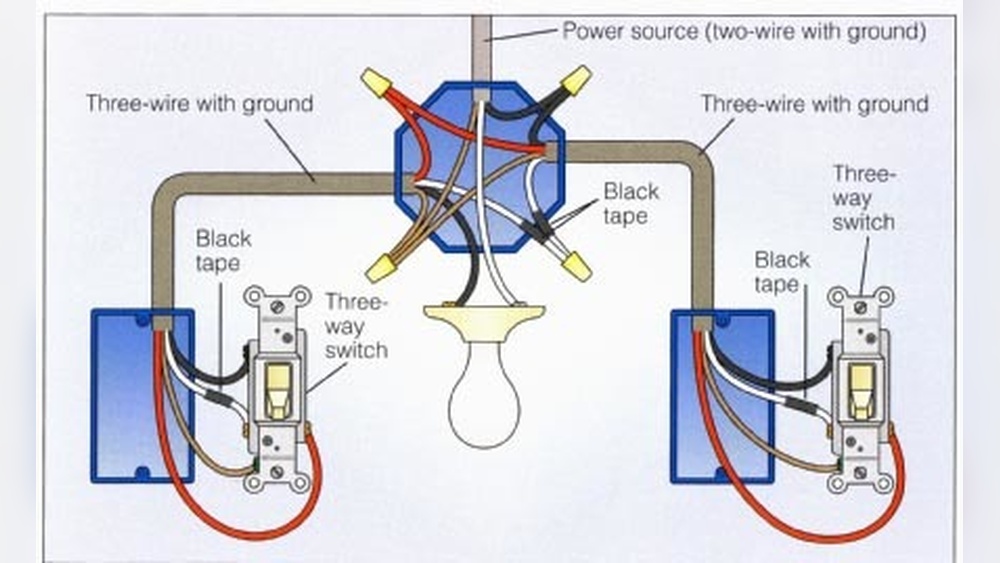
Check For Traveler Wires
Traveler wires connect the two switches controlling one light. They allow the switches to work together. Identify these wires by their color and position. Usually, they are red or black. Mark them for easy identification later.
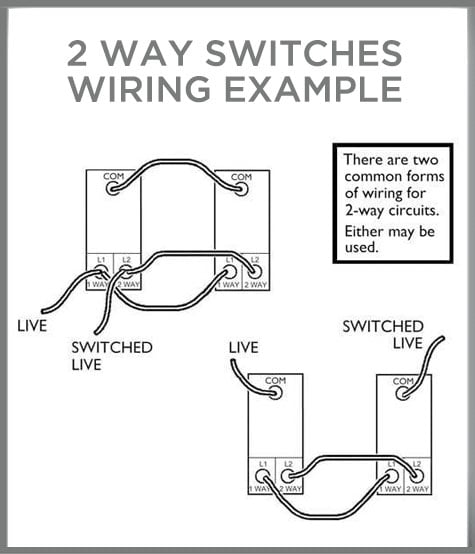
Use A Wiring Diagram For Reference
A wiring diagram shows how wires connect in a double switch setup. Keep one nearby during your work. It helps to match your wires with the diagram. This reduces confusion and mistakes.
Step-by-step Wiring Guide
Wiring a double switch can seem tricky at first. This step-by-step guide breaks it down into clear, simple actions. Follow each step carefully to install your double switch safely and correctly. This guide helps you understand the process without confusion.
Turn Off Power
Always start by turning off the power at the breaker box. This stops any chance of electric shock. Use a tester to check if the wires are dead. Safety first before touching any wiring.
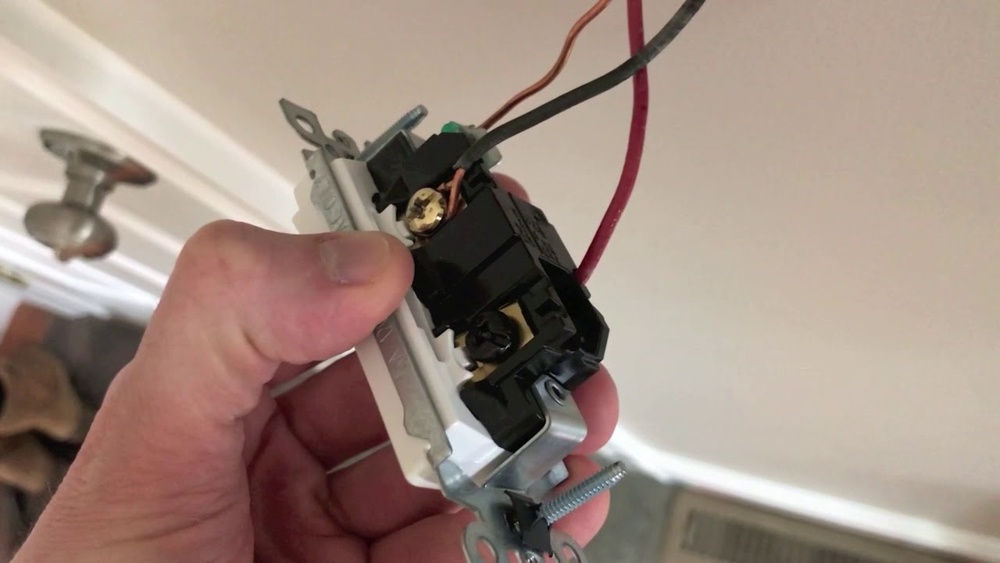
Remove Old Switch
Unscrew the old switch cover and remove the screws holding the switch. Gently pull the switch out of the wall box. Take note of how wires connect to the old switch for reference. Keep the wires separated and avoid touching them together.
Connect New Switch Wires
Identify the wires for each switch terminal. Attach the live wire to the common terminal. Connect the traveler wires to the remaining terminals on the new switch. Use wire nuts to secure any loose wires. Make sure all connections are tight and no bare wire shows.
Secure The Switch
Push the wires carefully back into the box. Align the switch with the screw holes and fasten it tightly. Attach the switch cover plate. Check the switch is stable and sits flush against the wall.
Restore Power
Turn the breaker back on to restore power. Test the double switch by flipping both switches. Each switch should control its light as expected. If the lights do not work, turn off the power and recheck connections.

Credit: rayneautomotivehelp.freshdesk.com
Testing The Double Switch
Testing the double switch is a key step after wiring it. This step checks if the switch works correctly. You avoid safety risks and electrical faults by testing. Let’s explore how to test the double switch safely and clearly.
Turn On The Power
Start by turning on the power at the circuit breaker. This gives electricity to your double switch. Never test the switch without power. Use caution and make sure hands are dry.
Check Each Switch Position
Flip the first switch up and down. Notice if the light responds each time. Do the same for the second switch. Both switches should control the light independently.
Test All Switch Combinations
Try all possible on/off combinations. The light should turn on or off in each case. This confirms correct wiring and function. If the light doesn’t respond, check connections again.
Use A Voltage Tester
A voltage tester helps verify power flow. Touch the tester to switch terminals carefully. It shows if electricity flows as expected. This tool adds extra safety and accuracy.
Common Mistakes To Avoid
Double switching a light can seem simple, but many people make mistakes. These errors can cause the switch not to work or even create safety issues. Knowing what to avoid helps you finish the job right and stay safe.
Incorrect Wiring Connections
One common mistake is mixing up the wires. Each wire has a specific role in the circuit. Connecting the wrong wires can stop the switch from working. Always match wires to the correct terminals. Use a tester to check wire functions before connecting.
Not Turning Off Power
Forgetting to cut the power is a serious error. Working on live wires risks electric shock. Always switch off the circuit breaker before starting. Double-check with a voltage tester to ensure no power flows.
Using The Wrong Type Of Switch
Two-way switches are needed for double switching. Using a regular single switch will not work properly. Make sure to buy switches labeled as “two-way” or “double switch” for this setup.
Ignoring Wire Labels And Colors
Wire colors and labels guide correct installation. Ignoring them leads to confusion and errors. Follow color codes carefully: usually, red or black are live wires, and green or bare wires are ground. Label wires if needed before disconnecting.
Poor Screw Tightening
Loose screws cause bad connections and flickering lights. Tighten all terminal screws firmly, but do not overtighten. Check each screw after wiring to ensure a secure fit.
Benefits Of Double Switching
Double switching a light adds extra control and convenience to your home. It lets you operate one light from two places. This is helpful in rooms with two entrances or long hallways.
Beyond convenience, double switching improves safety and energy use. It also increases the value of your home by adding a practical feature.
Improved Convenience
Double switches let you turn lights on or off from different spots. No need to walk across a dark room to find a switch. It saves time and effort daily.
Enhanced Safety
Controlling lights from two points reduces accidents. You can light the way before entering a room. This helps avoid trips and falls in the dark.
Energy Efficiency
Double switching prevents leaving lights on by mistake. You can switch off lights easily from another exit. This simple control lowers electricity bills.
Increased Home Value
Homes with double switches feel more modern and smart. Buyers like homes with extra features. It adds appeal and can increase resale value.
Frequently Asked Questions
What Is A Double Switch Light Setup?
A double switch light setup allows controlling one light from two different switches. It’s common in hallways or large rooms. This setup improves convenience and lighting control in multiple locations.
How Do I Wire A Double Switch For A Light?
To wire a double switch, connect the traveler wires between switches. Link the power source to the first switch and the light fixture to the second. Always turn off power before starting wiring for safety.
Can I Install A Double Switch Without Professional Help?
Yes, if you have basic electrical knowledge and tools. Follow wiring diagrams carefully and ensure power is off. When unsure, hire a professional to avoid hazards or code violations.
What Tools Do I Need To Double Switch A Light?
You need a screwdriver, wire stripper, voltage tester, electrical tape, and wire nuts. These tools help safely connect wires and secure the switches during installation.
Conclusion
Double switching a light can save energy and add convenience. It lets you control one light from two spots. Follow safety steps to avoid mistakes. Take your time and check each connection. This skill helps in hallways or large rooms.
Practice makes you more confident and careful. Always switch off power before starting work. Now, you can try this simple electrical task yourself. Keep learning and improving your home skills. Easy and useful.