Are you struggling with a faulty 3 way light switch? Replacing it might seem tricky, but you can do it yourself with the right steps.
Imagine saving money and gaining confidence by fixing this common household issue on your own. In this guide, you’ll discover simple, clear instructions that anyone can follow. By the end, you’ll know exactly how to replace your 3 way light switch safely and efficiently.
Keep reading—you’re closer than you think to mastering this handy skill!

Credit: www.youtube.com
Tools And Materials Needed
Replacing a 3-way light switch requires the right tools and materials. Having everything ready makes the job faster and safer. This section lists what you need before starting.
Basic Hand Tools
You need a screwdriver set. Both flathead and Phillips screwdrivers work well. A pair of needle-nose pliers helps to bend and hold wires. Wire cutters are essential to trim wires cleanly. A utility knife can strip wire insulation carefully.
Electrical Tester
An electrical tester or voltage tester checks if wires carry current. It keeps you safe by confirming the power is off. This tool helps avoid electric shock during work.
Replacement 3-way Switch
Buy a new 3-way switch that matches the old one. Check the brand and model if possible. Using the correct switch ensures proper function and safety.
Wire Connectors And Electrical Tape
Wire connectors, also called wire nuts, secure wire connections. Use the right size for the wires you join. Electrical tape wraps connections for extra safety and insulation.
Safety Gear
Wear safety glasses to protect your eyes from dust and debris. Use insulated gloves to prevent electric shocks. Safety gear helps keep the work environment safe.
Safety Precautions
Safety is the top priority when replacing a 3-way light switch. Electrical work can cause shocks or fires without care. Follow safety steps to protect yourself and your home.
Turn Off Power At The Circuit Breaker
Switch off the circuit breaker that controls the light switch. Do not rely on the wall switch alone. Use a tester to confirm no electricity flows to the switch.
Use Proper Tools And Equipment
Choose insulated screwdrivers and wire strippers. Wear rubber-soled shoes and safety glasses. These tools reduce the risk of electric shock and injury.
Label Wires Before Disconnecting
Mark each wire with tape or a label. This step helps you reconnect wires correctly later. Avoid confusion and incorrect wiring.
Work In A Dry Environment
Ensure the work area is dry. Water and electricity cause dangerous shocks. Do not work in wet conditions or with wet hands.
Keep Children And Pets Away
Electric work needs focus and space. Keep kids and pets out of the area. Prevent accidents and distractions.
Identify The Existing Wiring
Identifying the existing wiring is the first step in replacing a 3-way light switch. Understanding the wires helps avoid mistakes and ensures safety. It also makes the replacement process smoother and faster.
Before touching any wires, turn off the power at the breaker box. Use a voltage tester to confirm no electricity flows to the switches. Safety first.
Locate The Switch Boxes
Find both switch boxes controlling the light. Usually, they are at opposite ends of the hallway or room. Remove the switch cover plates carefully. This reveals the wiring inside.
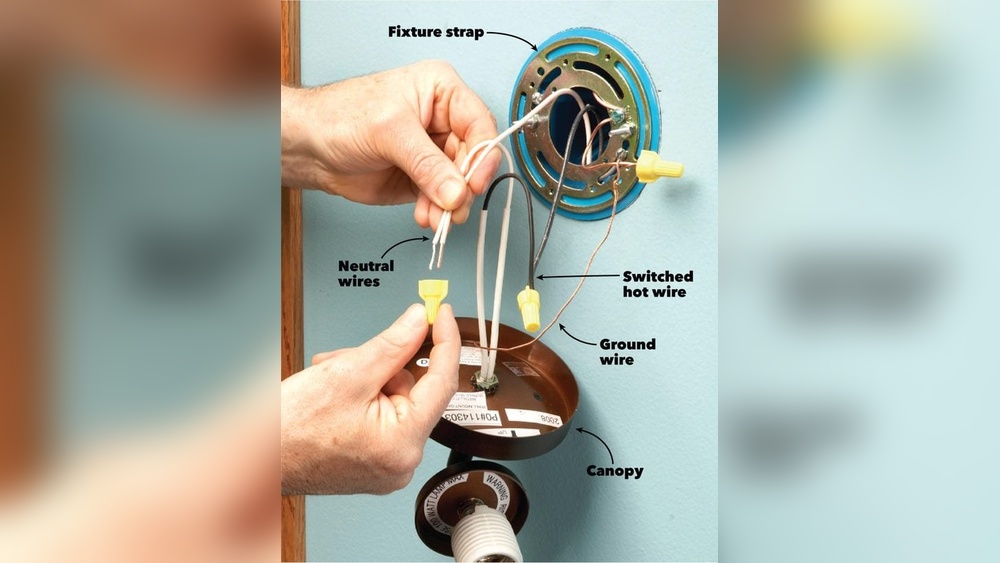
Recognize Wire Colors And Types
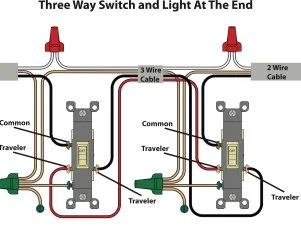
Look for black, white, red, and bare copper wires. Black wires often carry power. Red wires usually act as travelers between switches. White wires serve as neutral, and bare copper wires ground the circuit.
Note The Wire Connections
Check how wires connect to each switch. One switch will have a power source wire. The other connects to the light fixture. Traveler wires link both switches. Write down or take a photo for reference.
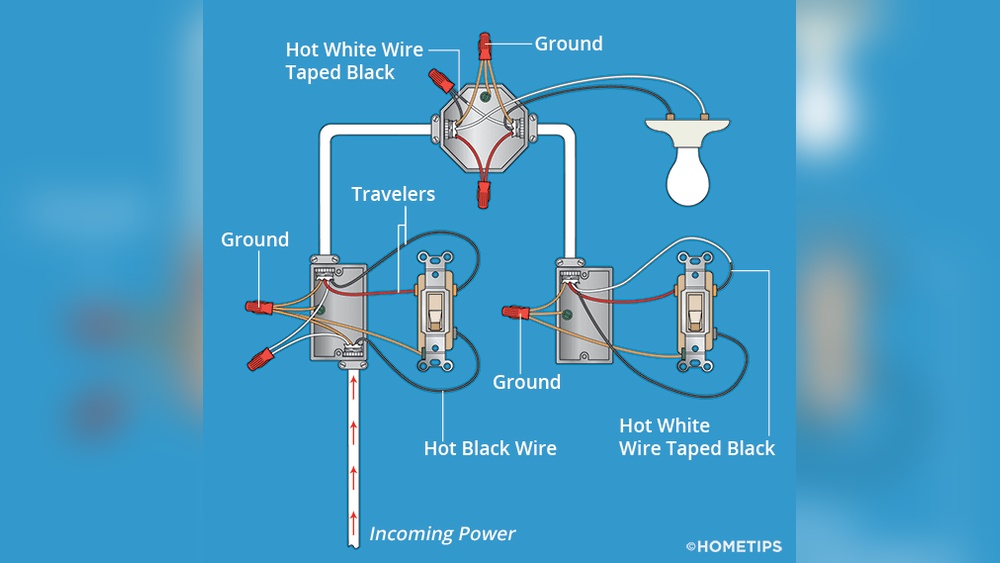
Identify Common And Traveler Terminals
Each 3-way switch has one common terminal and two traveler terminals. The common terminal is often darker or labeled. Traveler terminals connect to the red and black traveler wires. Confirm this before disconnecting wires.
Turn Off The Power
Turning off the power is the first and most important step before replacing a 3 way light switch. It keeps you safe from electric shocks. Always take this step seriously. Never try to work on electrical wiring with the power on.
Before you start, find the correct circuit breaker. This breaker controls the power to the switch you want to replace. Turning off the wrong breaker can cause frustration and delay your work.
Locate The Circuit Breaker Panel
The circuit breaker panel is usually in the basement, garage, or utility room. It holds all switches for your home’s electricity. Look for labels next to each breaker. They tell which part of the house each controls.
Turn Off The Right Breaker
Flip the breaker switch to the OFF position. This cuts power to the switch. Double-check by turning the light switch on and off. The light should not come on. If it does, turn off another breaker and test again.
Use A Voltage Tester For Safety
Always use a voltage tester to check for live wires. Touch the tester to the switch wires. If the tester lights or beeps, the power is still on. Do not touch the wires until the tester shows no power.
Remove The Old Switches
Removing the old switches is the first step to replace a 3 way light switch. It requires care and attention to safety. Turn off the power at the breaker box before starting.
Take your time to avoid mistakes. This step sets the stage for installing the new switches properly.
Locate the correct breaker for the switch circuit. Flip it off to cut the electricity. Test the switch with a voltage tester to confirm power is off.
Remove The Switch Cover Plate
Use a screwdriver to remove the screws holding the cover plate. Carefully pull the plate away from the wall. Keep the screws safe for later use.
Unscrew The Old Switch
Unscrew the mounting screws that hold the switch to the electrical box. Gently pull the switch out to expose the wires. Avoid touching the wires directly.
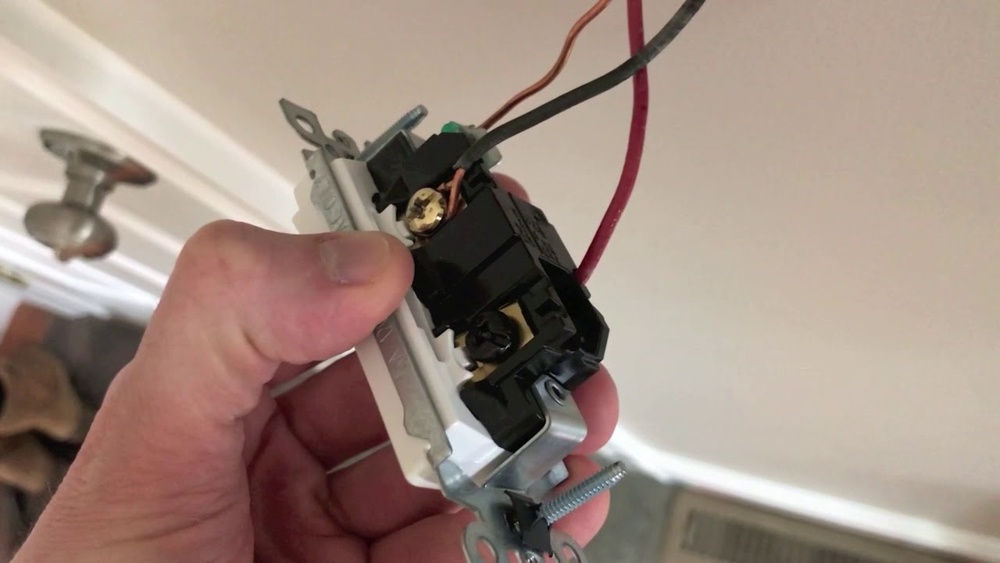
Note The Wire Connections
Look closely at how wires connect to the switch terminals. Take a photo or draw a simple diagram. This helps ensure correct wiring for the new switch.
Disconnect The Wires
Loosen the terminal screws or remove wire nuts. Carefully separate the wires from the switch. Keep the wires untangled and ready for the new switch.

Credit: diy.stackexchange.com
Wire The New 3 Way Switches
Wiring new 3 way switches is a key step in the replacement process. It ensures your lights work smoothly from two locations. Careful connection of each wire is important for safety and function.
Connecting The Common Terminal
Identify the common terminal on the switch. It is usually a darker screw. Connect the wire that was attached to the old switch’s common terminal. This wire often carries power or goes to the light fixture.
Make sure the wire is tight around the screw. Loose connections can cause flickering or failure.
Hooking Up Traveler Wires
Traveler wires connect the two switches. They usually use lighter colored screws. Attach the traveler wires to these terminals. Either wire can go to either screw.
Ensure the wires are firmly wrapped around the screws. This keeps the electrical path stable.
Securing Ground Wires
Ground wires provide safety by preventing shock. Connect the bare copper or green wire to the green ground screw. If there is a ground wire in the box, link it to the switch ground as well.
Twist ground wires together if needed. Use a wire nut to keep them secure. Proper grounding helps protect you and your home.
Mount The Switches And Restore Power
Mounting the switches and restoring power finishes the 3-way switch replacement. This step secures the switches in place and checks the wiring. Proper mounting prevents loose connections or switch movement.
After mounting, restore power to test the switches. Confirm both switches control the light correctly. Safety is key; ensure no wires touch before powering on.
Secure The Switches In The Electrical Boxes
Place each switch carefully inside its electrical box. Align the screw holes on the switch with those in the box. Use a screwdriver to fasten the switches firmly. Do not overtighten; it can crack the switch or box.
Attach The Switch Covers
Once the switches are secure, attach the switch covers. Line up the cover plate with the switch and box. Screw the cover gently to avoid damage. Covers protect the wiring and give a finished look.
Turn On The Circuit Breaker
Go to your electrical panel. Find the breaker controlling the switches. Flip the breaker to the ON position. This restores power to the circuit safely.
Test Both Switches
Operate each switch to check light control. The light should turn on and off from both switches. If it does not work, turn off the breaker and recheck wiring.
Test The Switches
Testing the switches is an important step after replacing a 3-way light switch. It ensures the wiring is correct and the switches work together. Without proper testing, the lights may not turn on or off as expected. This section explains how to test the switches safely and clearly.
Prepare For Testing
Turn the power back on at the breaker box. Use a voltage tester to check the wires are live. Make sure no wires are touching each other. This prevents shocks and short circuits.
Operate Each Switch
Flip the first switch up and down. Watch if the light turns on or off. Then, move to the second switch and do the same. Both switches should control the light from either end.
Check For Correct Wiring
If the light does not respond correctly, the wiring may be wrong. Double-check connections on each switch. Look for loose or swapped wires. Fix any issues before finalizing the installation.
Use A Continuity Tester
Turn off the power again. Use a continuity tester to check the switch connections. This tool shows if wires connect properly inside the switch. It helps find wiring problems without guessing.
Troubleshooting Common Issues
Troubleshooting common issues with a 3 way light switch helps keep your lights working smoothly. Many problems happen due to wiring mistakes or worn parts. Checking these problems saves time and avoids extra costs.
Switch Not Working
The switch may stop working if wires are loose or disconnected. Turn off the power before checking. Use a tester to see if power reaches the switch. Replace the switch if it feels hot or looks damaged. Sometimes, the problem is with the other switch in the circuit.
Light Flickering
Flickering lights often mean a poor connection. Check the wire terminals for tightness. Loose wires cause flicker and may be unsafe. Use a screwdriver to secure all screws. Replace bulbs if flickering continues after fixing connections.
Loose Connections
Loose connections cause many switch problems. Inspect all wiring nuts and screws for tightness. Gently pull wires to ensure they stay in place. Reconnect any loose wires firmly. Loose wires can cause sparks or switch failure.
Credit: www.hgtv.com
Frequently Asked Questions
How Do I Identify A 3 Way Light Switch?
A 3 way switch has three terminals and no ON/OFF markings. It controls one light from two locations, unlike a standard switch.
What Tools Are Needed To Replace A 3 Way Switch?
You need a screwdriver, voltage tester, wire stripper, electrical tape, and replacement 3 way switch for safe and effective replacement.
How Do I Turn Off Power Before Replacing The Switch?
Turn off the circuit breaker controlling the switch to ensure no electricity flows during the replacement process.
How To Connect Wires On A New 3 Way Switch?
Match wire colors to the same terminals on the new switch: common, traveler, and ground wires must be properly connected.
Conclusion
Replacing a 3-way light switch is easier than it seems. Follow each step with care and take safety first. Double-check all wires before you connect anything. Use a tester to ensure power is off. Take your time and don’t rush the job.
Soon, your lights will work perfectly from both switches. Enjoy the satisfaction of fixing it yourself. Simple tools and clear instructions make it doable. Keep this guide handy for future electrical projects. You’ve got this!