Have you ever wanted to control your lamp with a simple flip of a wall switch? Connecting a lamp to a light switch might seem tricky, but it’s easier than you think.
Imagine turning on your favorite lamp without reaching for the cord—just a quick switch flip. In this guide, you’ll discover step-by-step how to make this happen safely and quickly. By the end, you’ll have the confidence to set it up yourself, saving time and adding convenience to your space.
Keep reading to unlock this simple yet powerful upgrade for your home lighting!

Credit: www.electricaltechnology.org
Tools And Materials Needed
Connecting a lamp to a light switch is a simple electrical project. Having the right tools and materials makes the job easier and safer. Prepare everything before starting the work. This saves time and avoids mistakes.
Basic Tools
You need a few basic tools to connect a lamp to a switch. A screwdriver is essential for removing and securing screws. A wire stripper helps remove insulation from wires cleanly. Use a voltage tester to check if the wires are live. Pliers can twist wires together and hold parts firmly.
Electrical Materials
Gather electrical wires that match your home’s wiring. Use insulated wires for safety. A light switch suitable for your lamp’s voltage is important. Connectors like wire nuts or terminal blocks join wires securely. Electrical tape adds extra protection to wire connections.
Safety Equipment
Protect yourself with safety gear. Wear insulated gloves to avoid electric shocks. Safety glasses shield your eyes from debris. Work in a well-lit area to see clearly. Turn off power before touching any wires.
Safety Precautions
Working with electrical wiring can be risky. Safety must come first before starting any project. Taking simple safety steps protects you from shocks and fires.
Always plan your work carefully. Use the right tools and materials. Follow safety rules strictly to avoid accidents.
Turn Off The Power
Switch off the circuit breaker for the lamp’s room. Double-check that power is off by testing the switch or outlet. Never work on live wires.
Use Proper Tools
Choose insulated tools made for electrical work. Avoid using damaged or worn-out tools. Good tools help prevent slips and shocks.
Wear Safety Gear
Wear rubber-soled shoes to reduce shock risk. Use safety glasses to protect your eyes. Gloves can protect your hands from sharp edges.
Check Wiring And Connections
Inspect wires for damage before starting. Replace frayed or cracked wires. Make sure all connections are tight and secure to avoid shorts.
Follow Local Electrical Codes
Know the local rules for wiring and switches. Use materials approved by your area’s safety standards. Correct wiring ensures safe and legal work.
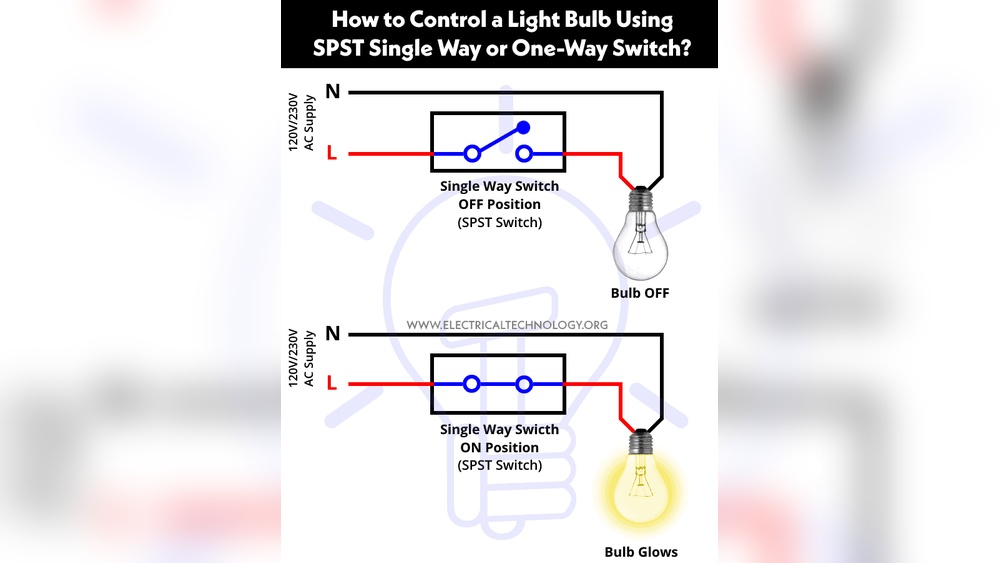
Identify Your Wiring Setup
Start by checking the type of wiring in your home. Knowing if you have a single-pole or three-way switch helps. This step ensures you connect the lamp correctly and safely.
Knowing your wiring setup is the first step to connect a lamp to a light switch. It helps you avoid mistakes and stay safe. Different homes have different wiring systems. Some use simple wires, while others have complex setups.
Before you start, turn off the power at the breaker box. Use a voltage tester to check the wires. This ensures no electricity flows while you work. Understanding your wiring setup makes the connection easier.
Locate The Power Source
Find where the power enters the switch box. Usually, a black or red wire carries the current. This wire is called the “hot” wire. It supplies electricity to the switch and lamp.
Sometimes, the power comes from the light fixture, not the switch. This changes how you connect the wires. Knowing the power source saves time and confusion.
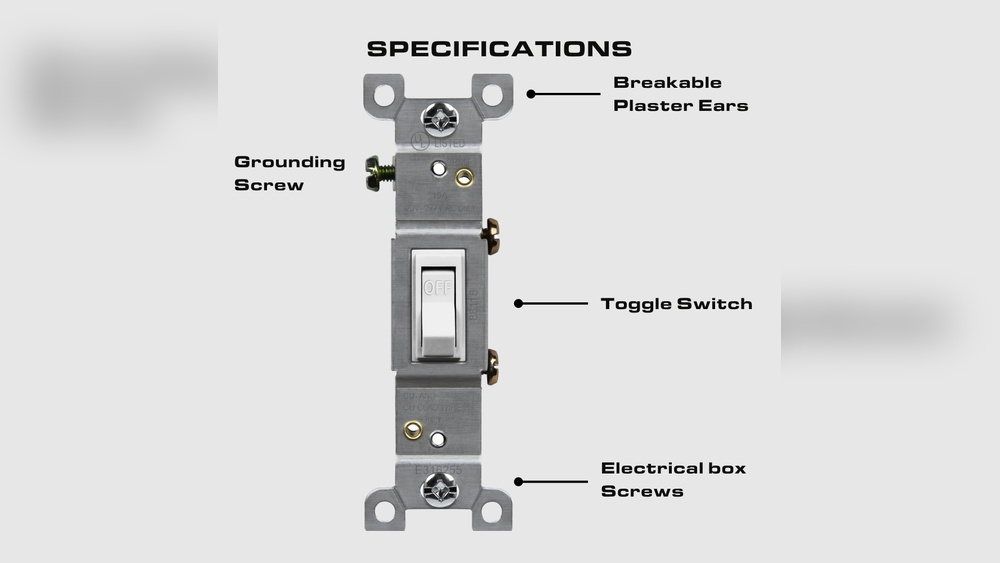
Identify The Switch Wires
Look for two wires connected to the switch terminals. These are the switch wires. One wire brings power in; the other sends power out to the lamp. Usually, these wires are black or red.
Some switches have a grounding wire, often green or bare copper. This wire helps protect against electrical shock. Always connect the grounding wire properly.
Check For Neutral Wires
Neutral wires carry electricity back to the panel. They are usually white. Not all switch boxes have neutral wires. Some older homes may lack them.
Neutral wires connect directly to the lamp’s neutral wire. This completes the electrical circuit. Knowing if you have neutral wires helps with the correct lamp connection.

Credit: www.youtube.com
Turn Off Power
Turning off power is the first and most important step before connecting a lamp to a light switch. It keeps you safe from electric shocks. Never skip this step. Always make sure no electricity flows to the switch or lamp while working.
Safety is key when handling electrical parts. Even a small mistake can cause harm or damage. Turning off power stops all current, making it safe to work on wires and connections.
Locate The Circuit Breaker
Find the main circuit breaker panel in your home. It is often in the basement, garage, or utility room. Look for the breaker labeled for the room you will work in. This breaker controls the power to the switch and lamp.
Switch Off The Correct Breaker
Flip the breaker switch to the OFF position. This cuts the power to the circuit. Double-check that the switch and lamp are no longer powered. Use a voltage tester or try turning the light switch on.
Verify Power Is Off
Use a non-contact voltage tester to check the wires. Hold the tester near wires and terminals. If it does not beep or light up, power is off. Never rely only on the breaker label. Always test before touching wires.
Remove Existing Switch Or Outlet
Removing the existing switch or outlet is the first step in connecting a lamp to a light switch. This step makes room for the new wiring and helps you work safely. It takes careful handling to avoid electric shocks or damage.
Turn off the power at the circuit breaker before starting. Double-check with a voltage tester to be sure the power is off. Safety is the top priority during this process.
Turn Off Power At Circuit Breaker
Find the circuit breaker that controls the switch or outlet. Switch it off to cut power to that area. This step prevents electric shocks while working on wires.
Remove The Switch Or Outlet Cover Plate
Use a screwdriver to remove the screws holding the cover plate. Take off the plate carefully to expose the switch or outlet. Keep the screws in a safe place for later use.
Unscrew The Switch Or Outlet
Loosen the screws holding the switch or outlet to the electrical box. Pull the device out gently, exposing the wires behind it. Do not pull too hard to avoid wire damage.
Disconnect The Wires
Note how the wires are connected to the switch or outlet. Use a screwdriver to loosen the terminal screws and disconnect the wires. Keep the wires separated and avoid touching them together.
Connect Wires To The Switch
Connecting the wires to the switch is a key step in wiring a lamp to a light switch. This part ensures the switch controls the lamp properly. You must handle wires carefully to keep everything safe and functional.
Before attaching anything, identify each wire’s role. Knowing which wire carries power and which returns it is crucial. This makes the connection correct and avoids electrical problems.
Identify Hot And Neutral Wires
Look for the hot wire first. This wire carries electricity from the power source. It usually has black or red insulation. The neutral wire completes the electrical circuit. It often has white insulation. Use a voltage tester to confirm the hot wire. Always turn off power at the breaker before touching wires.
Attach Wires To Terminals
Attach the hot wire to the switch terminal marked “common” or “line.” This terminal controls the flow of electricity. Connect the neutral wire to the wire nut or the neutral terminal if present. Tighten all terminal screws firmly. Ensure no bare wire is exposed outside terminals. Proper attachment prevents loose connections and sparks.
Connect Lamp Wiring
Connecting the lamp wiring is a key step in linking your lamp to a light switch. This process involves joining the wires safely and correctly. It ensures the lamp works properly and reduces the risk of electrical problems.
Follow simple steps to join the wires. This helps keep the connection strong and secure. Use the right tools and materials to make the job easier and safer.
Use Wire Connectors
Start by stripping about half an inch of insulation from each wire. Twist the exposed ends together tightly. Then, screw on a wire connector to cover the joined wires. This protects the wires and stops them from touching anything else.
Wire connectors come in different sizes and colors. Choose one that fits your wires. Make sure the connector holds the wires firmly without slipping.
Secure Ground Wire
The ground wire is usually green or bare copper. Connect it to the grounding screw or wire in the switch box. This step is very important for safety. It prevents electric shock if a fault occurs.
Wrap the ground wire around the grounding screw. Tighten the screw to hold the wire in place. If there is a grounding wire from the lamp, connect it to the same point.
Mount The Switch And Test
Mounting the switch and testing the lamp is the final step. This ensures everything works safely and correctly. Proper mounting keeps the switch secure and looks neat on the wall. Testing confirms the lamp responds to the switch as expected. Follow these simple steps to finish your wiring project.
Attach Switch To Wall Box
Place the switch carefully inside the wall box. Align the screw holes on the switch with those on the box. Use a screwdriver to tighten the screws. Make sure the switch fits snugly and does not move. Avoid overtightening, which can damage the switch or wall box. Check the switch is straight and flush with the wall surface. This step helps the switch stay firmly in place for safe use.
Restore Power And Test Lamp
Turn the power back on at the circuit breaker. Flip the wall switch to the “on” position. Watch the lamp closely to see if it lights up. If the lamp turns on, the connection is correct. If it does not, switch off the power and check your wiring again. Testing ensures the lamp and switch work together without problems. This final check keeps your home safe and your lighting functional.
Troubleshooting Tips
Troubleshooting is key when connecting a lamp to a light switch. It helps find and fix problems fast. Simple checks save time and keep you safe.
Follow these tips to solve common issues. Each step shows what to check and how to fix it. You can get your lamp working in no time.
Check The Power Source
Make sure the lamp is plugged into a working outlet. Test the outlet with another device. No power means no light.
Inspect The Light Bulb
Look at the bulb for damage or looseness. Replace the bulb if it is burnt out. Tighten the bulb securely in the socket.
Examine The Switch Wiring
Turn off power before checking wires. Loose or wrong wires stop the lamp from working. Tighten connections and match wire colors.
Test The Switch Function
Flip the switch on and off. Listen for a click sound. No click might mean a broken switch needing replacement.
Verify The Lamp Cord
Check the lamp cord for cuts or frays. A damaged cord is unsafe and stops power flow. Replace the cord if needed.
Use A Voltage Tester
A voltage tester shows if electricity flows to the switch and lamp. No voltage means a wiring or breaker problem. Handle with care.

Credit: www.youtube.com
Frequently Asked Questions
How Do I Wire A Lamp To A Wall Switch?
To wire a lamp to a wall switch, connect the lamp’s hot wire to the switch’s output. Then, connect the neutral wires together and ground all connections properly for safety.
Can I Use A Regular Lamp With A Light Switch?
Yes, most regular lamps can connect to a light switch. Ensure the switch controls the lamp’s hot wire for proper on/off function.
What Tools Are Needed To Connect A Lamp To A Switch?
You need a screwdriver, wire stripper, voltage tester, wire nuts, and electrical tape. These tools help safely and effectively connect the lamp to the switch.
Is It Safe To Connect A Lamp To A Light Switch?
Yes, it is safe if you follow electrical codes and turn off power before working. Use proper wiring and grounding for safety.
Conclusion
Connecting a lamp to a light switch is a simple task anyone can do. Follow the steps carefully and stay safe while working with electricity. Double-check all wires before turning the power back on. This project helps control your lighting easily and saves energy.
Take your time and enjoy the comfort of switched lighting. You can do it!