Are you tired of your ceiling fan light switch not working properly? Changing that switch yourself might seem tricky, but it’s easier than you think.
Imagine saving time and money by fixing it on your own without calling an electrician. You’ll discover simple steps to replace your ceiling fan’s light switch safely and quickly. Keep reading, and soon you’ll have full control over your fan’s lighting again.
Tools And Materials Needed
Changing a light switch in a ceiling fan requires specific tools and materials. Having the right items makes the job safer and easier. Gather everything before starting to avoid interruptions.
Each tool plays a key role in the process. Some help with electrical connections, while others assist in removing and installing parts. Choose tools that fit well in your hands for better control.
Tools Needed
- Flathead screwdriver – to remove switch plate and screws
- Phillips screwdriver – for tightening and loosening screws
- Voltage tester – to check if wires are live
- Wire stripper – to prepare wires for connection
- Needle-nose pliers – for bending and holding wires
- Electrical tape – to cover wire connections
Materials Needed
- New light switch compatible with ceiling fan
- Wire nuts – to secure wire connections
- Replacement screws – in case original ones are damaged

Credit: www.youtube.com
Safety First
Safety is the most important step before changing a light switch in a ceiling fan. Electricity can be dangerous. Taking the right precautions protects you from shocks or injuries.
Work calmly and carefully. Do not rush. Follow each safety step to avoid accidents.
Turn Off The Power
Find the circuit breaker that controls the ceiling fan. Switch it off. Double-check by trying the light switch to confirm no power flows.
Use A Voltage Tester
Before touching wires, test the switch wires with a voltage tester. This tool shows if electricity is still present. Never skip this step.
Wear Protective Gear
Wear rubber gloves to reduce shock risk. Use safety glasses to protect your eyes from dust or debris.
Work In A Dry Area
Make sure the room is dry. Wet hands or floors increase the risk of electric shock. Use a dry ladder or stool if needed.
Keep Tools Insulated
Use tools with insulated handles. This helps prevent electric shocks while you work on wires.
Turn Off Power Supply
Turning off the power supply is the first step in changing a light switch in a ceiling fan. This step keeps you safe from electric shock. Always treat electricity with respect. Never skip this important safety measure.
Before starting, locate the correct circuit breaker or fuse. This controls the power to the ceiling fan and switch. Turning off the power stops electricity from flowing to the switch. This makes the work safe and easy.
Find The Circuit Breaker Box
The circuit breaker box is usually in the basement, garage, or utility room. It holds switches that control power for different parts of your home. Look for labels or a list to find the right breaker for the ceiling fan.
Switch Off The Correct Breaker
Flip the switch to the “off” position. This cuts power to the ceiling fan and its switch. Double-check by trying to turn on the fan or light. If nothing works, power is off and you can proceed safely.
Use A Voltage Tester To Confirm
Always test the wires with a voltage tester. This tool shows if electricity is still present. Touch the tester to the wires in the switch box. No light or sound means no power. Only then start working on the switch.

Credit: www.youtube.com
Remove The Old Switch
Removing the old switch from a ceiling fan is the first step in replacing or fixing it. This process requires care and attention to avoid damage or injury. Follow clear steps to safely access and disconnect the old switch. Understanding these steps makes the task easier and safer.
Accessing The Ceiling Fan Switch
Turn off the power at the circuit breaker to avoid electric shock. Use a ladder to reach the ceiling fan comfortably. Remove the fan’s light kit or cover to expose the switch. Locate the switch housing inside the fan. Unscrew the housing carefully and set aside the screws. Pull out the switch gently to see the wires connected to it.
Disconnecting Wires
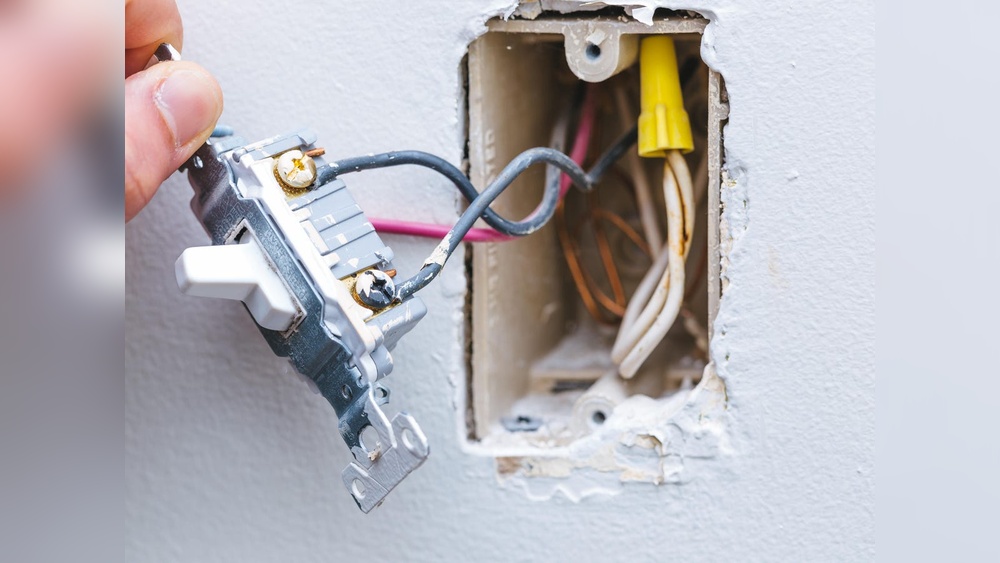
Note the wire colors and how they connect to the switch. Take a photo or label the wires for easy reassembly. Use a screwdriver to loosen the wire terminals on the switch. Disconnect each wire slowly and keep them apart. Avoid pulling on the wires to prevent damage. Once all wires are disconnected, remove the old switch completely.
Choose The Right Replacement Switch
Choosing the right replacement switch for your ceiling fan is important. The correct switch ensures safe and smooth operation. It also matches your fan’s controls and wiring.
Not all switches work for every ceiling fan. Some control the light only, while others handle both fan speed and light. Picking the proper switch avoids future problems and extra work.
Check Your Fan’s Switch Type
Identify if your fan uses a single-pole or double-pole switch. Single-pole switches control one circuit. Double-pole switches control two circuits at once. This step is key to find the right match.
Match The Switch Ratings
Look at the voltage and current ratings on your old switch. The new switch must handle the same or higher ratings. This keeps your fan safe from electrical issues.
Consider Switch Features
Decide if you want a simple on/off switch or a multi-speed switch. Some switches offer dimming or remote control options. Choose features that fit your needs and fan model.
Check The Switch Size And Style
The new switch should fit inside the fan’s switch housing. Check the size and mounting style. A wrong size can cause installation problems.
Install The New Switch
Installing the new switch is a key step in changing your ceiling fan’s light switch. This part needs care and focus. Follow each step closely to ensure your fan works safely and correctly.
Connecting The Wires
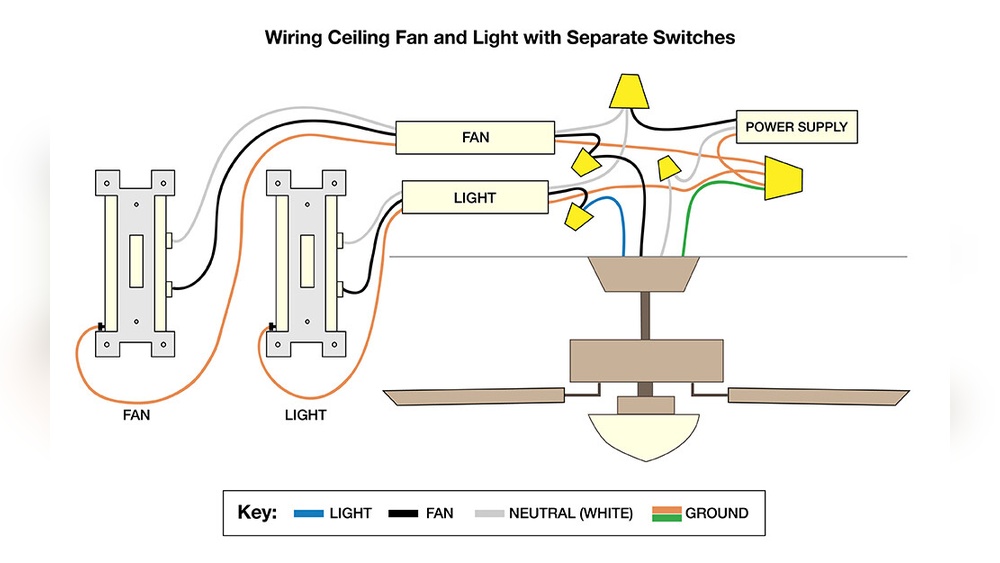
Start by matching the wires from the switch to the fan wires. Usually, the wires are color-coded. Connect black to black and white to white. Use wire nuts to twist wires together tightly. Make sure no wire is exposed outside the nuts. This prevents shorts and sparks.
Check the new switch’s instructions for any special wire connections. Some switches have a ground wire, usually green or bare copper. Attach this wire to the fan’s ground wire or the metal box.
Securing The Switch
After wiring, place the switch carefully into the switch box. Push the wires back gently to avoid damage. Use screws to fix the switch firmly in place. Tighten screws so the switch does not move.
Attach the switch cover plate over the switch. This keeps wires safe and gives a clean look. Make sure the cover fits well and the switch moves easily.
Test The New Switch
Testing the new switch is a key step after installation. It ensures the switch works safely and correctly. This step helps avoid problems like flickering lights or a fan that won’t turn on. Follow these simple tests to check your work.
Turn On The Power
Restore power at the circuit breaker. Make sure the switch controls the ceiling fan’s light or fan motor. Flip the switch up and down slowly. Watch for any sign of power or response.
Check Fan And Light Operation
Turn on the fan and the light separately. Each should work smoothly and without delay. If the fan or light doesn’t respond, the wiring might need rechecking.
Look For Sparks Or Noise
Listen for buzzing or crackling sounds near the switch. Watch for sparks or smoke. Stop immediately if you see or hear anything unusual. These signs mean a wiring problem or a faulty switch.
Test The Switch Multiple Times
Flip the switch several times quickly. The fan and light should react each time. Consistent performance shows the switch is ready for daily use.

Credit: diy.stackexchange.com
Troubleshooting Common Issues
Changing a light switch in a ceiling fan can sometimes cause unexpected problems. Troubleshooting common issues helps fix these problems quickly. This section covers frequent problems and easy ways to solve them. Follow the steps below to get your ceiling fan switch working well again.
Check For Loose Wiring
Loose wires often cause a ceiling fan switch to fail. Turn off the power first. Open the switch box carefully. Look for wires that are not tightly connected. Tighten any loose wire nuts or screws. Make sure no wires are touching each other. Close the box and test the switch again.
Test The Switch Itself
Sometimes the switch is faulty and needs replacing. Use a voltage tester to check the switch. If it shows no power flow, the switch may be broken. Replace it with a new switch of the same type. Installing a new switch can solve many problems quickly.
Inspect The Ceiling Fan Wiring
The problem might be in the fan’s wiring, not the switch. Check the wires connecting the fan to the switch. Look for damaged or disconnected wires. Repair or replace any damaged wiring. This can restore proper function to your fan and light.
Verify Power Supply
No power means the switch won’t work. Check the circuit breaker or fuse box. Reset any tripped breakers or replace blown fuses. Use a tester to confirm power is reaching the switch. Restoring power often fixes the issue.
Frequently Asked Questions
How Do I Safely Turn Off Power Before Changing A Switch?
Always switch off the circuit breaker controlling the fan. Use a voltage tester to confirm no power is present. This prevents electrical shock and ensures safety during the switch replacement.
What Tools Do I Need To Change A Light Switch?
You typically need a screwdriver, voltage tester, wire stripper, and replacement switch. These tools help you safely remove the old switch and install the new one.
How Can I Identify The Correct Wires For The Switch?
Look for black (hot) and white (neutral) wires connected to the switch. Use a voltage tester to confirm wires before disconnecting to avoid errors.
Can I Replace A Fan Light Switch With A Dimmer Switch?
Yes, if the dimmer is compatible with your fan’s light type. Ensure it supports the bulb wattage and type to avoid damage.
Conclusion
Changing a light switch in a ceiling fan is simple with the right steps. Always turn off the power before starting work. Follow the instructions carefully to avoid mistakes. Take your time and check each connection twice. This small task can improve your home’s lighting control.
A little effort brings better comfort and convenience. Now, you can handle this job safely and confidently. Try it yourself and enjoy the results.