Have you ever wished you could control your lights from more than one spot? Adding an extra light switch can make your daily routine easier and more convenient.
Whether it’s for a hallway, stairwell, or large room, having multiple switches means you don’t have to walk around in the dark. In this guide, you’ll discover simple, step-by-step instructions that anyone can follow—even if you’re not an expert. By the end, you’ll have the confidence to add that extra switch yourself and enjoy better lighting control in your home.
Keep reading to learn how!

Credit: www.youtube.com
Planning Your Switch Addition
Planning your switch addition is an important first step. It helps avoid problems and extra costs later. Careful planning ensures your new switch works well and is safe. Consider the best spot, switch type, and electrical needs before starting.
Choosing The Right Location
Pick a spot that is easy to reach and use. Think about where you need light the most. Near doors or in hallways are common places. Avoid spots near water or heat sources. Also, check if there is space inside the wall for wiring.
Selecting Compatible Switch Types
Choose a switch that fits your needs and style. Single-pole switches work for one light source. Three-way switches control lights from two places. Dimmer switches let you adjust light brightness. Make sure the switch matches your existing wiring and fixtures.
Assessing Electrical Load And Safety
Check your home’s electrical system capacity before adding a switch. Too many devices on one circuit can cause problems. Use a circuit tester or call an electrician to check load. Always follow safety rules and local electrical codes. Turn off power at the breaker before working on wiring.
Gathering Necessary Tools And Materials
Before adding an extra light switch, prepare all the tools and materials. Proper preparation saves time and prevents mistakes. Gather everything you need to work safely and efficiently.
Basic Tools Checklist
Start with essential tools. A screwdriver set is a must for removing and installing screws. Wire strippers help remove insulation from wires without damage. A voltage tester checks if wires are live. Needle-nose pliers bend and twist wires easily. A drill with bits helps make holes for new wiring. Tape measure ensures accurate placement of switches and wires. Have electrical tape handy for insulating wire connections.
Switches And Wiring Options
Choose the right switch type for your project. Single-pole switches control one light from one location. Three-way switches control lights from two locations. Pick the correct gauge of electrical wire. Usually, 14-gauge wire works for most lighting circuits. Use wire connectors or wire nuts to join wires securely. Buy extra wire to allow for adjustments during installation.
Safety Gear Essentials
Safety gear protects you from electrical shocks and injuries. Wear insulated gloves to avoid electric shock. Use safety goggles to protect your eyes from dust and sparks. A dust mask keeps you safe from inhaling particles. Non-slip shoes provide stable footing while working. Always turn off power at the circuit breaker before starting. Double-check with a voltage tester to confirm the power is off.
Turning Off Power Safely
Turning off power safely is the first step before adding an extra light switch. It protects you from electric shocks and accidents. Always take time to follow safety steps carefully.
Locating The Circuit Breaker
Find the main electrical panel in your home. It is usually in the basement, garage, or utility room. The panel has switches called circuit breakers. Each breaker controls power to a part of your house. Look for labels next to the breakers to identify which one controls the lights.
If labels are missing or unclear, you can test by switching off one breaker at a time. Have someone help you check if the lights go off. This way, you find the correct breaker safely.
Confirming Power Is Off
After turning off the breaker, check that power is really off. Use a voltage tester or a non-contact tester on the light switch wires. The tester will show if electricity is still present.
Never trust only the breaker switch. Always test the wires before starting work. This step keeps you safe from electric shocks and injury.
Removing The Existing Switch
Removing the existing switch is the first step in adding an extra light switch. It requires care and attention to avoid electrical hazards. Before starting, always turn off the power at the circuit breaker. Confirm the power is off using a tester.
Unscrewing The Switch Plate
Begin by removing the screws that hold the switch plate. Use a screwdriver that fits the screws well. Keep the screws safe for later use. Gently pull the plate away from the wall. This exposes the switch and wiring behind it.
Disconnecting Wires Carefully
Note how the wires connect to the switch before removing them. Take a photo or label wires for reference. Use a screwdriver to loosen the terminal screws. Gently pull the wires free without forcing them. Avoid touching any bare wire ends together. Place the old switch aside safely.
Running New Wiring
Running new wiring is an important step when adding an extra light switch. This process ensures your switch works safely and efficiently. Proper wiring helps avoid electrical problems and keeps your home safe. Follow clear steps to run wires correctly and neatly.
Planning Wire Pathways
Start by planning where the wires will run. Look for the shortest and easiest paths inside walls or ceilings. Avoid areas with pipes or other wires. Mark the spots where you will drill holes or place wiring channels. Planning helps save time and prevents damage.
Fishing Wires Through Walls
Fishing wires means pulling them through walls to reach your switch and light. Use a wire fish tape or a flexible rod to guide the wire inside the wall. Work slowly to avoid breaking the wire or damaging drywall. Make small holes if needed, then patch them later.
Connecting To Power Source
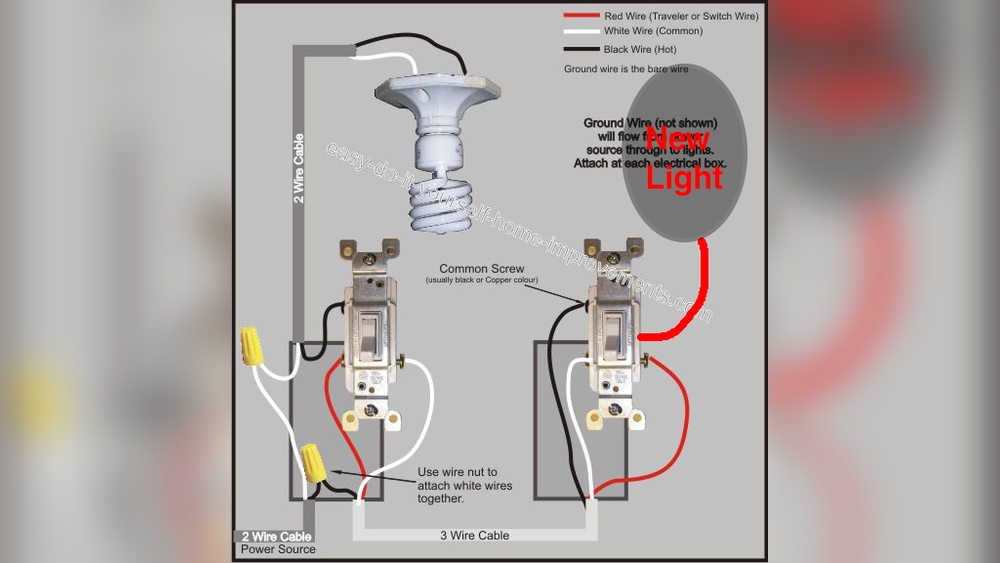
Connect the new wiring to a power source, usually from an existing switch or circuit. Turn off the main power before starting connections. Use wire nuts to join wires safely. Match wire colors correctly: black to black, white to white, and ground wires to ground. Test the connection after finishing.
Installing The Extra Switch
Installing an extra light switch makes controlling your lights easier. It lets you turn lights on or off from different spots. This process needs careful steps to keep everything safe and working well. Follow these instructions to install your new switch correctly.
Wiring The New Switch
Turn off the power at the breaker box before starting. Use a voltage tester to check wires for electricity. Connect the new switch wires to the existing circuit wires. Match black wires to black, white to white, and ground to ground. Twist wire connectors tightly to secure each connection. Keep wires neat and inside the electrical box.
Securing The Switch In The Box
Push the wires gently into the box without pinching them. Align the switch with the box holes. Use screws to fasten the switch firmly in place. Make sure the switch is straight and tight. Attach the switch cover plate to finish the look.
Testing The Connections
Turn the power back on at the breaker. Flip the new switch to test if the light works. Check for any flickering or unusual sounds. If the light does not work, turn off the power again and recheck wiring. Confirm all connections are tight and correct before final use.
Finishing Touches
Finishing touches are key to completing your extra light switch installation. These steps ensure safety and functionality. You will see how the switch fits into your home and works correctly.
Reattaching Switch Plates
Start by placing the switch plate back over the switch. Align the holes on the plate with the screws on the switch box. Use a screwdriver to tighten the screws. Do not overtighten; the plate should be snug but not cracked.
Restoring Power And Testing
Turn the power back on at the circuit breaker. Check the light switch by flipping it on and off. Make sure the light turns on and off smoothly. Test any other switches on the same circuit to confirm all works well.
Troubleshooting Common Issues
If the light does not turn on, double-check your wiring. Ensure all connections are tight and in the right place. Look for loose wires or screws. If the switch feels loose, tighten the mounting screws. Still no light? Switch off power and review each step carefully.

Credit: diy.stackexchange.com
Safety Tips For Electrical Work
Working with electricity needs care and focus. Safety is the top rule when adding an extra light switch. Small mistakes can cause shocks or fires. This section shares important safety tips for electrical work. Follow these tips to protect yourself and your home.
When To Call A Professional
Some tasks need expert skills. Complex wiring or old circuits require a professional. If you feel unsure, stop and call an electrician. Professionals have tools and knowledge to handle risks. They keep your home safe and code-compliant.
Avoiding Common Mistakes
Turn off power before starting any work. Use a voltage tester to check wires. Never touch wires with wet hands or metal tools. Label wires to avoid confusion. Tighten connections but don’t overtighten screws. Follow instructions carefully and use the right materials.

Credit: www.youtube.com
Frequently Asked Questions
How Do I Add An Extra Light Switch Safely?
Turn off the power at the breaker before starting. Use a voltage tester to confirm no electricity flows. Follow wiring diagrams carefully and connect wires to the new switch. If unsure, consult a licensed electrician to ensure safety.
What Tools Are Needed To Add A Light Switch?
You will need a screwdriver, wire stripper, voltage tester, electrical tape, and wire nuts. A drill may be necessary for mounting. Having these tools ready ensures a smooth and safe installation process.
Can I Add A Light Switch To An Existing Circuit?
Yes, you can add a switch to an existing lighting circuit. Ensure the circuit can handle additional load. Turn off power and connect the switch in series with the light fixture’s wiring for proper control.
How Much Does It Cost To Add An Extra Light Switch?
Costs vary, but materials typically range from $5 to $20. Hiring a professional electrician may cost $50 to $150. DIY installation can save money but requires proper tools and knowledge.
Conclusion
Adding an extra light switch can brighten up your space easily. Follow safety steps carefully to avoid any problems. Choose the right tools and materials for the job. Take your time and check your work as you go. This simple change improves convenience and lighting control.
Enjoy a well-lit room with just a few steps. Stay safe and ask for help if unsure. Your home will feel more comfortable and bright.


