Have you ever wished you could control an outlet with a simple flick of a light switch? Imagine turning on your favorite lamp or charging device without bending down or unplugging anything.
It’s easier than you think, and once you know how, you’ll wonder why you didn’t do it sooner. In this guide, you’ll learn straightforward steps to take control of your outlets and make your home more convenient and efficient. Ready to transform your space with just one switch?
Let’s dive in.

Credit: www.do-it-yourself-help.com
Tools And Materials Needed
Controlling an outlet with a light switch requires specific tools and materials. Having the right items makes the job easier and safer. Prepare all tools before starting the work.
Each tool and material has a clear role. Understanding their use helps avoid mistakes. This section lists all needed items for this project.
Basic Electrical Tools
You will need a screwdriver set, both flathead and Phillips. Wire strippers are essential to remove insulation from wires. A voltage tester ensures power is off before working. Needle-nose pliers help bend and hold wires safely.
Materials For Wiring
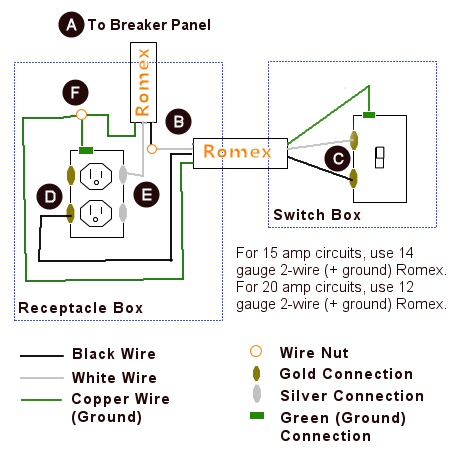
Use electrical wire that matches your home’s circuit type. Typically, 14 or 12-gauge wire works for most outlets. Wire nuts are necessary to join wires securely. Electrical tape adds extra safety by insulating wire connections.
Safety Equipment
Wear insulated gloves to protect from electric shocks. Safety glasses keep dust and debris out of your eyes. Work in a well-lit area to see all wiring clearly. A non-contact voltage tester gives extra safety assurance.
Switch And Outlet Components
Choose a single-pole light switch suitable for your circuit. A standard 120V electrical outlet matches most household needs. Outlet cover plates finish the look and protect wiring. Make sure all parts meet local electrical codes.

Credit: projectsbypeter.com
Safety Precautions
Safety is the top priority when controlling an outlet with a light switch. Electrical work can be risky without the right steps. Follow these precautions to protect yourself and your home.
Turn Off The Power
Always switch off the circuit breaker before starting any work. Double-check with a voltage tester to confirm no electricity flows to the outlet. This step prevents shocks or injuries.
Use Proper Tools
Choose insulated tools made for electrical jobs. Avoid makeshift tools that can slip or cause short circuits. Proper tools help you work safely and efficiently.
Check Local Codes
Understand your area’s electrical rules before beginning. Some places require permits or professional help. Following codes keeps your project legal and safe.
Inspect Wiring Carefully
Look for damaged or old wires before connecting the switch. Replace any frayed or brittle wires. Good wiring prevents fires and electrical faults.
Secure Connections Firmly
Tighten all wire connections to avoid loose contacts. Loose wires can create sparks or stop the switch from working. Firm connections ensure safety and proper function.
Test Before Closing
After wiring, turn the power on and test the switch. Make sure the outlet works correctly and the switch controls it. Fix any issues before securing everything back.
Identify The Outlet Wiring
Identifying the outlet wiring is the first step in controlling an outlet with a light switch. Knowing how the wires connect helps you make the right changes safely. It also ensures the switch controls only the outlet you want.
This step requires some care. Power must be off before you start. Safety comes first.
Turn Off The Power
Find your home’s circuit breaker. Switch off the breaker that controls the outlet. Use a voltage tester to check the outlet. Make sure no electricity flows to the wires.
Remove The Outlet Cover
Use a screwdriver to take off the outlet cover. This exposes the outlet and the wiring behind it. Look carefully at the wires connected to the outlet.
Identify Hot, Neutral, And Ground Wires
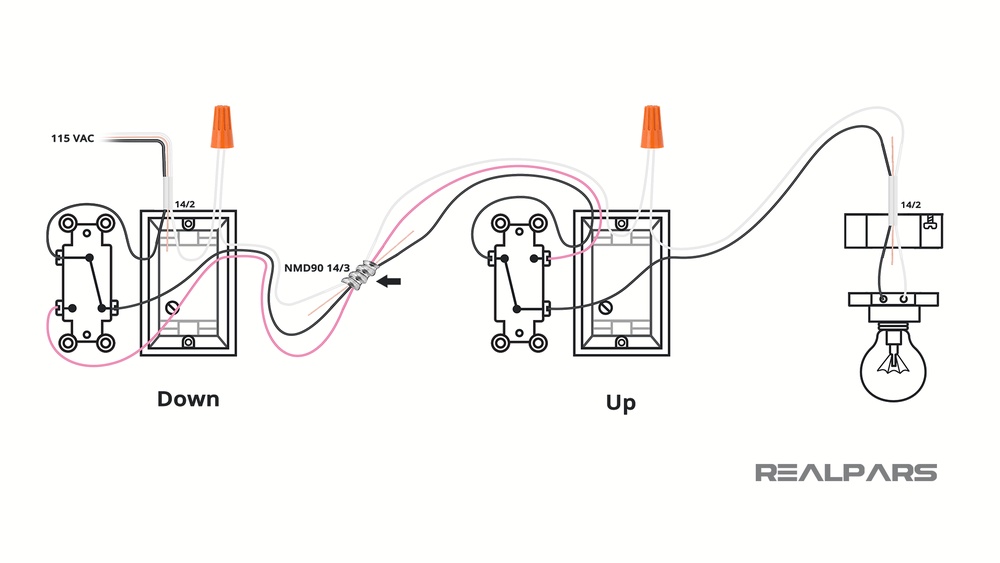
Hot wires are usually black or red. Neutral wires are white. Ground wires are green or bare copper. Knowing these helps you connect the switch properly.
Check For Switched Wires
Look for wires that connect to the switch. Sometimes one hot wire passes through the switch. This wire controls the outlet’s power.
Note Wire Connections
Take a picture or write down the wire connections. This helps you remember the original setup. It also guides you when you add the switch.
Credit: www.oneprojectcloser.com
Turn Off Power At The Breaker
Turning off the power at the breaker is the first step to control an outlet with a light switch safely. It stops electricity from flowing to the outlet. This step protects you from electric shock and prevents damage to your electrical system.
Before starting any wiring work, always switch off the power. Never trust the wall switch alone to cut the power. Electricity can still be live and dangerous.
Locate The Correct Breaker
Find your home’s electrical panel. It is often in the basement, garage, or utility room. Look for the breaker labeled for the room or area you want to work on. If no label exists, turn off breakers one by one to find the right one.
Switch Off The Breaker
Flip the breaker switch to the OFF position. This stops the flow of electricity to the outlet. You should hear or feel a click when the breaker is off. Make sure it stays in the off position while working.
Verify Power Is Off
Use a non-contact voltage tester to check the outlet. Place the tester near the outlet slots. If the tester lights up or beeps, power is still on. Test again after switching off another breaker if needed. Never touch wires without confirming power is off.
Remove The Outlet Cover And Inspect
Removing the outlet cover is the first step to control an outlet with a light switch. This step lets you see the wiring behind the outlet. It helps to understand how the outlet connects to the switch. Always turn off the power before starting. Safety first.
Once the cover is off, look closely at the wires. Check for any signs of damage or loose connections. This inspection helps to know what changes are needed. It also prevents problems later on.
Gather Necessary Tools And Safety Gear
Before removing the cover, get a screwdriver ready. Wear gloves to protect your hands. Use a voltage tester to ensure the power is off. These tools keep the work safe and easy.
Remove The Outlet Cover Carefully
Use the screwdriver to unscrew the outlet cover. Keep the screws in a safe place. Gently pull the cover away from the wall. Avoid forcing it to prevent damage.
Inspect The Wiring Behind The Outlet
Look at the wires attached to the outlet. Notice the colors: usually black, white, and green or bare copper. Check if wires are tightly connected to screws. Loose wires can cause problems.
Check For A Switch Loop
Look for a wire that runs to the light switch. This wire controls the outlet power. Identifying this loop is key to controlling the outlet with the switch.
Disconnect Outlet Wires
Disconnecting the outlet wires is a key step in controlling an outlet with a light switch. This process helps you safely separate the outlet from its power source before making changes. Always turn off the power at the circuit breaker to avoid electric shock. Use a voltage tester to double-check the wires are not live.
Careful handling of wires is important to prevent damage. Label each wire to remember where it connects. This makes reassembly easier and safer. Keep your workspace clean and organized for a smooth process.
Turn Off The Power
Switch off the circuit breaker controlling the outlet. Confirm no electricity flows to the outlet using a voltage tester. This prevents accidents during wire disconnection.
Remove The Outlet Cover
Unscrew the outlet cover plate gently. Set the screws aside in a safe place. This exposes the wires connected to the outlet.
Loosen Wire Connections
Use a screwdriver to loosen the screws holding the wires. Do not pull on the wires directly. Carefully free each wire from the outlet terminals.
Label Each Wire
Attach small tape pieces to each wire. Write simple labels like “hot,” “neutral,” or “ground.” This helps identify wires for future connections.
Disconnect The Wires
Remove all wires from the outlet terminals. Keep the wires separated and away from each other. This prevents accidental contact and short circuits.
Wire The Switch To Control The Outlet
Controlling an outlet with a light switch lets you turn devices on or off easily. Wiring the switch to the outlet redirects power flow. This simple setup saves energy and adds convenience to your home.
Gather The Necessary Tools And Materials
Start by collecting the tools you need. A screwdriver, wire stripper, voltage tester, and electrical tape are essential. Also, have a standard single-pole light switch and wire connectors ready. Safety first: always turn off power at the breaker before working.
Identify The Wires In Your Outlet Box
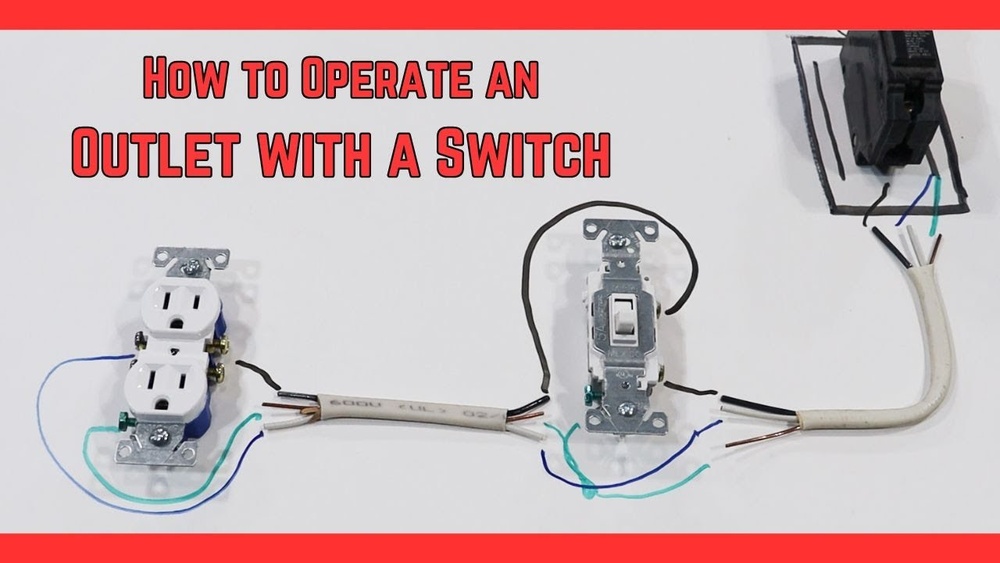
Remove the outlet cover carefully. Use the voltage tester to check for live wires. You will see three types of wires: black (hot), white (neutral), and green or bare (ground). Note which wire supplies power to the outlet.
Connect The Switch To The Outlet Wiring
Cut the black wire leading to the outlet. Attach one end to the switch’s input terminal. Connect the other end to the switch’s output terminal. This creates a break in the hot wire, controlled by the switch.
Secure The Neutral And Ground Wires
Twist the white neutral wires together using a wire connector. Do not connect neutrals to the switch. Join the ground wires and attach them to the switch’s green screw. Proper grounding prevents electrical hazards.
Install The Switch And Outlet Back In The Box
Push the wires neatly into the electrical box. Screw the switch into place. Reattach the outlet and cover plate. Restore power at the breaker and test the switch control on the outlet.
Install The Switch And Outlet Back
Installing the switch and outlet back is the final step in controlling an outlet with a light switch. This step secures the devices in place and prepares them for use. Proper installation ensures safety and functionality.
Take your time to align the switch and outlet correctly. This helps avoid loose connections and damage.
Position The Outlet In The Wall Box
Carefully push the outlet into the wall box. Make sure wires do not get pinched. Hold the outlet steady to keep wires intact.
Screw The Outlet Securely
Use screws to fasten the outlet to the wall box. Tighten screws enough to hold the outlet firmly. Avoid over-tightening to prevent cracking.
Place The Switch In The Wall Box
Gently push the switch into its wall box. Check that wires fit without strain. Keep the switch level and straight.
Screw The Switch In Place
Attach screws to secure the switch. Ensure it does not move when pressed. Proper tightening prevents future issues.
Attach The Wall Plates
Place the wall plates over the switch and outlet. Align them carefully to cover all gaps. Screw the plates gently but firmly.
Restore Power And Test The Setup
Restoring power and testing the setup is the final step in controlling an outlet with a light switch. This step confirms that your wiring is correct and the switch properly controls the outlet. Safety is important, so follow each step carefully.
Turn On The Circuit Breaker
Start by turning on the circuit breaker that powers the outlet and switch. This restores electricity to the area. Make sure the breaker is fully switched on to avoid partial power flow.
Check The Outlet For Power
Use a voltage tester or plug in a device to check if the outlet receives power. The outlet should turn on or off based on the switch position. This shows the switch controls the outlet correctly.
Operate The Light Switch
Flip the light switch on and off several times. Each flip should turn the outlet power on or off. This confirms the wiring is correct and the switch works as intended.
Look For Any Issues
Watch for flickering lights or devices that don’t turn on. These problems might mean loose wiring or a faulty connection. If you see issues, turn off power and check your wiring again.
Troubleshooting Common Issues
Troubleshooting issues with controlling an outlet using a light switch can feel tricky. Common problems often have simple fixes. Understanding these issues saves time and effort.
Start by checking the wiring. Loose or incorrect connections cause most problems. Next, consider the switch type and the outlet’s status. Testing the switch and outlet helps find the issue fast.
Check For Loose Or Incorrect Wiring
Loose wires can stop the outlet from working properly. Turn off the power before inspecting wires. Look for disconnected or poorly connected wires. Tighten or reconnect wires as needed.
Test The Light Switch Functionality
Sometimes, the switch itself may be faulty. Use a voltage tester to check the switch. Replace the switch if it does not control power correctly.
Ensure The Outlet Is Switched
Not all outlets are controlled by the switch. Some outlets have half of the sockets switched, the other half always on. Test the outlet with a lamp or device. Confirm the switch controls the outlet part you want.
Reset Tripped Breakers Or Gfci Outlets
Power interruptions often come from tripped breakers or GFCI outlets. Check your breaker panel for tripped switches. Press the reset button on GFCI outlets to restore power.
Replace Faulty Outlets
Old or damaged outlets may not work with switches. Inspect the outlet for cracks or burn marks. Replace the outlet to ensure safe, reliable operation.
Frequently Asked Questions
How Do I Wire An Outlet To A Light Switch?
To wire an outlet to a light switch, connect the switch to control the outlet’s hot wire. This setup allows the outlet to turn on and off with the switch, providing convenient control over devices plugged into the outlet.
Can Any Outlet Be Controlled By A Light Switch?
Not all outlets can be controlled by a light switch. It requires specific wiring where the switch interrupts the hot wire feeding the outlet. Ensure your outlet and switch are on the same circuit for proper control.
What Tools Are Needed To Control An Outlet With A Switch?
You need a screwdriver, wire stripper, voltage tester, electrical tape, and the appropriate wiring. Always turn off power before working and verify connections with the voltage tester for safety.
Is It Safe To Control An Outlet With A Switch?
Yes, it is safe if wired correctly following electrical codes. Always turn off power before installation and use proper tools. If unsure, consult a licensed electrician to ensure safety.
Conclusion
Controlling an outlet with a light switch is simple and useful. It helps save energy and adds convenience to your home. Just follow safety steps and use the right tools. You can turn lamps or devices on and off easily.
This small change makes daily life smoother. Try this project to improve your space today.