Are you ready to transform your space with a beautiful painting but not sure how to hang it securely on your wall? Hanging a painting might seem simple, but getting it just right can make all the difference in how your room feels.
You want your artwork to catch eyes, stay safe, and look perfect every time you walk by. In this guide, you’ll discover easy steps and smart tips to hook your painting on the wall like a pro—no guesswork, no damage, just flawless results.
Keep reading, and you’ll be ready to showcase your favorite pieces with confidence and style.
Credit: www.artbycedar.com
Choose The Right Spot
Choosing the right spot to hang a painting is very important. It helps the artwork look its best and fits well in your space. Picking the perfect place makes your room feel balanced and inviting. Think about where the painting will get attention and match the room’s style.
Consider Wall Material
Different walls need different hooks and nails. Drywall is common but fragile. Use anchors for heavy paintings on drywall. Brick and concrete walls need special drill bits. Wood walls allow easy nailing. Knowing your wall type avoids damage and keeps the painting secure.
Assess Lighting Conditions
Good light makes paintings shine. Natural light shows true colors but can fade art over time. Use indirect sunlight to protect your painting. Artificial lights like spotlights can highlight details. Avoid glare that makes it hard to see the painting clearly.
Evaluate Room Layout
Think about the room’s flow and furniture. Hang art where people can see it easily. Avoid crowded walls or busy corners. Center the painting at eye level for best view. Make sure the painting fits the wall space well.

Credit: www.liftingitalia.com
Select Suitable Hooks
Selecting the right hooks is key to hanging your painting safely and securely. The hooks must hold the painting’s weight and fit the wall type. Choosing the wrong hook can cause damage to your wall or make the painting fall.
Understand the different hooks available and their uses. Match the hook’s weight capacity to your painting. Also, check if the hook works with your wall material. This ensures a strong hold and keeps your wall intact.
Types Of Hooks
There are many hooks for hanging paintings. Picture hooks have small nails and are good for light frames. Adhesive hooks stick to the wall and work without nails. Sawtooth hangers attach directly to the painting’s back and hang on nails or screws.
For heavier paintings, use wall anchors with screws. These give extra support in drywall or plaster. Choose hooks that match your painting size and style.
Weight Capacity
Check the hook’s weight limit before buying. The hook must support the painting’s full weight. Overloading a hook may cause it to break or pull out. Use multiple hooks for very heavy paintings to spread the weight.
Always choose hooks with a higher weight rating than your painting. This adds safety and prevents accidents.
Wall Compatibility
Different walls need different hooks. Drywall, plaster, brick, and concrete require special hooks or anchors. Adhesive hooks work best on smooth, painted walls but not on textured or rough surfaces.
Use wall anchors for drywall to prevent holes from enlarging. Masonry hooks are for brick or concrete walls. Match the hook type to your wall for a firm hold.
Prepare Your Tools
Preparing your tools is the first step to hang a painting on the wall. Having the right items ready saves time and effort. It also helps you avoid mistakes and damage. Let’s explore what you need before starting the project.
Gather Necessary Supplies
Collect all the tools and materials you need. This includes hooks, nails, screws, and a hammer. You might also need wall anchors for heavier paintings. A pencil is useful to mark spots on the wall. Having everything ready keeps the work smooth and quick.
Use Measuring Tools
Measuring tools help you place the painting perfectly. A tape measure is ideal to check distances. A level ensures the painting hangs straight. A ruler or yardstick can help with smaller adjustments. Accurate measurements prevent crooked or uneven placement.
Have Safety Gear Ready
Safety is important while hanging paintings. Wear safety goggles to protect your eyes from dust and debris. Gloves protect your hands from sharp tools and nails. A dust mask can help if you drill into the wall. Preparing safety gear keeps you safe during the task.
Mark The Placement
Marking the placement of your painting hooks is a key step. It ensures your artwork hangs straight and looks great. Careful marking helps avoid unnecessary holes in your wall. Follow simple steps for precise placement. This saves time and effort during installation.
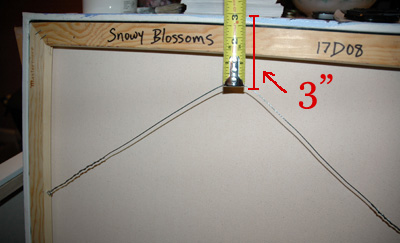
Measure Height And Center
Start by deciding the height for your painting. A good rule is to hang art at eye level. Measure the wall’s width to find the center point. Mark this spot lightly with a pencil. This will guide the hook placement and keep your painting balanced.
Use A Level
Place a level across the marked center point. This checks if your marks are straight. Adjust marks until the bubble is centered. A level ensures your painting won’t hang crooked. This step is important for a professional look.
Mark Drill Points
Identify where the hooks will go on the wall. Mark these spots clearly with a pencil. Use the painting’s hanging hardware as a guide. Accurate drill points prevent misalignment. Double-check these marks before drilling holes.
Install Hooks Correctly
Installing hooks correctly is key to safely hanging your painting. It keeps the artwork secure and protects your wall from damage. Follow these simple steps to ensure your hooks are strong and steady.
Drill Pilot Holes
Start by marking the spot for the hook. Use a drill bit smaller than the screw. Drill a pilot hole to guide the screw in straight. This prevents the wall from cracking or splitting.
Insert Anchors If Needed
For drywall or plaster, anchors provide extra support. Push or tap the anchor into the pilot hole. Anchors hold screws firmly and stop them from pulling out. Choose an anchor size that fits your screw and weight.
Attach Hooks Securely
Place the hook over the hole or anchor. Use a screwdriver or drill to tighten the screw. Make sure the hook feels tight and does not wiggle. Test by gently pulling to confirm it holds well.
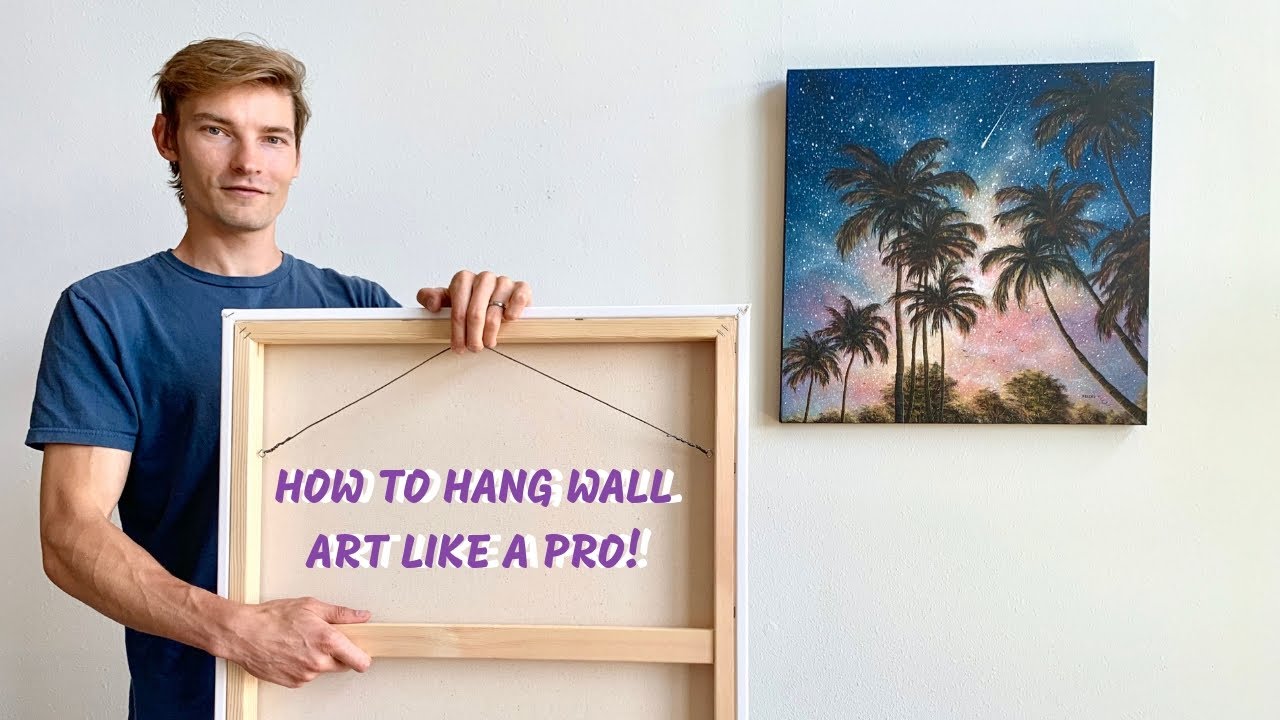
Hang The Painting
Hanging a painting on the wall is the final step to show off your art. It gives your room a fresh and personal look. Doing it right keeps your painting safe and looking great for years.
Follow these easy steps to hang your painting perfectly. Careful handling and small adjustments make a big difference.
Check Hanging Hardware
Look at the back of your painting. Check if it has hooks, wires, or brackets. Use strong hardware that fits the painting’s weight. Replace any weak or old parts before hanging. This prevents damage and keeps your painting secure.
Position The Painting
Hold the painting up on the wall where you want it. Step back to see how it looks. Choose a spot that matches the room’s light and style. Make sure the painting is not too high or low. Mark the wall lightly with a pencil for where the hooks will go.
Adjust For Levelness
Use a small level tool to check if the painting is straight. Adjust the hooks or wire until the painting hangs evenly. Take your time to get it perfect. A crooked painting can spoil the whole look of the room.
Maintain And Adjust
Maintaining and adjusting your wall painting hook ensures your art stays secure and looks great. Regular care prevents accidents and keeps the display neat. Small changes can improve the hanging over time without much effort.
Check Stability Regularly
Look at the hook often to see if it stays firm. Gently shake the painting to test its hold. Tighten screws or nails if you notice any looseness. A stable hook protects your wall and art from damage.
Make Minor Adjustments
Sometimes, the painting may hang crooked or shift. Move it slightly left or right to make it straight. Adjust the hook height if the artwork is too low or high. Small tweaks keep your display looking perfect.
Protect Wall And Art
Use felt pads behind the painting to avoid wall marks. Check for scratches or holes near the hook. Replace or repair hooks to prevent wall damage. Protecting both keeps your home and art in top shape.
Credit: www.youtube.com
Frequently Asked Questions
How Do I Choose The Right Hook For Painting?
Select a hook based on the painting’s weight and wall type. Use sturdy hooks for heavy frames and adhesive hooks for light paintings. Always check the hook’s weight rating to ensure secure support and prevent damage to your wall or artwork.
What Tools Are Needed To Hang A Painting On The Wall?
Essential tools include a measuring tape, pencil, level, hammer, and appropriate hooks or nails. These tools help position the painting accurately and securely. Using a level ensures the painting hangs straight, enhancing the room’s aesthetics and preventing damage.
How High Should I Hang A Painting On The Wall?
Hang paintings at eye level, roughly 57-60 inches from the floor to the center. This height creates a balanced look and makes viewing comfortable. Adjust slightly for furniture height or room layout to maintain visual harmony.
Can I Hang Paintings On Drywall Without Studs?
Yes, use wall anchors or drywall hooks designed for your painting’s weight. Avoid nails alone as they may not support heavy frames. Anchors distribute weight evenly, preventing wall damage and ensuring your painting stays securely mounted.
Conclusion
Hanging a painting on the wall is simple with the right steps. Choose the right hook and check your wall type. Measure carefully to place the painting at eye level. Use a level to keep it straight. Take your time to avoid damage and ensure it looks good.
A well-hung painting can brighten any room and show your style. Enjoy your art and the fresh look it brings.