Are you struggling with an old deadbolt that just won’t come off your door? Removing a deadbolt might seem tricky, but with the right steps, you can do it quickly and without stress.
Imagine finally freeing your door from that stubborn lock and getting it ready for a new one or just fixing what’s broken. In this guide, you’ll discover simple, clear instructions that anyone can follow—even if you’re not a DIY expert.
Stick with me, and you’ll have that old deadbolt out in no time. Ready to get started? Let’s dive in.

Credit: www.youtube.com
Tools Needed
Preparing the door is a key step before removing an old deadbolt. This step helps avoid damage and makes the removal smoother. Take your time to set up the area and gather the right tools. This preparation saves effort later and keeps the door safe.
Clear The Area Around The Door
Remove any objects near the door. This gives you space to work freely. Clear rugs or mats to avoid slipping. Good lighting helps you see screws and parts clearly.
Gather Necessary Tools
Collect a screwdriver, drill, and a small container for screws. Having tools ready speeds up the process. Check if your screwdriver fits the deadbolt screws.
Inspect The Door And Deadbolt
Look closely at the deadbolt and door surface. Note any damage or worn parts. This helps you plan the removal carefully. Check for extra screws or covers hiding the lock.
Prepare The Door
Start by gathering basic tools like a screwdriver and a flashlight. Clear the area around the deadbolt to work easily. Check the screws on both sides of the door before removing the old lock.
Locate The Screws On The Interior Knob Or Lever
The first step is to find the screws holding the knob or lever. These screws are usually on the faceplate or hidden under a small cover. Use a flathead screwdriver to gently pry off any covers. This exposes the screws you need to remove.
Unscrew The Interior Knob Or Lever
Use a Phillips-head screwdriver to remove the screws. Turn the screwdriver counterclockwise. Keep the screws in a safe place for later use. Once the screws are out, the knob or lever should come off easily.
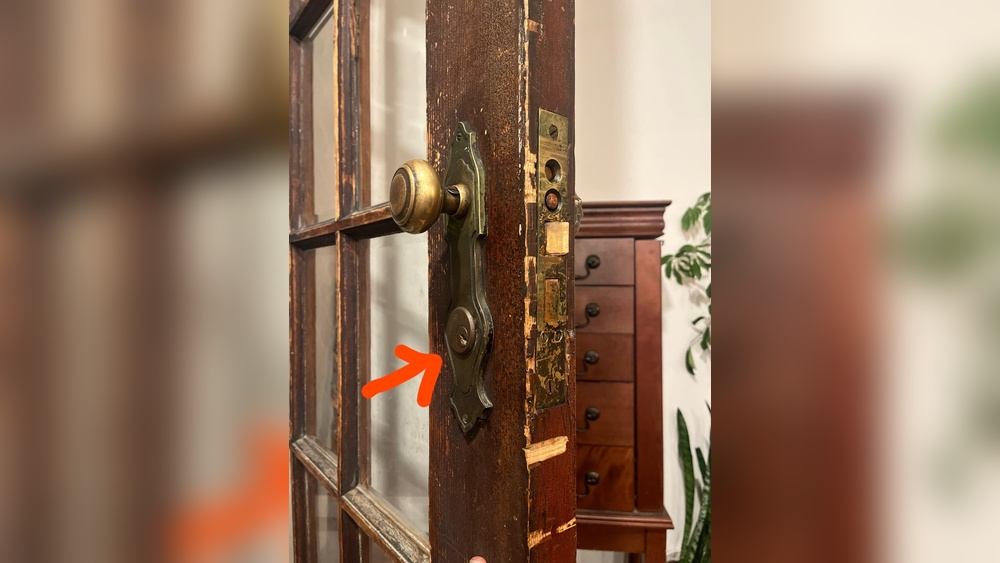
Remove The Interior Plate
Behind the knob or lever, there is a metal or plastic plate. This plate holds the lock mechanism in place. Gently pull the plate away from the door. Sometimes, you may need to unscrew it as well. Removing this plate exposes the deadbolt mechanism.
Remove The Interior Knob Or Lever
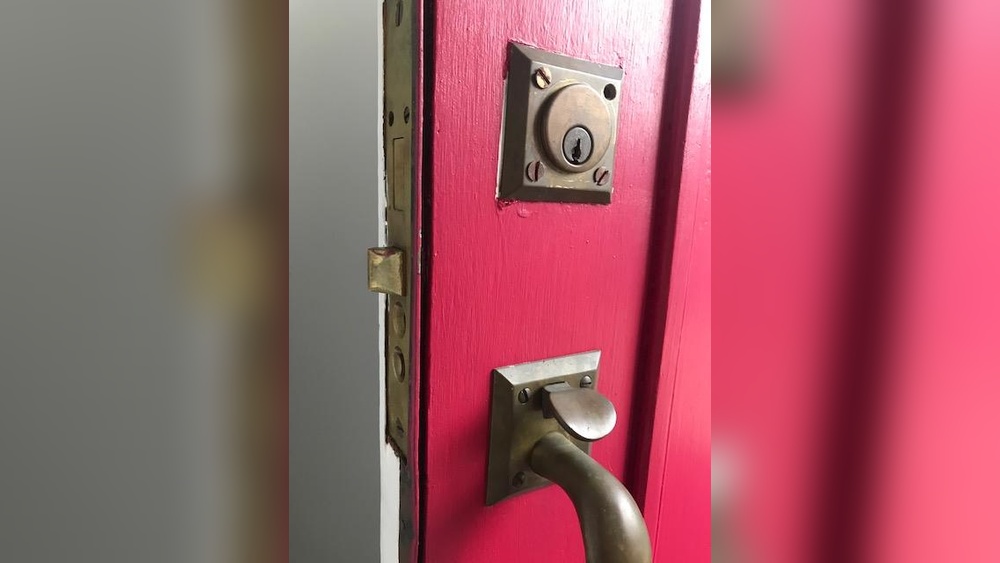
The deadbolt faceplate holds the lock mechanism in place on the door edge. Removing it is a key step to take out the deadbolt. This part is usually secured with screws that need to be loosened carefully.
Before unscrewing, check the type of screwdriver needed. Using the right tool helps avoid damage to screws or the door.
Locate The Faceplate Screws
Look at the edge of the door. You will see a small metal plate covering the deadbolt. The screws are on this plate. They keep the faceplate tight against the door.
Choose The Correct Screwdriver
Match the screwdriver head to the screws on the faceplate. Most deadbolts use a Phillips or flathead screwdriver. Using the wrong size can strip the screw heads.
Unscrew The Faceplate Carefully
Turn the screwdriver counterclockwise to loosen the screws. Hold the faceplate steady while unscrewing. Keep the screws safe to reuse later.
Remove The Faceplate From The Door
Once screws are out, gently pull the faceplate away. It should come off easily. This exposes the deadbolt mechanism inside the door.
Unscrew The Deadbolt Faceplate
Removing the latch mechanism is a key step in taking out an old deadbolt. The latch is the part that extends into the door frame to keep the door closed. Taking it out carefully prevents damage to your door and makes installing a new lock easier.
This process needs a few tools and patience. The latch sits inside the edge of the door, held by screws. Removing these screws frees the latch for easy removal.
Locate And Unscrew The Latch Plate
First, find the latch plate on the edge of the door. It covers the latch and is fastened with screws. Use a screwdriver to remove these screws completely. Keep them safe for later use or disposal.
Pull Out The Latch Mechanism
After removing the screws, gently pull the latch mechanism out of the door edge. It may need a little wiggle to come free. Avoid forcing it to prevent damage to the door or the latch.
Check For Obstructions Inside The Door
Look inside the door cavity where the latch was. Remove any debris or old grease that might block the new latch. A clean space ensures the new lock works smoothly.
Prepare The Door For The New Deadbolt
Inspect the latch hole for any damage or rough edges. Sand down rough spots gently with sandpaper. This step helps the new latch fit perfectly without sticking.
Extract The Deadbolt Cylinder
Checking for damage and cleaning the area is an important step before removing an old deadbolt. This process helps prevent future problems and makes the removal easier. Dirt, rust, or damage can make the deadbolt hard to remove. A clean and smooth surface also prepares the door for a new lock.
Take your time to carefully inspect the door and the lock area. This ensures safety and saves effort later. Cleaning removes dust and grime that build up over time. This step keeps the door in good shape and ready for repair or replacement.
Inspect The Door Surface Around The Deadbolt
Look closely at the door near the deadbolt. Check for cracks, splinters, or holes. These signs show if the door has weakened. A damaged door may need repair before installing a new lock. Make a note of any problem areas.
Check The Deadbolt For Rust Or Corrosion
Rust can cause the deadbolt to stick or jam. See if the metal parts have orange or brown spots. Rust weakens the lock and makes removal hard. Light rust can be cleaned, but heavy corrosion may require extra tools or replacement.
Remove Dust And Dirt From The Lock Area
Use a soft brush or cloth to clear dust. Dirt can block screws and moving parts. Cleaning helps you see all parts clearly. It also stops dirt from falling inside the door. Keep the area neat for easier work.
Clean The Door Surface With Mild Soap
Mix mild soap and water for cleaning. Use a damp cloth to wipe the door around the deadbolt. This removes oils and grime that hide damage. Dry the surface well after cleaning. A clean door surface improves lock fitting later.

Credit: www.doityourself.com

Credit: diy.stackexchange.com
Frequently Asked Questions
How Do I Remove An Old Deadbolt From A Door?
To remove an old deadbolt, first unscrew the interior and exterior plates. Then, pull out the deadbolt mechanism from the door edge carefully. Remove the latch by unscrewing its screws. This process is simple and requires only a screwdriver.
What Tools Are Needed To Remove A Deadbolt Lock?
You only need a screwdriver, typically Phillips or flathead, to remove a deadbolt. A drill may help if screws are stuck. No special tools are required, making it easy for beginners to remove an old deadbolt.
Can I Remove A Deadbolt Without Damaging The Door?
Yes, removing a deadbolt carefully will not damage the door. Always unscrew the lock parts gently and avoid forcing any components. Using the correct screwdriver size reduces the risk of scratches or damage to the door surface.
How Long Does It Take To Remove An Old Deadbolt?
Removing an old deadbolt usually takes about 10 to 15 minutes. The time depends on screw condition and lock type. With basic tools and careful work, you can finish the task quickly and efficiently.
Conclusion
Removing an old deadbolt can seem tough, but it is simple. Follow each step carefully and take your time. Use basic tools and stay safe while working. After removal, you can easily install a new lock or leave the door as is.
This guide helps you save money and do the job yourself. Remember, patience and the right tools make all the difference. Now, your door is ready for any upgrade or repair you want.