Are you planning to add glass blocks to your wall but unsure how to secure them properly? Anchoring glass blocks might seem tricky, but with the right steps, you can make your installation strong and lasting.
This guide will walk you through simple, clear instructions so you can confidently anchor glass blocks to your wall. By the end, you’ll have the know-how to create a beautiful, sturdy glass block feature that stands the test of time.
Keep reading to discover easy tips that save you time and avoid costly mistakes.

Credit: glassblockwarehouse.com
Choosing The Right Glass Blocks
Choosing the right glass blocks is the first step to a strong and beautiful wall. The type, size, and quality of the blocks affect the final look and durability. Select blocks that fit your design and meet your project needs. This choice ensures easier installation and long-lasting results.
Types Of Glass Blocks
Glass blocks come in many styles. Some are clear, allowing light to pass through easily. Others have patterns or textures for privacy. Frosted blocks soften light and add a modern touch. Choose blocks based on the amount of light and privacy you want.
Size And Thickness Considerations
Blocks come in different sizes and thicknesses. Standard sizes are easier to handle and fit most wall frames. Thicker blocks offer better strength and insulation. Pick sizes that match your wall structure for a neat finish. Consider thickness for stability and energy efficiency.
Selecting Quality Materials
Quality matters in glass blocks. Look for blocks made from strong, durable glass. Good blocks resist cracks and chips. Check for uniform color and clear patterns. High-quality blocks last longer and keep their look over time. Avoid low-quality blocks that may break easily.
Preparing The Wall Surface
Preparing the wall surface is a key step before anchoring glass blocks. It ensures the blocks stick well and stay secure. A clean, smooth, and stable wall helps the blocks fit perfectly. This part guides you through the process.
Cleaning And Smoothing The Surface
Remove dirt, dust, and grease from the wall. Use a brush or cloth to clean the area. Any old paint or loose material must be scraped off. Smooth the surface with sandpaper to create a flat base. A clean and even wall helps the adhesive hold better.
Marking The Layout
Plan the glass block placement carefully. Use a pencil and a level to draw straight lines. Mark the positions of each block on the wall. This step avoids mistakes and keeps the blocks aligned. Clear markings make the installation faster and neater.
Checking Wall Stability
Check if the wall is strong enough to hold the blocks. Tap gently to listen for hollow sounds. Look for cracks or loose parts that may cause problems. Repair any weak spots before starting the installation. A stable wall ensures the glass blocks stay safe and firm.
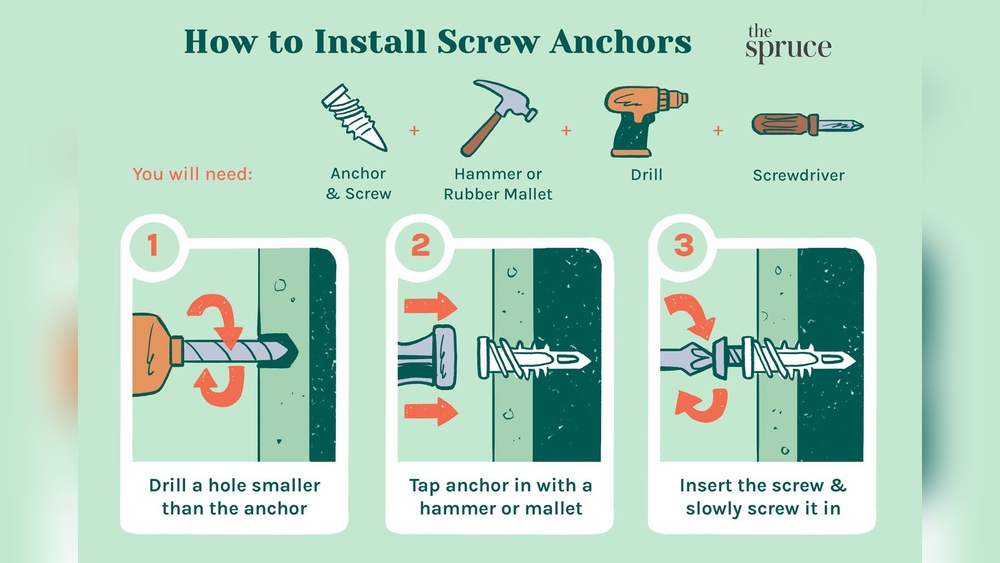
Gathering Tools And Materials
Before anchoring glass blocks to a wall, gather all necessary tools and materials. Having everything ready saves time and ensures a smooth process. This step helps avoid interruptions during installation.
Essential Tools
Start with the basic tools needed for the job. A level ensures blocks are straight and even. A measuring tape helps with precise spacing. Use a rubber mallet to gently tap blocks into place. A trowel spreads mortar smoothly. Safety gloves protect your hands during work.
Mortar And Adhesives
Choose the right mortar designed for glass blocks. It should be strong and water-resistant. Use a pre-mixed mortar or mix powder as per instructions. Some projects may require clear adhesive for better appearance. Ensure the adhesive suits glass and wall surfaces.
Anchoring Hardware
Select anchors that hold glass blocks firmly to the wall. Metal or plastic anchors work well. Use anchors sized for the block thickness and wall type. Screws or brackets help secure the blocks in place. Check that all hardware is rust-resistant for durability.
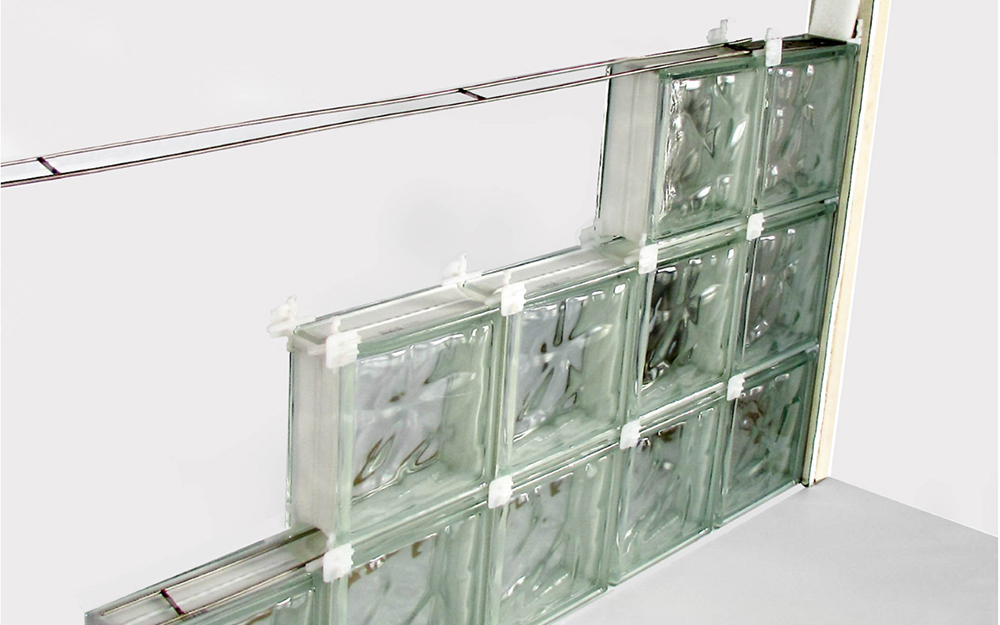
Installing Support Framework
Installing a strong support framework is key to anchoring glass blocks safely. This framework holds the blocks steady and ensures the wall stays stable. Choose a frame material that suits your wall and project needs. Prepare the wall properly before fixing the frame. The framework must be level and well aligned for a neat finish.
Metal Or Wooden Frame Options
Metal frames offer strong support and resist moisture well. They work great for wet areas like bathrooms. Wooden frames are easier to cut and shape. Use treated wood to avoid damage from humidity. Both frame types can hold glass blocks firmly if installed right.
Securing The Frame To The Wall
Start by marking where the frame will attach. Use anchors and screws to fix metal frames tightly. For wooden frames, use wood screws to secure them to studs or solid surfaces. Check that the frame does not move after tightening. A fixed frame prevents shifting of glass blocks later.
Ensuring Level And Alignment
Use a spirit level to check the frame’s horizontal and vertical lines. Adjust the frame before fully tightening screws. Accurate alignment helps glass blocks fit perfectly. Double-check measurements to avoid gaps or uneven surfaces. A level frame leads to a professional-looking glass block wall.
Setting Glass Blocks In Place
Setting glass blocks in place is a key step in building a strong, beautiful wall. It needs careful work to hold the blocks firmly. Proper setting keeps the glass blocks aligned and secure. This ensures the wall looks neat and lasts long.
Applying Mortar Or Adhesive
Start by spreading mortar or adhesive evenly on the wall surface. Use a trowel to apply a smooth, thin layer. This helps the glass blocks stick well. Avoid using too much mortar to prevent mess. Make sure the mortar stays wet while placing each block.
Positioning Blocks Correctly
Place each glass block gently on the mortar or adhesive. Press it lightly to set it in place. Check that the block sits flat and straight. Use a level tool to keep blocks aligned. Adjust the blocks before the mortar dries for the best fit.
Maintaining Consistent Spacing
Use spacers or small wedges to keep equal gaps between blocks. Even spacing creates a clean and professional look. It also allows room for mortar joints. Check spacing often as you work across the wall. Consistent gaps help the wall stay strong and stable.
Credit: blog.innovatebuildingsolutions.com
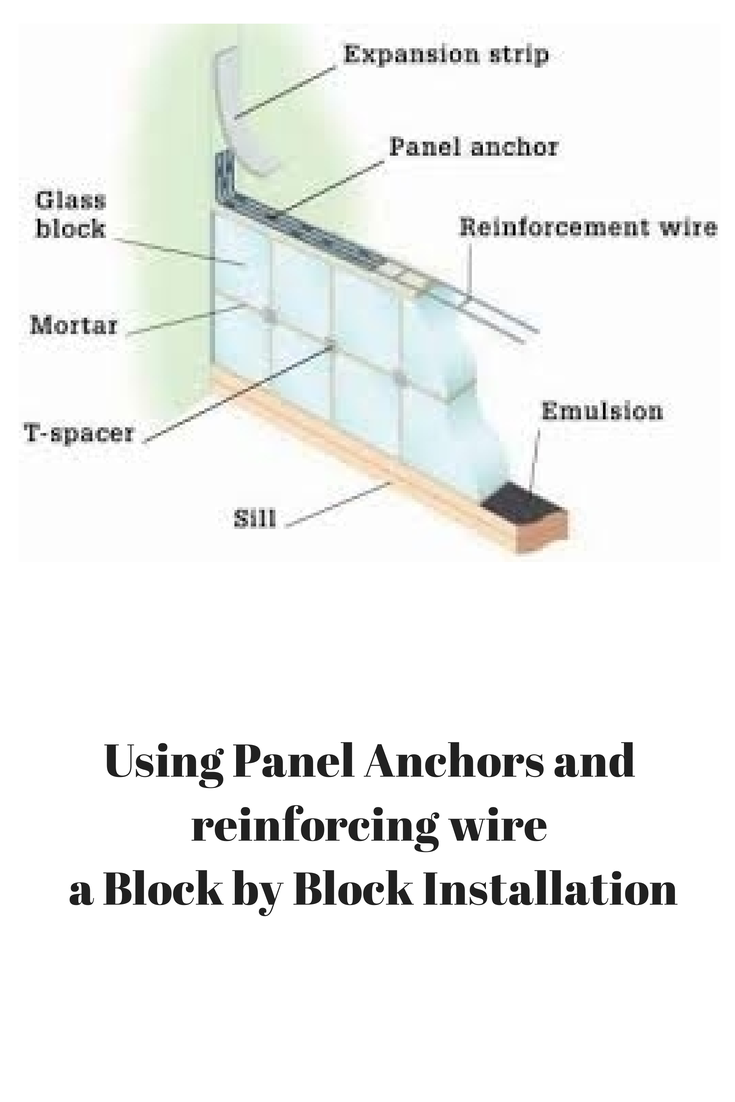
Anchoring Blocks For Stability
Anchoring glass blocks properly ensures the wall stays strong and safe. Without solid anchors, blocks can shift or crack. This part explains how to secure blocks firmly to the wall. Follow these simple steps for stable glass block installation.
Using Anchors And Clips
Plastic or metal anchors hold blocks to the wall. Clips fit over block edges and attach to anchors in the wall. These hold blocks tight and stop movement. Choose anchors that fit your wall material. Secure clips firmly for best results.
Embedding Reinforcement Bars
Reinforcement bars add extra strength inside the blocks. Place steel bars horizontally or vertically while laying blocks. Embed bars in mortar or grout for stability. This helps the wall resist pressure and prevents cracks. Use bars thick enough to support the block size.
Double-checking Anchor Security
Check each anchor and clip after installation. Push blocks gently to test for movement. Tighten or replace loose anchors immediately. Proper checks prevent future damage or block shifts. Secure anchors ensure a long-lasting glass block wall.
Finishing Touches
Finishing touches complete the look and strength of your glass block wall. These steps help the wall stay strong and look neat. Proper finishing keeps water out and stops cracks from forming. Follow these simple steps for a polished result.
Filling Joints And Sealing
Fill all joints between glass blocks with mortar or grout. Use a small trowel to push the material deep into gaps. Seal the joints to stop water from entering. This step keeps the wall stable and protects it from damage.
Cleaning Excess Mortar
Remove extra mortar from the glass blocks quickly. Use a damp sponge or cloth before it dries. Clean blocks make the wall shine and look tidy. Avoid scratching the glass by using soft cleaning tools.
Inspecting For Gaps Or Weak Points
Check the wall carefully for any gaps or weak spots. Look for places where mortar is missing or cracked. Fix these areas by adding more mortar or grout. This step ensures your glass block wall stays strong for years.
Maintenance Tips For Longevity
Maintaining glass blocks anchored to a wall helps keep them strong and beautiful. Proper care can extend their life and prevent costly repairs. Small actions done regularly protect your investment and keep the blocks safe.
Regular Cleaning Methods
Clean glass blocks gently using a soft cloth and mild soap. Avoid harsh chemicals that can damage the surface. Rinse with clear water to remove soap residue. Dry the blocks with a clean towel to prevent water spots.
Checking For Loose Blocks
Inspect the glass blocks often to find any looseness. Gently press each block to feel for movement. Loose blocks can cause cracks or fall out. Tighten anchors or call a professional if you find loose blocks.
Repairing Minor Damages
Fix small chips or cracks quickly to stop them from growing. Use a clear epoxy designed for glass blocks. Apply the epoxy carefully and let it dry completely. Replace blocks that have large damage to ensure safety.
Credit: www.homedepot.com
Frequently Asked Questions
How Do You Securely Anchor Glass Blocks To A Wall?
Use a metal frame or mortar to anchor glass blocks. Ensure blocks align properly, then apply mortar between blocks and the wall. Use spacers for even gaps. Let mortar cure fully for a strong hold. This prevents movement and ensures durability.
What Materials Are Needed To Anchor Glass Blocks?
You need glass blocks, mortar mix, metal anchors or frames, spacers, a trowel, and a level. Mortar bonds blocks to the wall securely. Anchors or frames provide additional stability. Spacers keep consistent gaps for a neat finish.
Can Glass Blocks Be Anchored On Drywall?
Glass blocks require a solid backing, so drywall alone is insufficient. Reinforce drywall with plywood or metal studs. Use metal anchors or framing for extra support. Proper anchoring prevents blocks from shifting or cracking over time.
How Long Does Mortar Take To Set For Glass Blocks?
Mortar typically sets in 24 to 48 hours. Avoid disturbing the blocks during this time. Full curing may take up to a week for maximum strength. Follow manufacturer instructions for best results.
Conclusion
Anchoring glass blocks to a wall is a straightforward task with the right steps. Use proper tools and materials to ensure a strong hold. Measure carefully and follow safety tips for best results. Taking time to anchor blocks correctly keeps them secure and lasting longer.
This method also adds a clean, modern look to any space. Keep practicing, and your confidence will grow with each project. Simple steps lead to great results.