Are you looking to add a cool lighting effect to your room but want full control with your existing light switch? Connecting an LED strip to your light switch is easier than you might think.
Imagine turning your LED lights on and off just like your regular lights—no extra remotes or complicated apps needed. In this guide, you’ll discover simple, step-by-step instructions to make your LED strip work seamlessly with your light switch. Keep reading, and by the end, you’ll have a clear plan to brighten your space exactly the way you want.
Tools And Materials Needed
Preparing to connect an LED strip to a light switch requires specific tools and materials. Having the right items makes the job safer and easier. Gather everything before you start to avoid interruptions.
Basic Electrical Tools
You need a screwdriver set to open the switch panel. Wire strippers help remove insulation from the wires. A voltage tester ensures power is off before working. Electrical tape secures wire connections safely.
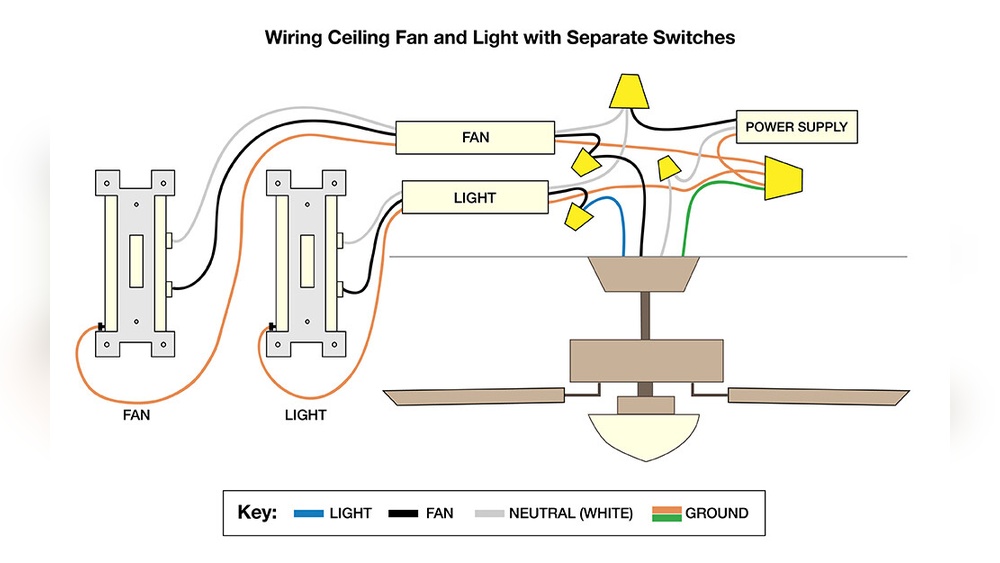
Led Strip And Power Supply
Choose an LED strip that fits your space and style. A compatible power supply matches the LED strip’s voltage and wattage. Check the power supply has the right plug type for your setup.
Connecting Wires And Accessories
Use insulated copper wires for connections. Wire connectors or quick splice connectors join wires without soldering. Heat shrink tubing or electrical tape protects and insulates joints.

Credit: www.youtube.com
Choosing The Right Led Strip
Choosing the right LED strip is the first step to a successful lighting project. The right strip ensures good brightness, color, and power use. It also makes connecting to a light switch easier and safer.
Not all LED strips are the same. Some work better indoors, others outdoors. Some have bright colors, while others focus on soft light. Knowing what you need helps pick the best one.
Understanding Led Strip Types
There are several types of LED strips. Single color strips light up in one color only. RGB strips can change colors with a controller. Addressable LED strips show many colors in different parts.
Choose a type that fits your room and mood. Single color strips work for simple lighting. RGB strips add fun color effects. Addressable strips offer creative designs.
Checking Led Strip Brightness
Brightness is key for good lighting. It is measured in lumens. Higher lumens mean more light. For reading or work areas, choose bright strips. For mood lighting, softer strips work well.
Check the package for lumens per foot or meter. Pick a brightness level that fits your needs. Avoid very dim or overly bright strips.
Considering Power Requirements
LED strips need power to work. Some run on 12V, others on 24V. Make sure your power supply matches the strip voltage. Using wrong power can damage the strip or cause fire risk.
Also, check the total power needed. Longer strips need more power. Calculate watts per meter times strip length. Choose a power supply with enough capacity.
Safety Precautions
Turn off the power before starting any wiring work. Use insulated tools to avoid electric shocks. Check connections twice to prevent short circuits or damage.
Turn Off Power At The Circuit Breaker
Always switch off the power before starting any electrical work.
Use the circuit breaker to cut electricity to the light switch.
This prevents electric shock and ensures safety during installation.
Use Insulated Tools
Select tools with insulated handles for working on electrical parts.
Insulated tools reduce the risk of electric shock significantly.
Never use metal tools without insulation on live wires.
Check Wire Connections Carefully
Inspect all wires for damage or wear before connecting the LED strip.
Loose or frayed wires can cause short circuits or fires.
Tighten connections securely to avoid sparks or power loss.
Follow Led Strip Voltage Requirements
Verify the LED strip voltage matches the power source and switch.
Using wrong voltage can damage the LED strip or create hazards.
Refer to product instructions to ensure proper voltage use.
Wear Protective Gear
Use gloves and safety glasses during installation.
Protect your hands and eyes from accidental sparks or debris.
Safety gear reduces injury risk while working with electricity.
Preparing The Work Area
Preparing the work area is an important first step to connect an LED strip to a light switch. A clean and safe space helps avoid mistakes. It also makes the task easier and faster.
Gather all the tools and materials before you start. This keeps everything close and saves time. Clear the surface so you have room to work. Proper lighting is key. You need to see wires and connections clearly.
Turn Off The Power Supply
Safety is the top priority. Switch off the main power to the light switch. Use a voltage tester to ensure no electricity flows. This prevents electric shocks and accidents.
Clear The Work Surface
Remove any objects from the area around the light switch. A tidy space prevents tools or wires from getting lost. It also reduces distractions during the work.
Gather Necessary Tools And Materials
Collect wire cutters, screwdrivers, electrical tape, and connectors. Have the LED strip and light switch nearby. This keeps you organized and ready to work.
Wear Safety Gear
Use insulated gloves to protect your hands. Safety glasses shield your eyes from debris. These simple steps keep you safe throughout the project.
Turning Off Power Supply
Turning off the power supply is the first step before connecting an LED strip to a light switch. This step ensures safety and prevents electrical shock. Always treat electricity with caution. Taking time to switch off power can save you from accidents and damage.
Never start any electrical work without cutting the power. Even a small mistake can cause serious harm. Follow simple steps to safely turn off the power supply.
Locate The Circuit Breaker Panel
Find the main electrical panel in your home. It is usually in the basement, garage, or utility room. The panel has switches called circuit breakers. Each breaker controls power to different parts of the house.
Identify The Correct Circuit Breaker
Look for the breaker that controls the light switch you will work on. The breakers are labeled, but sometimes labels are unclear. Turn off the breaker that you believe powers the switch.
Switch Off The Power
Flip the circuit breaker to the “off” position. This stops the flow of electricity to the light switch. Make sure the switch is fully off to avoid any power flow.
Verify Power Is Off
Test the light switch or use a voltage tester. The light should not turn on. The voltage tester will show no electrical current. Confirming power is off ensures safety during installation.

Credit: www.boogeylights.com
Identifying Wires On The Light Switch
Identifying wires on a light switch is the first step to connect an LED strip. Knowing which wire does what helps keep the setup safe and functional. Light switches usually have a few wires, each with a special role. Understanding these roles makes installation easier and prevents mistakes.
Safety is important. Always turn off the power before handling wires. Use a voltage tester to make sure no current flows through the wires. This prevents shocks and accidents during work.
Common Wire Types In A Light Switch
Most light switches have three main wires: live, load, and ground. The live wire brings power from the electrical panel. The load wire sends power to the light fixture. The ground wire is a safety connection to prevent shocks.
How To Identify The Live Wire
The live wire is often black or red. It carries current to the switch. Use a voltage tester to check which wire is live. The live wire stays hot even when the switch is off.
Recognizing The Load Wire
The load wire is usually black or red, like the live wire. It connects the switch to the light. This wire only has power when the switch is on. Testing with a voltage tester helps find the load wire.
Spotting The Ground Wire
The ground wire is green or bare copper. It does not carry electricity during normal use. It connects the metal parts of the switch to the earth for safety. Always connect the ground wire correctly.
Connecting Led Strip To The Switch
Connecting an LED strip to a light switch lets you control the lights easily. It helps turn the strip on or off with a simple flick. This connection needs careful wiring to avoid any problems. Following clear steps makes the process safe and effective.
Wiring The Positive And Negative Leads
Start by identifying the positive and negative wires on the LED strip. The positive wire is usually marked with a plus sign or red color. The negative wire often appears black or has a minus sign. Connect the positive wire to the switch’s output terminal. The switch will control the power flow through this wire. Connect the negative wire directly to the power supply’s negative terminal. This setup completes the circuit and allows the LED strip to work with the switch.
Securing Connections
Use wire connectors or electrical tape to secure all wire connections. Loose wires can cause flickering or short circuits. Make sure each connection is tight and insulated. Cover exposed wires to prevent electric shock. Check the connections again before turning on the power. Properly secured wires ensure safe and lasting operation of your LED strip lighting.
Testing The Connection
Testing the connection is a crucial step after wiring your LED strip to a light switch. This process confirms that everything works properly and safely. It helps to catch any wiring errors before finalizing the installation.
Careful testing ensures the LED strip lights up when you flip the switch. It also checks if the lights turn off smoothly without flickering or delay. Proper testing prevents electrical issues and extends the life of your LED strip.
Turn On The Power
Start by turning the main power back on. Use the circuit breaker or plug to restore electricity. Make sure all connections are secure before powering up. Then, flip the light switch connected to the LED strip.
Observe if the LED strip lights up immediately. If it does not, double-check your wiring and connections. A quick power test helps identify obvious problems early.
Check For Flickering Or Dim Lights
Look closely at the LED strip as it runs. Flickering or dim lights may indicate loose wires or low voltage. Watch for any inconsistent lighting along the strip length.
Fix any wiring issues or replace damaged strips if needed. Stable and bright lighting shows a healthy electrical connection.
Test The Switch Functionality
Flip the switch on and off several times. Each time, the LED strip should respond instantly. Delays or no response suggest a faulty switch or bad wiring.
Ensure the switch controls the LED strip only, without affecting other lights. Proper switch function is key for safe and convenient use.
Mounting The Led Strip
Mounting the LED strip correctly is key to a neat and lasting installation. A proper mount ensures the lights stay in place and shine bright. It also helps avoid damage to the strip or the surface.
Start by choosing a clean, dry, and smooth surface. Dirt or bumps can stop the adhesive from sticking well. Wipe the area with a cloth to remove dust and oil.
Measure And Plan The Layout
Measure the length of the area where you want the LED strip. Plan the route carefully to avoid corners and sharp bends. Cut the strip only at marked points to prevent damage.
Use The Built-in Adhesive
Most LED strips have sticky tape on the back. Peel off the protective layer slowly. Press the strip firmly onto the surface for a few seconds. This helps the adhesive bond tightly.
Secure With Extra Clips Or Mounts
For extra security, use mounting clips or brackets. These hold the strip in place, especially on ceilings or walls. Space clips evenly along the strip for steady support.
Check The Placement Before Final Fixing
Test the strip by turning it on before sticking it fully. This helps confirm the right position and length. Adjust if needed, then press down firmly for a strong hold.

Credit: www.boogeylights.com
Troubleshooting Common Issues
Troubleshooting common issues helps keep your LED strip working well. Problems often happen during or after installation. Identifying the cause is the first step to fix them quickly.
Basic checks can save time and money. Look for simple errors before trying complex solutions. This section covers common problems like LED strips not lighting and flickering lights.
Led Strip Not Lighting
Check if the power supply is connected properly. Loose wires can stop the LED strip from turning on.
Make sure the light switch is working and turned on. Test the switch by connecting another device.
Verify the LED strip is not damaged or cut incorrectly. Damage can break the circuit and stop lights.
Confirm the voltage matches the LED strip’s requirements. Using the wrong voltage can prevent lighting.
Inspect all connectors for corrosion or dirt. Dirty contacts block electricity flow.
Flickering Lights
Loose connections cause flickering. Tighten all wires and connectors securely.
Check the power supply for stable output. A weak power supply may cause flicker.
Look for interference from other electrical devices nearby. Move the LED strip or devices apart.
Ensure the LED strip is compatible with the dimmer or switch used. Some LEDs do not work well with dimmers.
Replace faulty or low-quality LED strips. Cheap strips often flicker due to poor components.
Frequently Asked Questions
How Do I Connect An Led Strip To A Light Switch?
To connect an LED strip to a light switch, cut the strip to length. Connect the strip’s positive wire to the switch’s output. Attach the switch’s input to the power supply’s positive terminal. Connect all negative terminals together and to power supply ground.
Can I Use Any Light Switch With Led Strips?
Most standard light switches work with LED strips. However, ensure the switch can handle the LED strip’s voltage and current. Use low-voltage switches for 12V or 24V LED strips to avoid damage and ensure safe operation. Check product specifications before installation.
What Tools Do I Need To Connect Led Strips To Switches?
You will need wire strippers, screwdrivers, electrical tape, and possibly a soldering iron. A voltage tester is helpful for safety. Use connectors designed for LED strips to simplify wiring. Proper tools ensure secure and reliable electrical connections.
Is It Safe To Connect Led Strips To Existing Light Switches?
Yes, it is safe if done correctly. Always turn off the power before wiring. Use proper gauge wires and connectors. Avoid overloading the switch with too many LED strips. Follow electrical codes and guidelines for safe installation.
Conclusion
Connecting LED strips to a light switch is simple and useful. It lets you control your lights easily from one place. Always check the power and wiring before starting. Use the right tools and follow safety steps closely. This small project can brighten your room with style and ease.
Try it yourself and enjoy a neat, clean lighting setup.