If you want to safely and effectively hook up a woodstove pipe going through a wall, you need to get it right the first time. A proper installation keeps your home warm and prevents dangerous smoke or fire hazards.
You might feel unsure about how to connect the pipe through the wall without causing leaks or damage. Don’t worry—this guide will walk you through each step with clear, simple instructions. By the end, you’ll have the confidence to complete the job safely and efficiently.
Keep reading to learn exactly what you need to know to make your woodstove pipe installation smooth and secure.
Choosing The Right Pipe
Choosing the right pipe for your woodstove is very important. The pipe must fit well and be safe. A wrong pipe can cause smoke leaks or even fire hazards. Picking the right type, material, and size makes sure your stove works well and stays safe.
Types Of Stove Pipes
There are two main types of stove pipes: single-wall and double-wall. Single-wall pipes are thinner and cheaper. They need more space from walls to stay safe. Double-wall pipes have insulation between two layers. They keep the heat inside and are safer near walls. Double-wall pipes cost more but are easier to install through walls.
Material Considerations
Most stove pipes are made of steel or stainless steel. Steel pipes are common and strong. They can rust if not cared for. Stainless steel resists rust and lasts longer. It is best for pipes going through walls or outside. Choose materials that handle high heat without damage.
Sizing The Pipe Correctly
Pipe size must match the stove’s outlet size. Too small pipes cause smoke backup. Too large pipes cool smoke too fast, causing creosote. Most stoves use 6-inch diameter pipes. Measure your stove outlet before buying pipes. Proper size keeps smoke moving and your home safe.

Credit: www.youtube.com
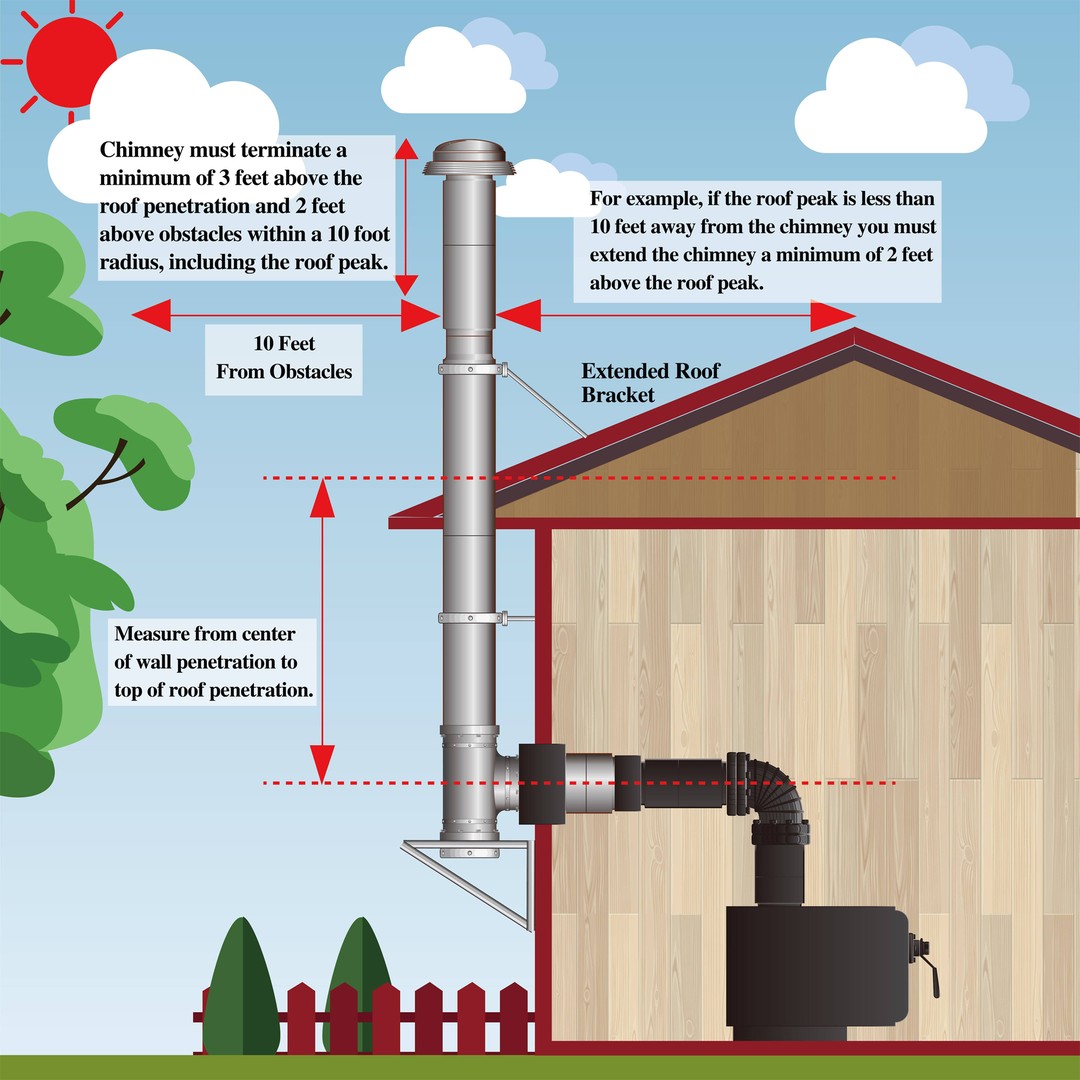
Planning The Pipe Route
Preparing the wall is a key step before installing a woodstove pipe through it. This process helps ensure safety and proper fitting of the pipe. A well-prepared wall keeps the heat away from flammable materials. Follow these steps carefully to make the job easier and safer.
Marking The Cut Area
Start by measuring the pipe diameter and the wall thickness. Use a pencil and a level to mark the exact spot on the wall. Draw a clear circle where the pipe will go. Double-check your measurements to avoid mistakes. Marking accurately saves time during cutting.
Cutting The Wall Safely
Wear safety goggles and gloves before you begin cutting. Use a suitable saw or drill for your wall type. Cut slowly along the marked line to avoid damage. Remove debris and check the hole size. A clean hole allows the pipe to fit easily.
Installing Wall Thimble
Place the wall thimble into the hole you made. This metal sleeve protects the wall from heat. Secure the thimble tightly with screws or fasteners. Check that it sits flush against the wall surface. The thimble creates a safe passage for the pipe.
Preparing The Wall
Installing the woodstove pipe through the wall needs careful steps. This task ensures smoke exits safely and your home stays warm. Follow clear steps to connect, secure, and seal the pipe. Proper installation stops leaks and prevents fire risks. Keep tools and materials ready before starting.
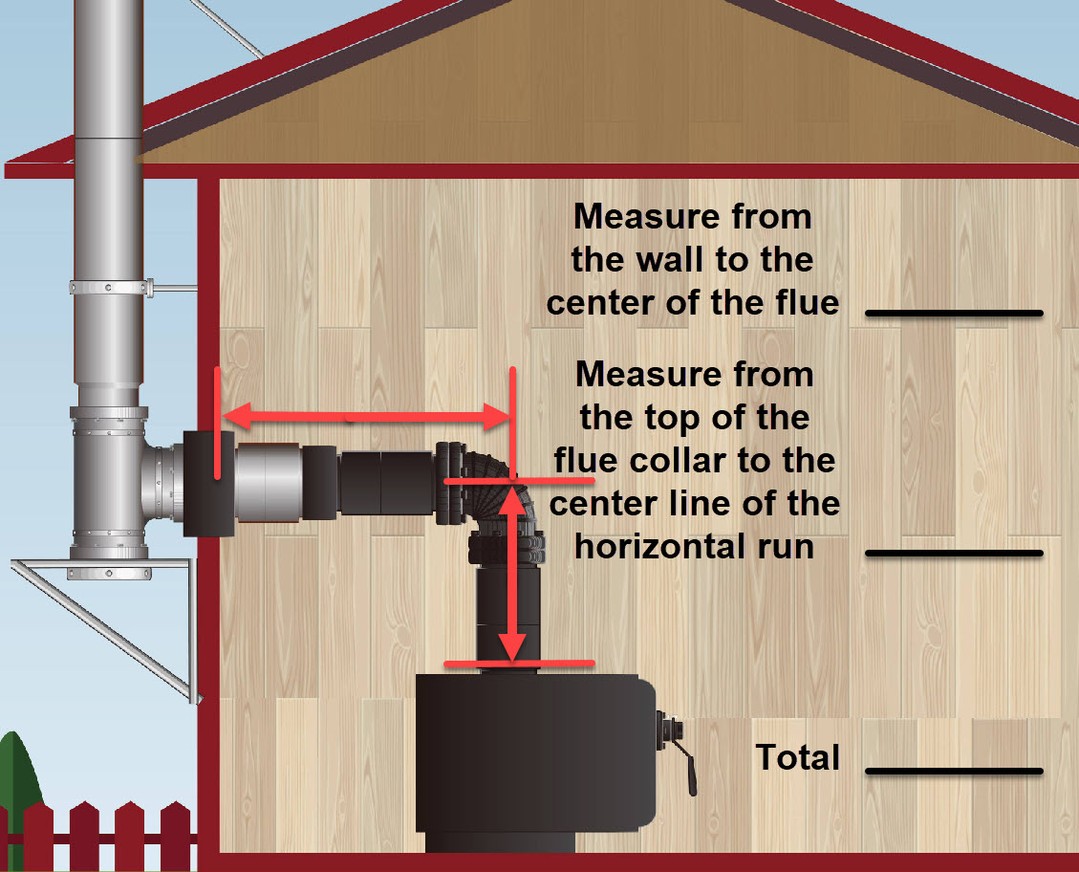
Connecting Pipe Sections
Start by joining the pipe sections tightly. Slide one pipe end into the next. Check that the pipes fit snugly without gaps. Use screws to fix the joints firmly. This keeps the pipe stable and safe. Make sure the direction of the pipe follows the stove outlet.
Securing The Pipe Through Wall
Next, pass the pipe through the wall opening. Use a wall thimble to protect the wall from heat. Attach the pipe securely to the thimble. Fasten brackets or straps outside and inside the wall. This stops the pipe from moving or falling. The pipe must stay steady and centered in the hole.
Sealing And Insulating
Seal around the pipe to block air leaks. Use high-temperature sealant for safety. Fill gaps with fireproof insulation material. This stops drafts and keeps heat inside. Proper sealing helps the stove work better. It also protects the wall from heat damage.
Installing The Pipe
Connecting the stove pipe to your woodstove is a crucial step. It ensures smoke exits safely and the stove works well. Follow simple steps to attach and seal the pipe properly. This will help your stove run clean and efficient.
Attaching Pipe To Stove Outlet
Start by fitting the pipe into the stove outlet. The pipe should slide in easily but fit snugly. Use the right size pipe for your stove’s outlet diameter. Align it straight to avoid gaps. Secure the pipe with screws or clamps to hold it firmly in place.
Ensuring A Tight Fit
Check all connections for tightness. A loose pipe lets smoke escape into your room. Use high-temperature silicone sealant around joints if needed. Wrap the joint with stove pipe tape for extra sealing. Tight connections keep your home safe and warm.
Testing For Leaks
Light a small fire in the stove to test. Watch for smoke or smell near the pipe joint. Use a flashlight in a dark room to spot any smoke leaks. If leaks appear, tighten or reseal the joint. Proper sealing keeps smoke out and air flowing correctly.
Connecting To The Stove
Maintaining your woodstove pipe that goes through the wall is very important. It keeps your home safe and your stove working well. Small problems can turn into big dangers if ignored. Regular checks help you avoid costly repairs and fire risks.
Regular Cleaning
Clean the pipe often to stop soot build-up. Soot can block the pipe and cause smoke to come inside. Use a chimney brush made for your pipe size. Clean both inside and outside parts of the pipe. Cleaning after every few weeks of use is best.
Inspecting For Damage
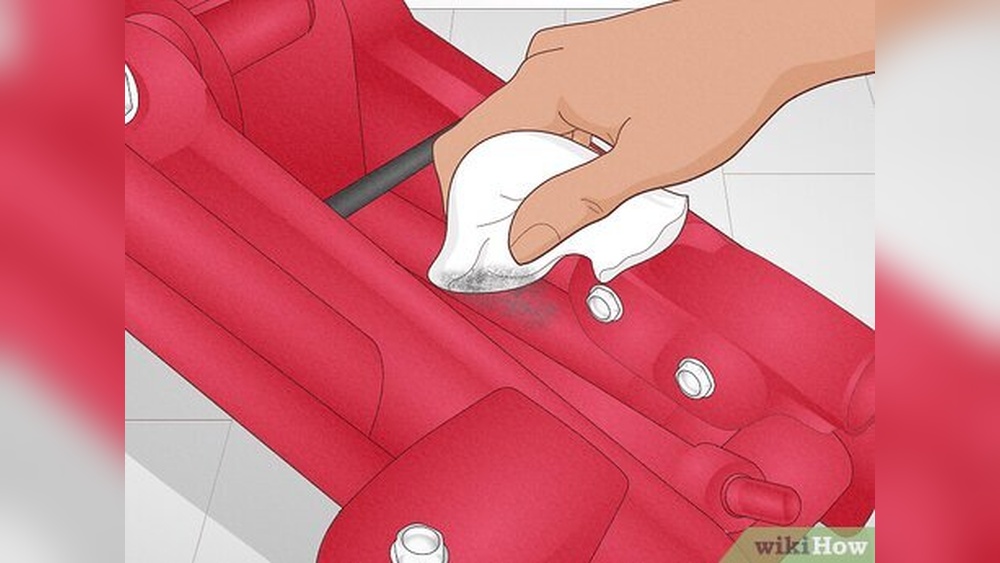
Look for cracks, rust, or holes on the pipe surface. Damaged pipes leak smoke and heat, causing hazards. Check the pipe seals around the wall too. Make sure no gaps allow air or smoke to pass. Fix small cracks quickly to avoid bigger problems.
Addressing Common Issues
Smoke backdraft is a common problem. It happens if the pipe is blocked or poorly installed. Check for bird nests or debris in the pipe. Loose pipe parts can cause leaks and smoke smell. Tighten any loose joints and replace broken sections fast.
Credit: allfuelhst.com
Credit: allfuelhst.com
Frequently Asked Questions
How Do I Safely Install A Woodstove Pipe Through A Wall?
Ensure you use a proper wall thimble and heat-resistant insulation. Maintain clearance from combustible materials and follow local building codes for safety.
What Materials Are Needed For Wall Pipe Installation?
You need a double-wall stove pipe, a wall thimble, high-temperature sealant, and fireproof insulation. These materials ensure safe, efficient venting.
How Much Clearance Is Required Around The Stove Pipe?
Typically, maintain at least 18 inches clearance from combustibles. Check manufacturer guidelines and local codes, as requirements may vary by installation.
Can I Install A Woodstove Pipe Through Any Wall?
No, the wall must be non-combustible or properly protected with a fireproof barrier. Always verify wall suitability before installation.
Conclusion
Hooking up a woodstove pipe through a wall takes care and the right steps. Follow safety rules and check local codes first. Use proper materials and tools for a secure fit. Seal all joints tightly to prevent leaks. Keep clearances from walls and furniture to avoid fire risks.
Regularly inspect the pipe for damage or blockages. This simple process helps your woodstove work safely and efficiently. Enjoy the warm, cozy heat with peace of mind.