Are you looking for a simple and effective way to support your walls or ceilings during repairs? Making a floor to ceiling screw jack yourself can save you money and give you the control you need for a secure fit.
In this guide, you’ll learn easy steps to build your own jack using common materials. Whether you’re a DIY enthusiast or tackling a quick fix, this method will help you get the job done safely and confidently. Keep reading, and you’ll discover how to create a strong, adjustable support that works perfectly for your space.
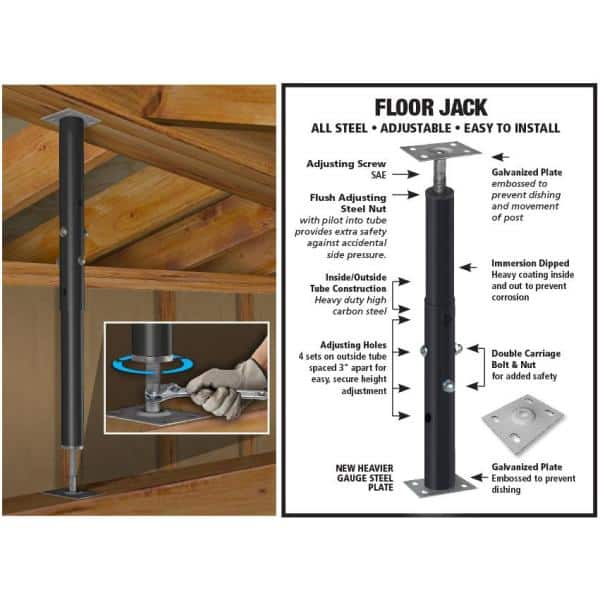
Credit: www.homedepot.com
Materials Needed
Gathering the right materials is the first step to making a floor to ceiling screw jack. Choose strong and reliable parts to ensure safety and durability. The materials include screws, jacks, and tools that help build the structure properly. Safety gear is also essential to protect yourself during the process.
Types Of Screws And Jacks
Select screws that are heavy-duty and rust-resistant. Threaded rods or long bolts work well for the screw mechanism. For the jack, use a sturdy metal pipe or a ready-made screw jack designed to hold weight. Make sure the jack can extend to the ceiling height.
Tools Required
You will need a wrench or pliers to tighten screws and bolts. A drill is helpful for making holes or securing screws firmly. A measuring tape helps ensure precise length and placement. A saw may be necessary to cut metal or wood parts to size.
Safety Gear
Wear safety goggles to protect your eyes from dust and debris. Use gloves to avoid cuts and improve grip on metal parts. A helmet can protect your head if you work under heavy objects. Always wear sturdy shoes to protect your feet on the worksite.

Credit: czmajet.en.made-in-china.com
Preparing The Workspace
Preparing the workspace is the first step in making a floor to ceiling screw jack. It ensures safety and accuracy. A clean and organized area helps you work faster. It also keeps tools and materials within reach. Proper preparation reduces mistakes and saves time.
Measuring Ceiling Height
Start by measuring the height from floor to ceiling. Use a tape measure for accuracy. Record the exact number to avoid errors. This measurement helps you cut the screw jack to the right length. Double-check the height before moving forward.
Clearing The Area
Clear the workspace around the installation spot. Remove furniture, rugs, and other obstacles. A clean area prevents tripping and damage. It also gives you room to move tools and parts. Keep the floor dry and free of debris.
Marking Positions
Mark the exact spots where the jack will stand. Use a pencil or chalk for clear marks. Check the marks twice to ensure they are straight. Proper marking guides you during assembly. It also helps keep the jack stable and safe.
Cutting And Assembling Parts
Cutting and assembling parts is a key step in making a floor to ceiling screw jack. This process needs care and precision for a strong and safe jack. You will work with wood or metal pieces and fit them with the screw mechanism. Each part must fit well and hold tight under pressure.
Cutting Wood Or Metal
Start by measuring the pieces you need. Use a tape measure and mark the wood or metal carefully. Cut the pieces with a saw for wood or a metal cutter for metal. Keep the cuts straight and smooth to help parts fit together. Wear safety gear like gloves and goggles for protection.
Assembling The Screw Mechanism
Attach the screw to the base and top pieces. The screw allows the jack to extend and hold pressure. Use nuts and washers to secure the screw firmly. Make sure the screw moves easily up and down. Tighten all bolts but avoid over-tightening, which can cause damage.
Ensuring Stability
Check that all parts fit tightly and do not wobble. Use extra screws or brackets for stronger joints. The jack should stand firm between the floor and ceiling without slipping. Test it by applying gentle pressure to see if it holds. Adjust parts if needed to improve balance and strength.
Credit: www.homedepot.com
Installing The Screw Jack
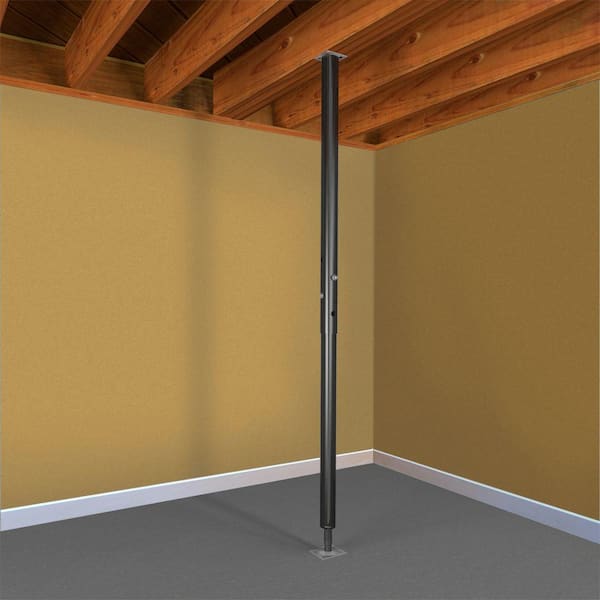
Installing the screw jack is a key step in making it work properly. This part of the process ensures the jack fits tightly between the floor and ceiling. A well-installed jack provides strong support and keeps everything safe. Follow these simple steps to install your screw jack correctly.
Positioning The Jack
Place the jack upright in the spot where you need support. Make sure it stands straight between the floor and ceiling. Check that both ends touch solid surfaces. Avoid placing the jack on weak or uneven areas. Good positioning helps the jack hold weight better.
Adjusting The Height
Turn the screw to change the jack’s height. Slowly extend it until it fits snugly but not too tight. The jack should press firmly but not damage the ceiling or floor. Small adjustments keep the jack stable and safe. Stop adjusting as soon as it feels secure.
Securing The Jack In Place
Lock the screw to hold the jack’s height steady. Use the locking mechanism or a wrench if needed. Check once more that the jack is straight and tight. Make sure it does not move when pushed lightly. A secure jack prevents accidents and supports weight well.
Testing And Adjustments
Testing and adjusting your floor to ceiling screw jack ensures it works safely and effectively. This step checks if the jack holds weight and if all parts fit well. Proper testing prevents accidents and makes the jack last longer.
Load Testing
Start by placing a small weight on the jack. Watch if it holds steady without slipping or bending. Increase the weight slowly until the jack supports the full load you expect to use. Stop if you see any signs of strain or movement. This test shows the strength and stability of your jack.
Making Necessary Adjustments
Check the screw and support plates for tightness. Tighten any loose parts carefully. If the jack tilts, adjust the base or top plate for better alignment. Lubricate the screw to make turning smooth. Small changes improve the jack’s function and safety.
Safety Checks
Look for cracks or damage in the metal parts. Test the locking mechanism to keep the jack in place. Make sure the jack stands straight between floor and ceiling. Remove any debris that might block the screw. Safety checks protect you during use and keep the jack reliable.
Maintenance Tips
Proper maintenance keeps your floor to ceiling screw jack working well. It helps avoid damage and ensures safety. Simple care steps extend the jack’s life and save money on repairs.
Regular Inspection
Check the jack before every use. Look for cracks, bends, or rust on metal parts. Test the screw for smooth turning. Tighten loose bolts and replace worn parts. Early fixes stop bigger problems.
Lubricating Moving Parts
Apply oil or grease to the screw and threads often. This reduces friction and makes turning easier. Clean old grease or dirt before applying new lubricant. Smooth movement lowers wear and tear.
Storage Recommendations
Store the jack in a dry place to prevent rust. Avoid damp or wet areas. Keep it off the ground on a shelf or pallet. Cover it with a cloth to block dust. Proper storage keeps the jack ready for use.
Frequently Asked Questions
What Materials Are Needed For A Floor To Ceiling Screw Jack?
You need a steel screw rod, steel plates, nuts, washers, and welding equipment. Quality materials ensure strength and safety during use.
How Do You Assemble A Floor To Ceiling Screw Jack?
Cut steel plates, drill holes, thread the screw rod, and weld plates. Then, tighten nuts to secure the jack firmly between floor and ceiling.
What Safety Tips Should I Follow When Making A Screw Jack?
Wear protective gear, use proper tools, and check material strength. Ensure the jack is stable before applying pressure to avoid accidents.
Can A Floor To Ceiling Screw Jack Support Heavy Loads?
Yes, if built with strong steel and proper welding. Always calculate load capacity to avoid overloading and potential failure.
Conclusion
Making a floor to ceiling screw jack is simple and useful. You can save money by building it yourself. It helps support heavy loads safely. Use strong materials and follow steps carefully. Check the jack often for safety. This tool can help in many home projects.
Try making one and see how it works. Keep it handy for future use. Safety first, always.