Have you ever wanted to control a single light from two different switches? Maybe you want the convenience of turning your hallway light on or off from both ends.
Connecting two light switches together can make your daily routine easier and add flexibility to your home lighting. But if you’re not sure how to do it safely and correctly, this guide is for you. Keep reading, and you’ll learn simple steps to connect two switches, avoid common mistakes, and make your lighting work exactly the way you want.
Tools And Materials Needed
Connecting two light switches needs the right tools and materials. Using the proper items makes the job safer and easier. This section lists what you need before starting the wiring process.
Basic Electrical Tools
A screwdriver set is essential to remove switch covers and screws. Wire strippers help remove insulation without cutting wires. A voltage tester checks if wires carry electricity. Needle-nose pliers assist in bending and holding wires. Electrical tape secures wire connections. A drill may be needed for mounting switches or boxes.
Types Of Light Switches
Choose switches based on your wiring plan. Single-pole switches control one light from one location. Three-way switches control one light from two spots. Four-way switches allow control from three or more places. Pick switches that match your existing wiring for compatibility.
Safety Gear
Wear insulated gloves to avoid electric shocks. Safety glasses protect your eyes from sparks or debris. Use rubber-soled shoes to reduce the risk of shock. Turn off power at the circuit breaker before starting. A flashlight helps if the power goes out during work.

Credit: diy.stackexchange.com
Safety Precautions
Working with light switches involves electricity, which can be dangerous. Safety must come first. Follow basic rules to protect yourself and your home. Taking these steps helps avoid shocks, fires, or other accidents.
Read every instruction carefully. Prepare your tools and space before starting. Stay calm and focused during the work.
Power Shutdown
Turn off the main power at the circuit breaker. This stops electricity from flowing to the switches. Double-check that the power is off by flipping the switches. Never start without shutting off the power.
Testing For Live Wires
Use a voltage tester to check wires. Touch the tester to each wire to see if it is live. If the tester lights up or beeps, the wire carries current. Test every wire before touching or connecting them.
Working Safely With Electricity
Wear rubber-soled shoes to reduce shock risk. Use tools with insulated handles. Keep your hands dry and avoid working in wet areas. Work slowly and carefully, paying attention to each step.
Types Of Switch Connections
Understanding the types of switch connections helps in wiring two light switches together. Each type controls lights differently. Knowing these basics makes the job easier and safer.
Single-pole Switches
Single-pole switches control one light or a group of lights. They have two terminals and a simple on/off function. This switch is common in most homes. It cannot control a light from two locations.
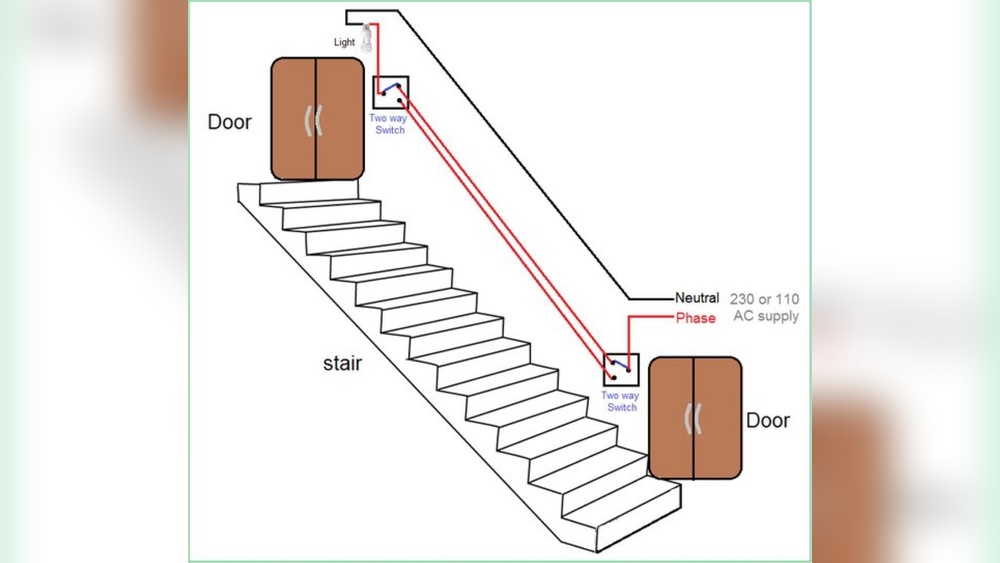
Three-way Switches
Three-way switches work in pairs to control one light from two locations. They have three terminals. This setup is useful for hallways or large rooms. It allows turning the light on or off from either switch.
Four-way Switches
Four-way switches work with two three-way switches to control a light from three or more locations. They have four terminals. This switch goes between two three-way switches. It is ideal for long hallways or big rooms with many entrances.
Credit: www.reddit.com
Wiring Basics
Understanding the basics of wiring is key to connecting two light switches. This knowledge helps you work safely and effectively. You will learn how to identify different wires and their purposes. This makes the installation process smooth and error-free.
Wiring two switches together involves more than just connecting wires. You must know which wire does what. This section breaks down the essentials for you. It makes the task easier and less confusing.
Understanding Wire Colors
Wire colors tell you their function in the circuit. Black wires usually carry electricity from the power source. White wires return the electricity back to the source. Green or bare wires are for grounding. This color code helps keep your wiring safe and organized.
Identifying Common, Traveler, And Ground Wires
The common wire connects to the power source or the light fixture. Traveler wires run between the two switches. They allow the switches to control the same light. Ground wires protect you from electric shocks. Recognizing these wires is important for proper switch connection.
Step-by-step Wiring Guide
Connecting two light switches together is a useful skill for controlling one light from two places. This step-by-step wiring guide helps you do it safely and correctly. Follow each step carefully for the best results.
Turn Off Power And Confirm
First, switch off the power at the circuit breaker. Use a voltage tester to check if the wires are dead. This step prevents electric shocks and keeps you safe.
Remove Existing Switches
Remove the cover plates from both switches. Unscrew the switches from the wall box. Carefully pull them out to expose the wiring behind.
Connect Wires To First Switch
Identify the common terminal on the first switch. Connect the power supply wire to this terminal. Attach traveler wires to the other two terminals.
Wire The Second Switch
On the second switch, connect the traveler wires to the matching terminals. Attach the wire leading to the light fixture to the common terminal. Make sure all connections are tight.
Secure Connections And Mount Switches
Push the switches back into their wall boxes. Screw them securely in place. Replace the cover plates. Turn the power back on and test the switches.
Testing The Connection
Testing the connection between two light switches is a key step. It ensures the wiring is correct and the switches work together. Without proper testing, the switches may not control the light properly. Follow these steps carefully to confirm the connection is safe and functional.
Restore Power
Turn the circuit breaker back on to restore electricity. Be careful and make sure no wires are exposed. Use a voltage tester to confirm power is on. Never touch wires without checking for power first.
Check Switch Operation
Flip each switch to the on position. Watch the light to see if it turns on and off. Test both switches multiple times. Each switch should control the light independently. If the light responds correctly, the connection is good.
Troubleshooting Common Issues
If the light does not turn on, double-check your wiring. Look for loose or crossed wires at the switches. Make sure all connections are tight and secure. Test the switches again after fixing any problems. If issues persist, use a multimeter to check for continuity.
Tips For A Clean Installation
A clean installation makes your light switches safer and easier to use. It helps prevent problems later and keeps the wiring neat. Follow these tips to keep your work tidy and efficient.
Labeling Wires
Label each wire before disconnecting. Use simple tags or colored tape. This helps you remember where each wire goes. Clear labels save time and reduce mistakes.
Using Wire Nuts Properly
Choose the right size wire nuts for your wires. Twist wires together tightly before capping. Make sure the wire nut fits snugly. This ensures a strong, safe connection.
Organizing Wiring Inside The Box
Arrange wires neatly inside the switch box. Avoid crowding or bending wires too much. Use cable ties to bundle wires if needed. A tidy box makes future work easier and safer.

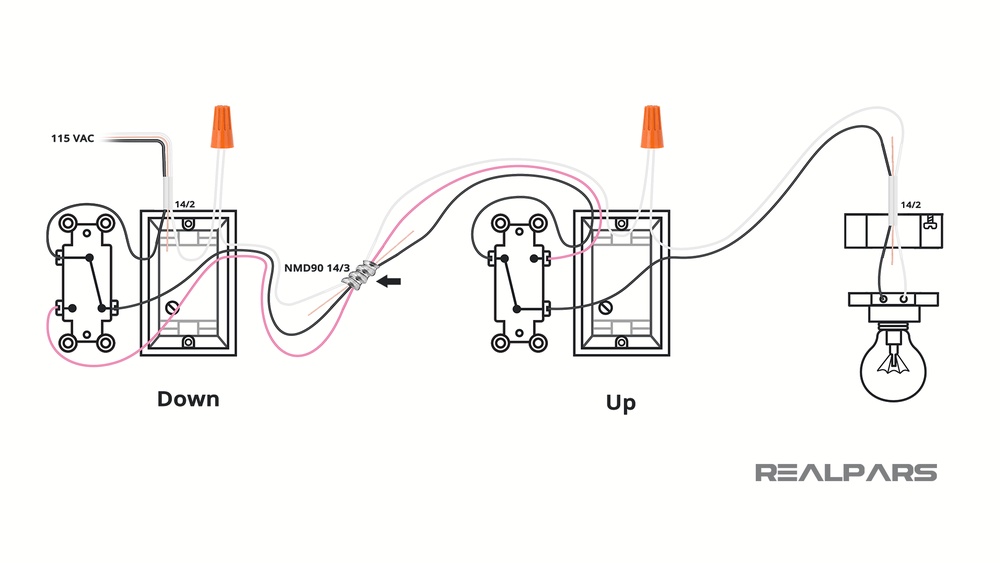
Credit: www.realpars.com
Frequently Asked Questions
How Do I Wire Two Light Switches Together Safely?
To wire two light switches together, use a three-way switch setup. Connect travelers between switches and ensure power is off. Follow local electrical codes and use proper tools for safety.
Can I Control One Light From Two Different Switches?
Yes, using a three-way switch system allows control of one light from two switches. It requires specific wiring with traveler wires and proper switch types.
What Tools Are Needed To Connect Two Light Switches?
You need a screwdriver, wire stripper, voltage tester, electrical tape, and wire nuts. These tools ensure safe and secure connections when wiring two light switches together.
Is It Necessary To Turn Off Power Before Wiring Switches?
Always turn off the power at the circuit breaker before wiring switches. This prevents electrical shock and ensures a safe working environment.
Conclusion
Connecting two light switches can make your lighting more flexible and convenient. Follow the steps carefully for a safe and correct setup. Double-check all wires before turning the power back on. Use the right tools and take your time. Mistakes can cause electrical problems or injury.
If unsure, ask a professional for help. Now, you can control lights from two places easily. Enjoy the improved lighting control in your home. Simple changes can make a big difference.