Are you looking to control three lights with just one switch? It might sound tricky, but it’s easier than you think.
Imagine turning on or off all your lights with a single flick—no more running back and forth to different switches. This guide will show you step-by-step how to connect three lights to one switch safely and effectively. Whether you’re upgrading your home or fixing a current setup, by the end of this article, you’ll have the confidence to handle the wiring yourself.
Ready to make your lighting smarter and simpler? Let’s get started!
Materials Needed
Gathering the right materials is the first step to connect three lights to one switch. The tools and parts you choose affect the ease and safety of your work.
Each item plays a clear role in the setup. Knowing what you need helps avoid delays and extra trips to the store.
Switch
Pick a single-pole switch that can handle the total wattage of all lights. It controls the power flow to the lights.
Light Fixtures
Select three light fixtures suitable for your room. Check their voltage and wattage ratings.
Electrical Wire
Use a three-conductor wire with ground. It connects the switch to the lights and the power source.
Wire Connectors
Wire nuts or push-in connectors join wires safely. They prevent loose connections and electrical shorts.
Electrical Box
Install an electrical box to hold the switch securely. It also protects wire connections.
Screwdriver And Wire Stripper
These tools help remove insulation and fasten wires. Use insulated tools for safety.
Voltage Tester
Use a voltage tester to check power is off before starting. Safety first.
Safety Precautions
Working with electrical wiring can be risky. Safety must come first when connecting three lights to one switch. Taking proper precautions protects you from electric shocks and fires.
Always prepare and plan before starting any electrical work. Use the right tools and follow safety rules. This section covers key safety tips to keep your project safe and smooth.
Turn Off Power At The Breaker
Cut the power to the circuit before working on the switch or lights. Use the main breaker panel to switch off the correct circuit. Double-check with a voltage tester to ensure no electricity flows.
Use Insulated Tools
Select tools with insulated handles. These protect you from accidental shocks. Avoid metal tools without insulation when handling live wires.
Wear Safety Gear
Wear rubber gloves and safety glasses. Rubber gloves stop electric shocks. Glasses protect your eyes from sparks or debris.
Check Wire Ratings
Use wires that match the circuit’s voltage and current ratings. Incorrect wires can cause overheating and fires. Follow electrical codes for wire size and type.
Secure Connections Firmly
Loose connections create sparks and heat. Tighten wire nuts and screws properly. Inspect all joints to avoid hazards.
Work In Dry Conditions
Keep the workspace dry to prevent shocks. Never work in wet areas or with wet hands. Use a dry cloth to wipe surfaces if needed.
Types Of Wiring
Wiring lights to a single switch needs the right method. The wiring type affects how lights work and how safe the setup is. Understanding wiring types helps in making the right choice for your project.
Each wiring type has its own use. Some are better for certain tasks. Knowing the difference helps avoid mistakes and ensures the lights function well.
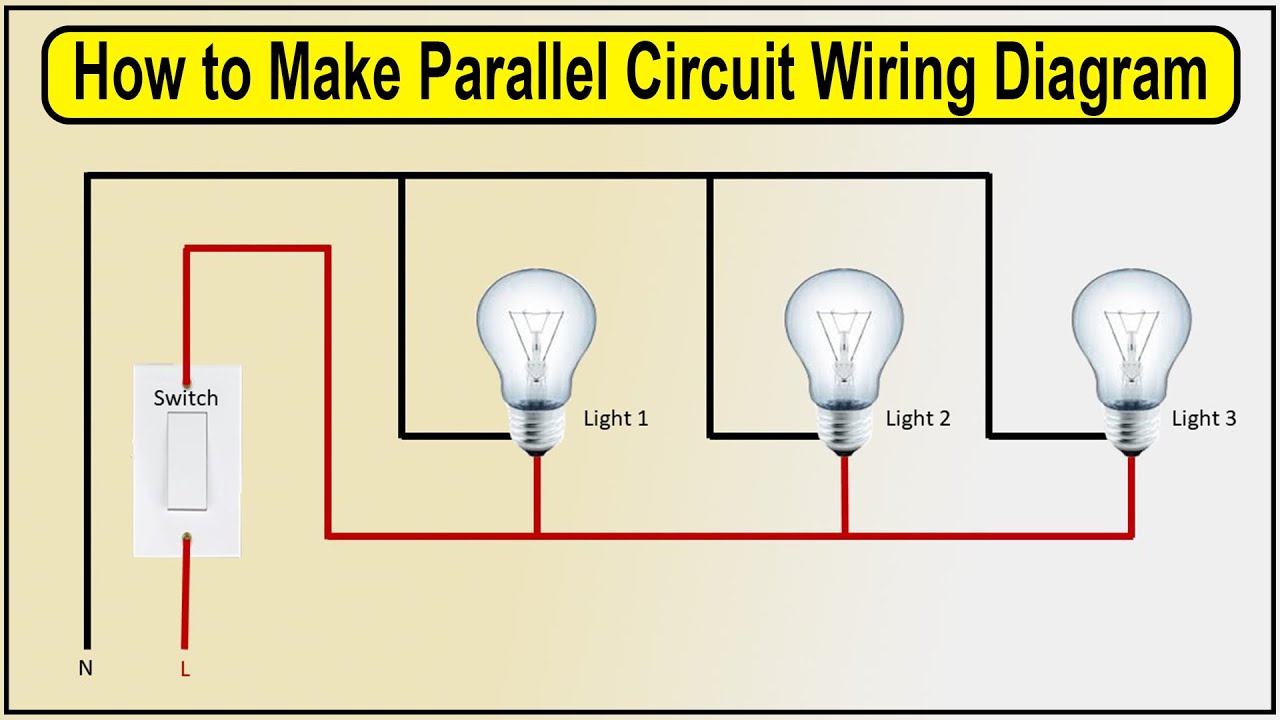
Series Vs Parallel Wiring
Series wiring connects lights one after another. Electricity flows through each light in order. If one light breaks, all lights go out. This wiring is simple but not common for home lights.
Parallel wiring connects each light directly to the power source. Lights work independently. If one light fails, others stay on. This method is safer and used in most homes.
Choosing The Right Wiring Method
Parallel wiring suits most home lighting projects. It keeps all lights bright and working well. Series wiring may cause dim lights and is less reliable.
Consider safety and ease of repair. Parallel wiring is easier to fix and safer to use. It also keeps electrical load balanced.

Credit: www.youtube.com
Preparing The Switch And Lights
Preparing the switch and lights is the first step to connect three lights to one switch. This part focuses on safety and gathering the right tools. Proper preparation helps avoid mistakes and accidents. It makes the work smoother and faster.
Before starting, you must turn off the power. This stops electricity from flowing and keeps you safe. Next, gather all the tools you need. Having everything ready saves time and prevents interruptions.
Turning Off Power
Locate the circuit breaker that controls the room’s electricity. Flip the breaker switch to the off position. Use a voltage tester to check if the power is off. Test the switch wires and light fixtures. Never work on wires with power on. Safety is the top priority.
Gathering Tools
Collect these basic tools before starting:
- Screwdriver set
- Wire stripper
- Voltage tester
- Electrical tape
- Wire nuts
- Drill (optional)
Having these tools handy makes the wiring process easier. It helps you work quickly and safely.
Wiring The Lights
Wiring the lights is a key step to control three lights with one switch. It involves connecting several wires safely and correctly. Understanding each wire’s role helps avoid mistakes and ensures the lights work well.
Focus on three main wires: hot, neutral, and ground. Each must be linked properly to complete the circuit and power the lights. Let’s break down how to connect each wire type.
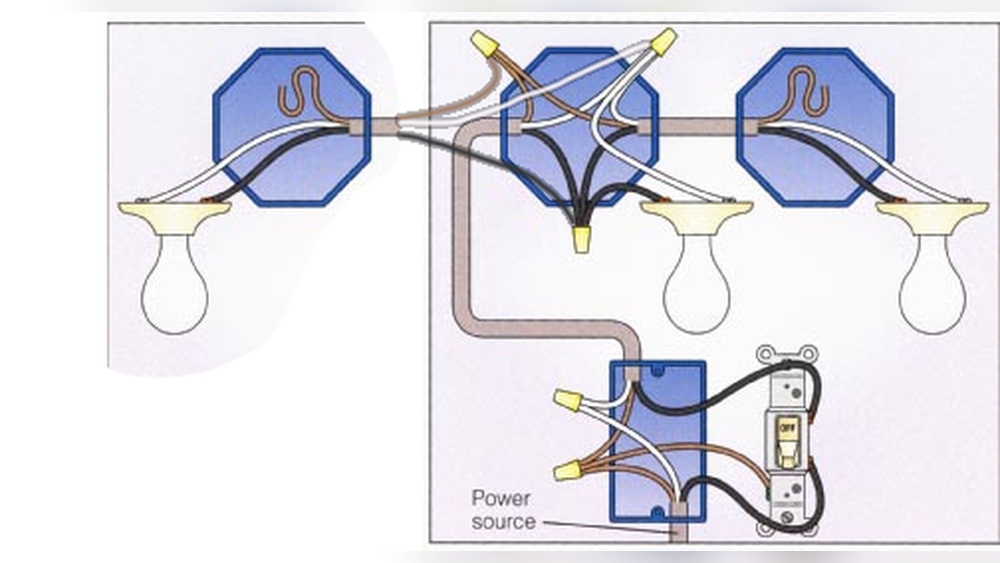
Connecting The Hot Wire
The hot wire carries electricity from the switch to the lights. Usually, it is black or red. Connect the hot wire from the switch to the black wires of all three lights. Use a wire connector to join them tightly. This lets the switch control all the lights at once.
Linking Neutral Wires
Neutral wires complete the electrical circuit by returning current to the power source. These wires are usually white. Connect the white wires from all three lights together and then to the neutral wire in the electrical box. Secure them with a wire nut to keep the connection safe.
Ground Wire Setup
The ground wire protects against electrical shocks. It is usually green or bare copper. Attach the ground wires from each light to the ground wire in the box. Also, connect them to the metal switch box if it is present. This ensures all parts are safely grounded.
Credit: www.youtube.com
Connecting To The Switch
Connecting the lights to the switch is the key step in this project. It controls all three lights with one switch. Proper wiring ensures safety and smooth operation.
Take your time with this step. Double-check each wire connection for accuracy. Correct connections prevent flickering and power loss.
Attaching Wires To The Switch
First, turn off the power at the breaker box. Safety is the top priority. Strip about half an inch of insulation from each wire.
Connect the black (hot) wire from the power source to the switch’s common terminal. Then, attach the black wires leading to each light to the switch’s other terminals. Use a wire nut to join the white (neutral) wires together, but do not connect them to the switch.
Attach the ground wires to the green screw on the switch. This step helps prevent electrical shocks.
Securing Connections
Twist wires tightly before securing with wire nuts. Loose connections cause sparks and failures. Wrap electrical tape around wire nuts for extra security.
Push wires carefully into the switch box without bending them sharply. Tighten screws on the switch terminals firmly.
Finally, fix the switch into the box and attach the cover plate. Restore power and test the switch to confirm all three lights work perfectly.
Testing The Setup
Testing the setup is a key step after wiring three lights to one switch. It confirms that everything works safely and correctly. You must check each part carefully to avoid problems later. Follow simple steps to ensure your lighting system functions well.
Restoring Power
Turn the main power back on at the circuit breaker. This restores electricity to the switch and lights. Watch for any sparks or unusual sounds. If you notice anything odd, turn off power immediately. Safety first.
Checking Each Light
Flip the switch and observe the lights. All three should turn on simultaneously. Check each bulb to see if it glows brightly. If one or more do not light up, check the wiring again. Make sure all connections are tight and correct. Replace any faulty bulbs as needed.
Troubleshooting Tips
Troubleshooting is key when connecting three lights to one switch. Small mistakes can stop the lights from working. This section helps find common problems fast. It shows simple fixes anyone can try. Clear steps make it easy to check the wiring and connections. Follow these tips to get your lights working right.
Check The Power Source
Start by confirming the power is on. Use a tester to see if the switch gets electricity. No power means no light. Make sure the circuit breaker is not tripped. Reset it if needed. This step saves time and avoids confusion.
Inspect Wire Connections
Loose or wrong connections cause issues. Turn off power before touching wires. Look for wires that are not tightly connected. Match the colors correctly: black to black, white to white. Secure all wire nuts. A good connection ensures proper current flow.
Test The Switch Function
Sometimes the switch itself is the problem. Use a multimeter to check if the switch works. Flip the switch and see if it changes the reading. Replace the switch if it does not work. A faulty switch stops all lights from turning on.
Examine The Light Bulbs
Check each bulb to see if it is burnt out. Swap bulbs with a working one to test. Clean the bulb sockets if dirty. Dirty or old sockets can cause poor contact. Good bulbs and sockets help the lights shine bright.
Look For Short Circuits
Short circuits can trip the breaker or blow fuses. Inspect wires for exposed copper or damaged insulation. Fix any bare wires with electrical tape. Avoid wire crossing that can cause shorts. Safe wiring prevents electrical hazards.

Credit: diy.stackexchange.com
Frequently Asked Questions
How Do I Wire 3 Lights To 1 Switch Safely?
Turn off power before wiring. Connect the switch’s live wire to all three lights’ live wires. Join neutral wires together. Use wire nuts and electrical tape for secure connections.
Can I Control 3 Lights With A Single Switch?
Yes, a single switch can control multiple lights. Wire the switch to the live wires of all three lights. This setup allows simultaneous on/off control.
What Tools Are Needed To Connect 3 Lights To 1 Switch?
You need a screwdriver, wire strippers, wire nuts, electrical tape, voltage tester, and a drill. These tools ensure safe and efficient installation.
Is It Necessary To Use The Same Wattage Bulbs For 3 Lights?
It’s best to use bulbs with similar wattage. This prevents overloading the circuit and ensures consistent lighting across all three fixtures.
Conclusion
Connecting three lights to one switch is simple and saves space. Follow the steps carefully and use the right tools. Always turn off the power before starting any wiring work. Check each connection to avoid problems later. This setup helps control all lights with one switch easily.
You can brighten your room without extra switches or wiring. Take your time, and don’t rush the process. Safety is key in any electrical work. Enjoy your well-lit space with one easy switch!