Have you ever wished you could brighten up a room with an extra light but didn’t want to deal with complicated wiring? Connecting a second light to your existing switch might sound tricky, but it’s easier than you think.
Imagine controlling two lights with just one switch—more light, less hassle. In this guide, you’ll discover simple, step-by-step instructions that anyone can follow. By the end, you’ll have the confidence to upgrade your space and enjoy better lighting without calling an electrician.
Keep reading, and let’s make your home shine brighter together!
Tools And Materials Needed
Before adding a second light to an existing switch, gather all the necessary tools and materials. Having the right items ready makes the job easier and safer. You will need basic electrical tools and parts to complete the wiring properly.
Tools Needed
- Screwdriver set – for removing and securing screws
- Wire stripper – to strip insulation from electrical wires
- Voltage tester – to check if wires are live
- Needle-nose pliers – for bending and holding wires
- Drill with bits – if you need to make holes
- Electrical tape – to insulate wire connections
- Flashlight – to see clearly in dark spaces
Materials Needed
- Second light fixture – choose one compatible with your setup
- Electrical cable – to connect the new light to the switch
- Wire nuts – for safely joining wires
- Light switch (optional) – if you plan to replace or add switches
- Mounting hardware – screws and anchors for fixtures

Credit: www.finehomebuilding.com
Safety Precautions
Working with electrical wiring can be risky. Safety must be your top priority before connecting a second light to an existing switch. Taking the right safety steps protects you and your home from accidents.
Simple precautions reduce the chance of electric shock and fire. Follow these rules carefully and take your time. Safety is not optional.
Turn Off Power At The Circuit Breaker
Always switch off the power at the circuit breaker before starting work. Do not rely on the light switch alone. Use a voltage tester to confirm the power is off. This step prevents shocks and injuries.
Use Proper Tools And Equipment
Choose tools designed for electrical work. Use insulated screwdrivers and wire strippers. Wear rubber-soled shoes and insulated gloves. These tools and gear help keep you safe during wiring.
Check Wiring And Components
Inspect wires for damage or wear before connecting them. Replace any frayed or old wires. Use the correct wire gauge and connectors for your setup. Safe wiring ensures a stable and secure connection.
Follow Local Electrical Codes
Know the rules for electrical work in your area. Follow the local codes for wiring and installation. Proper compliance avoids legal problems and enhances safety. Check with local authorities if unsure.
Locate The Existing Switch And Wiring
Locating the existing switch and wiring is the first step in adding a second light. Knowing exactly where the switch and wires are will make the process smoother and safer.
Start by turning off the power at the circuit breaker. This prevents any accidents while working with electrical parts. Safety is important.
Find The Switch Box
Look for the switch that controls the current light. Usually, it is on the wall near the room entrance. Remove the switch cover carefully.
Use a flashlight if the area is dark. This helps you see the wires inside the box clearly.
Identify The Wires
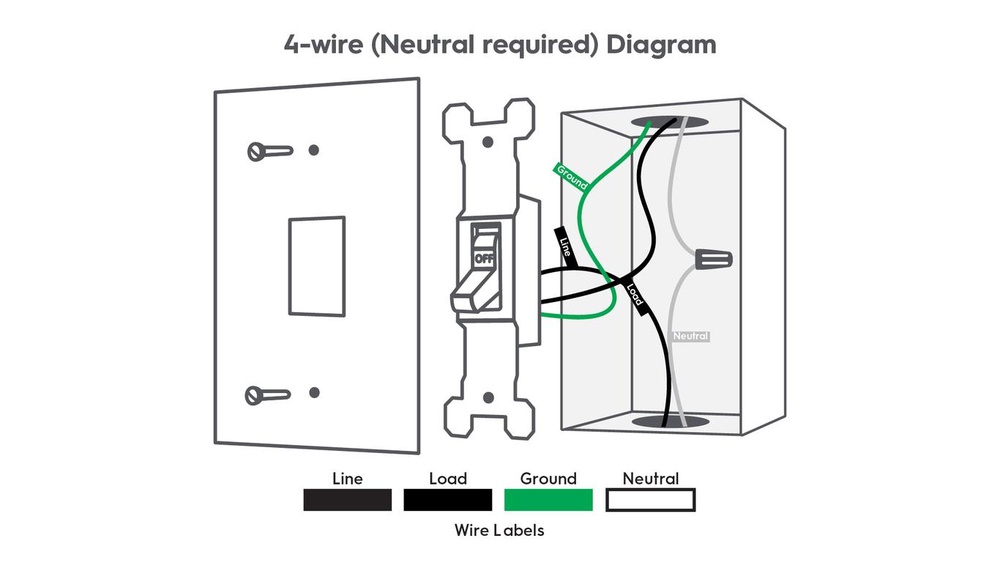
Inside the box, you will see several wires. Typically, there are black (hot), white (neutral), and green or bare copper (ground) wires.
Use a voltage tester to confirm the power is off. This is a key safety step before touching wires.
Trace The Wiring Path
Follow the wires running from the switch. They usually go through the wall to the light fixture.
Understanding this path helps you know where to connect the new light’s wires later.
Credit: www.reddit.com
Plan The Wiring Route
Planning the wiring route is a key step in connecting a second light to an existing switch. It helps avoid confusion and keeps the work safe. This step ensures wires run smoothly from the switch to the new light.
Good planning saves time. It also prevents damage to walls and ceilings. Knowing the path of the wires helps choose the right materials and tools.
Assess The Existing Wiring
Check the current wiring at the switch and light points. Note the type and size of wires used. This information guides the new wiring choices. Avoid mixing different wire types.
Choose The Shortest And Safest Path
Find the shortest route for the new wire. Shorter paths reduce the risk of damage and voltage drop. Avoid running wires near water pipes or heat sources. Stay clear of areas with heavy foot traffic.
Mark The Route On Walls Or Ceilings
Use a pencil to mark the planned wiring route. This helps during drilling and cable pulling. Mark spots for drill holes or wire clips. Keep marks neat and clear for easy reference.
Plan For Junction Boxes
Decide where to place junction boxes along the route. Junction boxes protect wire connections and make future repairs easier. Place boxes where wires will join or split. Ensure boxes are accessible and not hidden behind walls.
Turn Off Power Supply
Turning off the power supply is the first and most important step before working with any electrical wiring. This step keeps you safe from electric shocks and prevents damage to your electrical system. Always treat electricity with respect and caution.
Before starting, locate your home’s main electrical panel. This panel controls the power supply to all circuits in your house. Switching off the correct breaker will stop the electricity flow to the switch you want to work on.
Locate The Circuit Breaker
Find the circuit breaker that controls the switch’s power. The breakers are usually labeled for each room or area. If labels are missing or unclear, turn off the main breaker to cut power to the entire house.
Turn Off The Power
Flip the circuit breaker switch to the “off” position. This action stops the electrical current from reaching the switch. Double-check that the power is off before touching any wires.
Test The Power Is Off
Use a voltage tester or a multimeter to check the switch wires. Touch the tester to the wires connected to the switch. If the tester shows no voltage, the power is safely off.
Take Safety Precautions
Wear insulated gloves for extra protection. Use tools with insulated handles. Keep your work area dry to avoid electrical hazards.
Connect The Second Light Fixture
Connecting a second light fixture to an existing switch is a useful skill. It allows you to brighten up a space without adding more switches. The process is straightforward with careful steps. This section guides you through connecting the second light fixture safely and correctly.
Identify Live, Neutral, And Ground Wires
Start by finding the wires in the existing light box. The live wire is usually black or red. It carries power from the switch. The neutral wire is white and completes the circuit. The ground wire is green or bare copper. It protects against electrical shocks. Use a voltage tester to confirm the live wire.
Make Proper Wire Connections
Connect the live wire from the second light to the live wire in the box. Join the neutral wire from the new fixture to the existing neutral wire. Attach the ground wire from the fixture to the ground wire in the box. Use wire nuts to twist the wires together firmly. Ensure no bare wire is exposed outside the nut.
Secure The Connections
After twisting wires with wire nuts, wrap them with electrical tape. This adds extra safety and keeps the wires in place. Push the connected wires carefully back into the box. Make sure the wires are not pinched or bent sharply. Finally, attach the second light fixture securely to the mounting bracket.
Test The New Light Setup
Testing the new light setup is a crucial step after installation. It ensures your second light works properly with the existing switch. This step helps you catch wiring issues early. It also confirms the switch controls both lights correctly.
Testing prevents future electrical problems and keeps your home safe. Follow simple tests to check the new light’s functionality. Use basic tools and observe the light’s response to the switch.
Turn On The Power
Start by turning on the circuit breaker. This restores power to the switch and lights. Check that the switch can now control the lights. If the lights do not turn on, switch off the breaker immediately.
Test The Switch Operation
Flip the switch on and off several times. Watch both lights carefully. They should turn on and off smoothly together. If one light does not respond, check the wiring connections again.
Use A Voltage Tester
A voltage tester confirms power flow to the new light. Place the tester on the light’s terminals. It should show voltage when the switch is on. No voltage means a wiring or connection problem.
Check For Flickering Or Dim Lights
Look for any flickering or dim lights. These signs show poor connections or wrong wiring. Tighten wire nuts and check for loose wires. Fix any issues before finishing the installation.

Credit: diy.stackexchange.com
Troubleshooting Common Issues
Adding a second light to an existing switch can be simple. Still, some problems may appear. Knowing how to fix common issues helps save time and effort. This section covers the most frequent problems and how to solve them fast.
Check each step carefully. Small mistakes often cause big issues. Follow the tips below to get your light working perfectly.
Light Not Turning On
First, check if the bulb is good. A burned-out bulb is the easiest fix. Next, verify that the power is on at the main switch. Sometimes the circuit breaker trips without notice. Look for loose wires at the switch and light fixture. Tighten any loose connections carefully. Also, confirm the new light is wired correctly to the switch. Wrong wiring stops the light from turning on.
Flickering Lights
Flickering often means a loose wire or a bad bulb. Turn off the power before checking wires. Secure any loose wires at the switch and light. Replace the bulb if flickering continues. Old bulbs may flicker more. Sometimes, the switch itself is faulty. Consider swapping the switch if problems persist.
Switch Problems
A switch may feel loose or not click properly. This can cause failure to control the lights. Remove the switch cover and inspect the wiring. Look for corrosion or damaged wires. Replace the switch if it looks worn out. Use a new switch rated for the load of your lights. Test the switch after installation to ensure it works well.
Frequently Asked Questions
How Do I Add A Second Light To One Switch?
To add a second light, run a new cable from the switch or first light. Connect the new light’s wires to the existing wiring. Ensure the switch can handle the added load. Turn off power before starting for safety.
Can I Use The Same Switch For Two Lights?
Yes, a single switch can control two lights. Both light fixtures must be wired in parallel. This means connecting their hot and neutral wires together. Make sure the switch rating supports the total wattage of both lights.
What Tools Are Needed To Connect A Second Light?
You will need wire cutters, strippers, a screwdriver, electrical tape, and a voltage tester. Additionally, a drill may be required to run cables. Always use tools rated for electrical work and follow safety guidelines.
Is It Safe To Connect Multiple Lights To One Switch?
Yes, it is safe if the wiring is done correctly. Ensure the switch and wiring can handle the total electrical load. Always turn off power at the breaker before working. Follow local electrical codes for safety.
Conclusion
Adding a second light to an existing switch is simpler than it seems. Follow the steps carefully and stay safe. Use the right tools and check connections twice. Test the new light before finishing the job. This upgrade saves energy and brightens your space.
Now, enjoy better lighting with one switch controlling two lights.