Are you looking for a simple way to organize your space or hang items without drilling holes? Installing S hooks to your ceiling or wall can be the perfect solution.
It’s quick, easy, and doesn’t require special tools. Imagine turning your cluttered room into a neat, functional area in just minutes. In this guide, you’ll discover step-by-step instructions to install S hooks safely and securely. Keep reading to transform your space with minimal effort and maximum results.
Tools And Materials Needed
Installing S hooks to the ceiling wall needs the right tools and materials. Using proper items makes the job easier and safer.
Gathering everything before starting saves time and avoids interruptions. It helps to work smoothly from start to finish.
Tools Required
- Drill with suitable drill bits
- Screwdriver or power driver
- Measuring tape or ruler
- Level to ensure straight placement
- Pencil for marking positions
- Ladder or step stool for high ceilings
- Protective gloves for safety
Materials Needed
- S hooks of appropriate size and strength
- Anchors or wall plugs for secure fixing
- Screws compatible with anchors and hooks
- Ceiling wall suitable for mounting (drywall, wood, concrete)
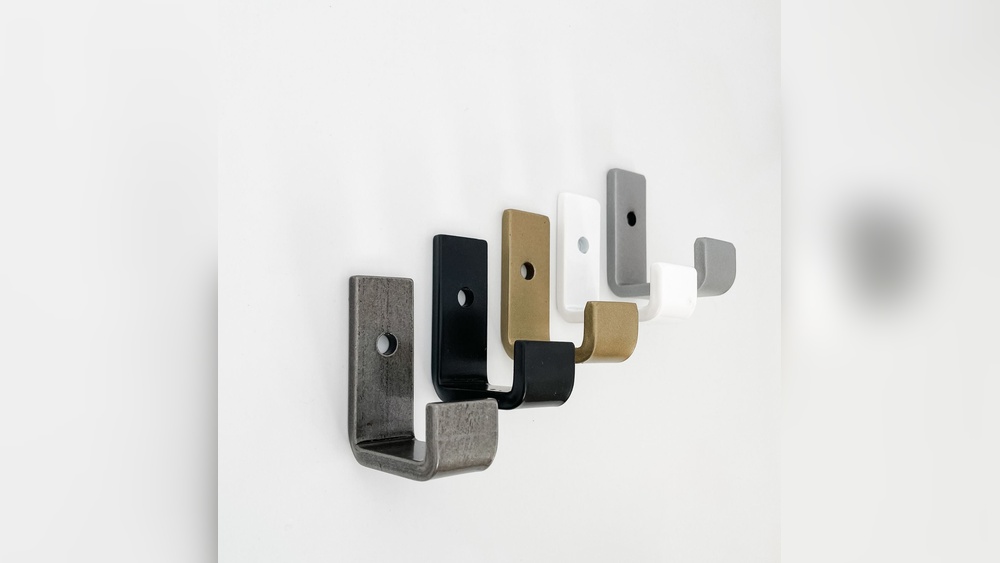
Select S hooks based on the weight they must hold. Metal hooks offer strength and durability. Plastic hooks suit lighter items and indoor use.
Check the hook size to fit the items you plan to hang. Too small hooks may bend or break easily.

Credit: www.temu.com
Choosing The Right S Hooks
Choosing the right S hooks is key to a strong and safe installation. The right hooks hold weight without bending or breaking. They fit well with your ceiling or wall type. This choice affects how long your hooks last and how secure your items stay.
Material Of S Hooks
Pick hooks made from sturdy materials like stainless steel or heavy-duty metal. These resist rust and wear. Avoid thin or weak metals that bend easily. Strong material ensures durability, especially in damp places.
Size And Thickness
Choose hooks thick enough for the items you hang. Thin hooks may bend under heavy weight. Match the hook size to the load size. Bigger items need larger, thicker hooks for safety.
Shape And Design
Look for hooks with smooth curves and closed ends. Open ends may let items slip off. Curved hooks hold items tightly and prevent damage. Some hooks have a latch for extra security.
Weight Capacity
Check the weight limit of each hook. Do not exceed this limit. Overloading can cause hooks to fail. Select hooks that support more than your heaviest item for safety.
Preparing The Ceiling Wall Surface
Start by cleaning the ceiling wall surface to remove dust and dirt. Ensure it is dry and smooth for better hook attachment. Check for any cracks or holes and fill them before installing S hooks.
Cleaning The Surface
Start by cleaning the ceiling wall surface thoroughly. Remove dust, dirt, and grease using a damp cloth. This step helps hooks stick better and last longer. Avoid using harsh chemicals that can damage paint or plaster.
Checking For Damage
Inspect the surface for cracks, holes, or peeling paint. Fix any damage with filler or spackle. Allow it to dry completely before moving on. A smooth surface ensures the hooks hold firmly and safely.
Measuring And Marking
Measure the exact spots where you want to place the S hooks. Mark these points lightly with a pencil. Accurate marks help keep your hooks aligned and evenly spaced for a neat look.

Credit: www.ebay.com
Marking Hook Placement
Marking the right spots for your S hooks is essential for a secure fit. This step helps avoid mistakes and ensures your hooks hold weight evenly. Precise markings save time and effort during installation.
Start by measuring the area where you want to place the hooks. Use a tape measure to find equal distances between each hook. Mark these points lightly with a pencil on the ceiling or wall.
Choose The Right Height And Spacing
Decide how high the hooks should be based on what you want to hang. Keep enough space between hooks for the items to hang freely. For heavier items, place hooks closer together for better support.
Use A Level For Straight Lines
A level keeps your marks straight and even. Hold the level against the wall or ceiling. Adjust the pencil marks until they line up perfectly. Straight lines look better and keep your hooks aligned.
Double Check Your Marks
Check the distance between marks twice. Make sure all marks are clear and visible. Confirm the marks match the measurements before drilling or screwing. This step prevents errors and saves time later.
Installing Anchors For Support
Start by marking spots on the ceiling or wall for the anchors. Drill holes carefully, then insert anchors to hold the S hooks firmly in place. Attach the S hooks by hooking them into the installed anchors for strong support.
Choosing The Right Anchors
Anchors hold the S hooks firmly in place. Choosing the right anchor depends on the wall type. Drywall, concrete, and brick all need different anchors. Use plastic anchors for drywall. Use metal anchors for concrete or brick walls. Check the weight the anchors must support. Select anchors that can hold more than the hook’s weight.
Marking The Anchor Positions
Start by measuring the spot for each anchor. Use a pencil to mark each point on the wall. Keep marks level and evenly spaced. Use a level tool for accuracy. Correct marking prevents uneven hanging later. Double-check the marks before drilling holes.
Drilling Holes For Anchors
Use a drill bit that matches the anchor size. Drill slowly to avoid wall damage. Drill straight into the wall at each mark. The hole should be deep enough for the anchor. Clean out dust from the holes. This helps anchors fit tightly.
Inserting Anchors Into The Wall
Push the anchor into the hole gently. Tap it lightly with a hammer if needed. Ensure the anchor sits flush with the wall surface. Do not force the anchor too hard. Firm placement keeps the anchor secure. This step is key to strong support.
Attaching S Hooks Securely
Attaching S hooks securely is important for safety and durability. Loose hooks can cause items to fall. Proper attachment keeps things stable and safe. Follow simple steps for a firm hold on the ceiling or wall.
Choosing The Right S Hook Size
Pick S hooks that fit your project needs. The hook must support the weight of the item. Too small hooks bend easily. Too large hooks may not fit the mounting point.
Preparing The Mounting Surface
Clean the ceiling or wall before attaching hooks. Remove dust and dirt for better grip. Check for cracks or weak spots. Use solid surfaces for strong support.
Securing The Hook Properly
Slide the S hook fully onto the mounting point. Make sure it closes tightly around the hook or ring. Use pliers to squeeze the open end. This prevents slipping or falling.
Testing The Hook Stability
Gently pull down on the S hook to test strength. It should not move or bend easily. Add a small weight to check security. Adjust or replace hooks that feel loose.
Testing Hook Stability
Testing the stability of S hooks after installation is key for safety and function. Proper testing ensures hooks hold weight without bending or slipping. This step prevents accidents and damage to your walls or ceiling.
Check Hook Attachment
Start by inspecting the hook’s connection to the wall or ceiling. Make sure it is firmly screwed or anchored. Wiggle the hook gently to see if it moves. No wobbling means a secure fit.
Apply Gradual Weight
Add weight slowly to the hook to test its strength. Begin with a light load, then increase the weight step by step. Watch for any signs of bending or loosening.
Observe For Movement
Look for any shifting or slipping of the hook during the test. If the hook slides or changes position, it may need tightening or repositioning.
Repeat Testing For Each Hook
Test every S hook individually to ensure all are stable. Each hook may hold different weight depending on its position and installation.
Safety Check Before Use
Confirm all hooks stay steady under the expected load. Only use hooks that pass the stability test to avoid accidents.
Credit: www.ebay.com
Safety Tips And Precautions
Installing S hooks to the ceiling wall can be easy and useful. Safety is the first step to avoid accidents. Follow these safety tips and precautions to keep the work area safe.
Wear Protective Gear
Always wear safety goggles to protect your eyes. Use gloves to avoid cuts or scratches on your hands. Wear a dust mask if drilling creates dust or debris.
Check The Ceiling Material
Know the type of ceiling before drilling. Some materials may need special anchors or screws. Avoid weak spots that can break or crumble easily.
Use The Right Tools
Choose tools designed for ceiling work. Use a drill with the correct drill bit size. Make sure the ladder is stable and tall enough to reach safely.
Secure The Ladder Properly
Place the ladder on a flat surface. Have someone hold the ladder while you work. Do not overreach; move the ladder as needed.
Mark The Hook Locations Carefully
Measure and mark the exact spots before drilling. Double-check the marks to ensure even placement. Avoid drilling too close to edges or corners.
Test The Hook Strength
Gently pull on each hook after installation. Make sure it holds firm and does not loosen. Use hooks rated for the weight you plan to hang.
Frequently Asked Questions
What Tools Are Needed To Install S Hooks On The Ceiling Wall?
To install S hooks, you need a drill, screws, anchors, a pencil, and a measuring tape. These tools help ensure precise and secure installation.
How Do I Find The Right Spot For S Hook Installation?
Measure and mark the desired location on the ceiling wall. Use a pencil and level to ensure hooks are evenly spaced for balanced hanging.
Can I Install S Hooks On Any Ceiling Material?
S hooks work best on drywall, wood, and concrete ceilings. Use appropriate anchors and screws depending on the ceiling material for secure support.
How Much Weight Can S Hooks Hold On Ceiling Walls?
Weight capacity depends on hook size and anchor strength. Typically, S hooks can hold between 10 to 50 pounds safely when installed correctly.
Conclusion
Installing S hooks on the ceiling wall is simple and practical. Follow the steps carefully for a secure fit. Use the right tools to make the job easier. Check the hooks to ensure they hold well. These hooks help organize and save space in your room.
Try different sizes based on what you want to hang. With a little effort, your space becomes neat and tidy. Small changes can make a big difference in your home. Give it a try and enjoy a clutter-free area.