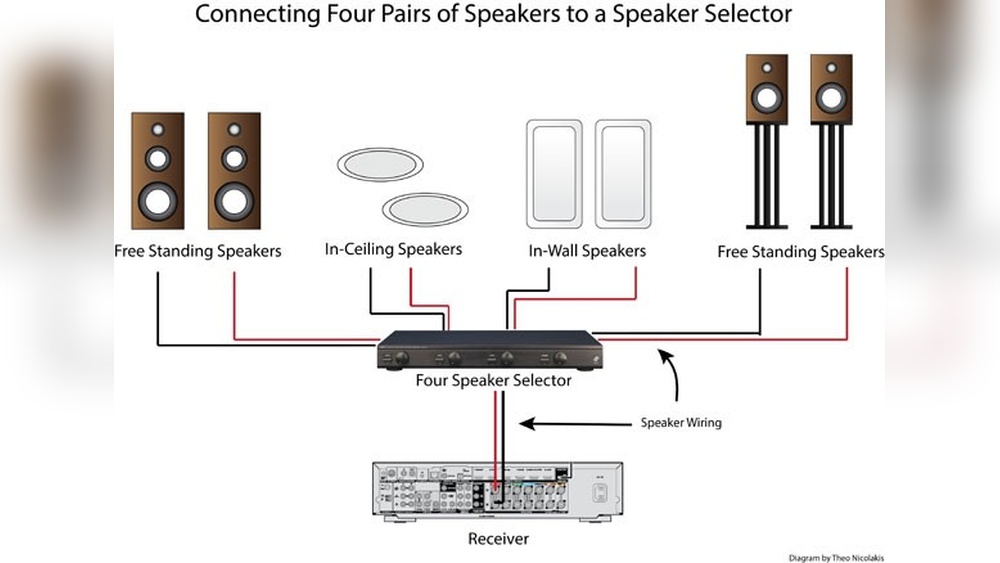
Are you ready to bring your music and movies to life with powerful sound? Hooking up in-wall speakers to your receiver might seem tricky, but it’s simpler than you think.
With the right steps, you’ll enjoy crisp, clear audio that fills your room without messy wires everywhere. In this guide, you’ll discover exactly how to connect your in-wall speakers to your receiver quickly and confidently. Keep reading, and soon you’ll have a seamless sound system that transforms your space.

Credit: xtenav.com
Choosing Wall Speakers
Choosing the right wall speakers is an important step before connecting them to a receiver. The right choice affects sound quality and how well your system works. Consider the room size, sound needs, and budget. A good speaker will give clear sound and last a long time. Learn about the types, placement, and matching to make a smart decision.
Types Of Wall Speakers
Wall speakers come in many designs. Some are in-wall, hidden inside the wall for a clean look. Others are on-wall, mounted on the wall surface. In-wall speakers often have better sound because of their size. On-wall speakers are easier to install and move. Choose based on your room style and how much space you want to use.
Speaker Placement Tips
Place speakers at ear level for the best sound. Avoid corners where sound can echo too much. Space speakers evenly for balanced audio. Keep them away from objects that block sound. Good placement makes voices clear and music full. Experiment with spots to find where sound feels natural.
Matching Speakers With Receiver
Check the speaker’s impedance and power needs. Match these with the receiver’s output. Wrong matching can cause poor sound or damage gear. Look for speakers that fit your receiver’s power range. Balanced matching ensures clear sound and safe use. Always read specs before buying to avoid problems.
Preparing Your Receiver
Preparing your receiver is the first step to connect your in-wall speakers properly. A well-prepared receiver ensures clear sound and easy setup. Take time to understand your receiver’s parts and tools needed. This helps avoid mistakes and saves time.
Identifying Speaker Outputs
Look at the back of your receiver. Find the speaker output terminals. These are usually marked as “Front,” “Rear,” or “Center.” Each terminal has positive (+) and negative (–) signs. Match these to your speaker wires for correct connection.
Checking Receiver Compatibility
Check if your receiver supports in-wall speakers. Review the receiver’s manual or labels. Confirm the power rating matches your speaker’s needs. Make sure the receiver can handle the speaker’s impedance, usually 4 to 8 ohms. This prevents damage and ensures good sound.
Gathering Necessary Tools
Prepare tools before starting. You will need speaker wire cutters, a screwdriver, and wire strippers. Also, have electrical tape handy. These tools help make secure and safe connections. Keeping tools ready speeds up the setup process.
Wiring Wall Speakers
Wiring wall speakers to a receiver requires careful planning and proper tools. Doing it right ensures good sound quality and safety. This section guides you through the key steps of wiring wall speakers.
Follow these steps to connect your speakers neatly and securely inside your walls.
Selecting Speaker Wire
Choose speaker wire that matches your speaker and receiver needs. Use 16-gauge wire for runs under 50 feet. For longer distances, 14-gauge wire works better. Look for wire with clear insulation and two distinct conductors. Copper wire offers good conductivity and durability.
Running Wires Through Walls
Plan your wire path to avoid electrical cables and pipes. Use a fish tape to pull wire through tight spaces. Drill holes in studs carefully to run wires smoothly. Keep the wire away from metal objects to prevent interference. Label both ends of the wire for easy identification later.
Stripping And Connecting Wires
Strip about half an inch of insulation from the wire ends. Twist the exposed copper strands to prevent fraying. Connect the positive wire to the red terminal and the negative wire to the black terminal. Tighten the terminals securely to avoid loose connections. Test the connection before closing the wall.
Credit: kdfoundation.org
Connecting To The Receiver
Connecting your in-wall speakers to the receiver is a key step for great sound. This process ensures your audio system works smoothly. Follow the steps carefully to avoid issues. Proper connection improves sound quality and system reliability.
Attaching Wires To Terminals
Start by stripping about half an inch of insulation from each wire end. Insert the bare wire into the receiver’s speaker terminals. Use the right terminals for left and right speakers. Make sure wires fit snugly to avoid loose connections. Loose wires can cause poor sound or no sound.
Ensuring Correct Polarity
Check the positive (+) and negative (-) markings on the receiver and speakers. Connect the positive wire to the positive terminal and negative to negative. Correct polarity keeps the speakers working in sync. Wrong polarity can cause weak or distorted sound. Use wire colors or labels to keep track easily.
Securing Connections
Tighten the terminal screws or clips to hold wires firmly. Give each wire a gentle tug to confirm it is secure. Loose connections may cause audio dropouts or interference. Avoid over-tightening to prevent damage to the wires or terminals. Properly secured wires ensure stable and clear sound.
Testing The Setup
Testing the setup is the key step after hooking up your in-wall speakers to the receiver. It ensures everything works well and sounds clear. This step helps find any problems before you start enjoying your music or movies.
Take your time to check each part of the system. Listen carefully to the sound quality and make small changes as needed. This process saves frustration later and improves your audio experience.
Powering On The System
Start by turning on the receiver and any connected devices. Make sure the speakers are connected to the right terminals. Look for lights or indicators that show the system is active. Avoid playing sound at full volume right away. Begin with low volume to protect your ears and equipment.
Adjusting Volume And Balance
Adjust the volume slowly to a comfortable level. Test each speaker by playing audio from different channels. Use the receiver’s balance controls to make sure sound is even from left to right. Fine-tune the bass and treble settings for clear sound. Walk around the room to check how the sound spreads.
Troubleshooting Common Issues
No sound? Check all cables and connections again. Make sure the receiver input matches the source device. Distorted sound may mean loose wires or damaged speakers. Try swapping speaker wires to identify faulty parts. Reset the receiver if it acts strange or freezes. Small fixes can often solve most problems.
Optimizing Sound Quality
Optimizing sound quality is key to enjoying your in-wall speakers fully. Proper setup and care make your music and movies sound clear and rich. Small changes can improve sound a lot. Focus on settings, room treatment, and upkeep.
Adjusting Receiver Settings
Start by setting the correct speaker size in your receiver. Choose small or large based on your speaker specs. Set the crossover frequency to match your speakers. Balance the speaker levels to avoid one being louder. Use the receiver’s equalizer to fine-tune bass and treble. Many receivers offer room correction tools. Run these tools to adjust sound for your room shape.
Using Acoustic Treatments
Sound reflects off walls and furniture. This can cause echoes and reduce clarity. Add soft materials like curtains or rugs to absorb sound. Place foam panels on walls to reduce reflections. Avoid placing speakers inside cabinets or behind objects. Keep speakers at ear level for best sound. Use bass traps in corners to control low frequencies. These simple steps improve sound clarity and depth.
Regular Maintenance Tips
Dust and dirt can harm speaker parts and sound quality. Clean speaker grills and cones gently with a soft cloth. Check speaker wires for damage or loose connections. Tighten connections to avoid sound dropouts. Inspect receiver vents to prevent overheating. Turn off equipment when not in use to extend life. Regular checks keep sound crisp and system reliable.

Credit: www.audioholics.com
Frequently Asked Questions
How Do I Connect In-wall Speakers To A Receiver?
Connect speaker wires from the receiver’s terminals to the in-wall speakers. Match positive to positive and negative to negative terminals for proper sound.
What Wire Type Is Best For In-wall Speaker Connections?
Use CL2 or CL3 rated speaker wire for in-wall installations. These wires meet safety codes and provide reliable audio transmission.
Can I Use A Single Receiver For Multiple In-wall Speakers?
Yes, a receiver with multiple channels can power several in-wall speakers. Ensure the receiver’s power output matches speaker requirements for best performance.
How To Identify Speaker Wire Polarity When Hooking Up?
Look for wire markings: a stripe, ridge, or color usually indicates positive polarity. Maintaining correct polarity ensures proper speaker phase and sound quality.
Conclusion
Connecting wall speakers to a receiver is simple and rewarding. Double-check all wire connections for a clear sound. Match the positive and negative terminals carefully. Keep speaker wires neat to avoid confusion later. Test the system before closing walls or cabinets.
Enjoy great audio without bulky speakers in your room. With these steps, your setup will work smoothly. Now, you can listen to music and movies with ease. This small effort makes a big difference in sound quality.