Are you tired of fumbling with multiple switches to control your fan and light? Imagine having just one simple switch that lets you manage both effortlessly.
Connecting your fan and light switch might seem tricky, but with the right steps, you can do it yourself and save time and money. In this guide, you’ll discover easy-to-follow instructions that anyone can understand, even if you’re not an expert.
Keep reading, and you’ll soon enjoy the convenience of controlling your fan and light with a single switch.
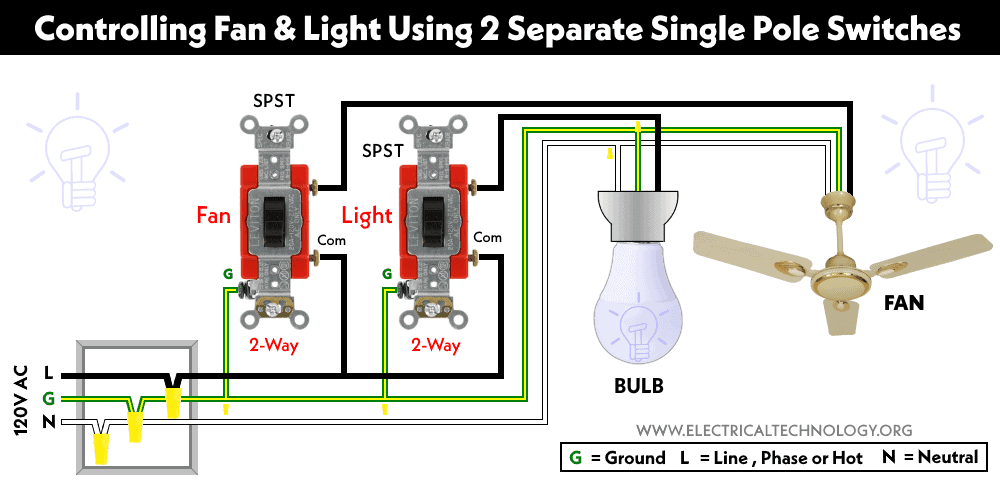
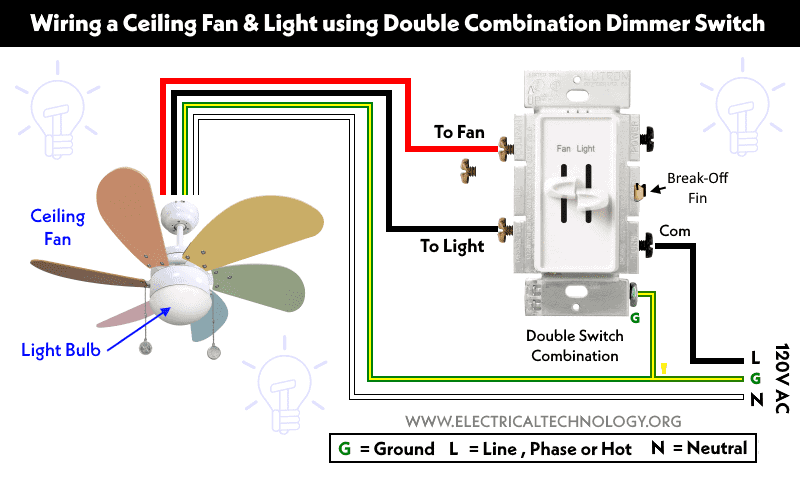
Credit: www.electricaltechnology.org
Tools And Materials Needed
Connecting a fan and light switch requires some basic tools and materials. Having the right items makes the job safer and easier. Prepare everything before starting to avoid delays or mistakes.
Use tools designed for electrical work. They help you handle wires carefully. Materials must fit your switch and fan type for proper connection.
Essential Tools For The Job
- Screwdriver set: flathead and Phillips types
- Wire stripper to remove insulation safely
- Voltage tester to check power status
- Needle-nose pliers for bending wires
- Electrical tape for securing connections
- Wire nuts to join wires securely
Materials Required
- Fan and light switch compatible with your wiring
- Electrical wires matching your home’s gauge
- Wall plate cover for switch protection
- Wire connectors suitable for your wire sizes
Safety Equipment
- Insulated gloves to prevent shocks
- Safety glasses to protect your eyes
- Flashlight for better visibility if needed
Safety Precautions
Safety is the top priority when connecting a fan and light switch. Electric work can be risky without the right steps. Following safety precautions protects you and your home from harm.
Taking time for safety prevents accidents and damage. It also ensures the switch and fan work correctly. Always prepare before starting any electrical task.
Turn Off The Power
Always switch off the power at the main circuit breaker. Double-check by testing the wires with a voltage tester. This stops electric shocks and serious injuries.
Use Proper Tools
Use insulated tools made for electrical work. Avoid using old or damaged tools. Proper tools keep you safe and make the job easier.
Wear Safety Gear
Wear rubber-soled shoes and safety glasses. Gloves protect your hands from sharp edges and electric shocks. Dress carefully to avoid accidents.
Check Wiring And Connections
Inspect all wires for damage or wear before connecting. Replace any damaged wires. Tighten all connections securely to avoid loose wiring issues.
Follow Manufacturer Instructions
Read the fan and switch manuals carefully. Follow all steps and warnings exactly. Proper installation keeps the system safe and functional.
Understanding Your Switches
Understanding your switches is the first step in connecting a fan and light switch. Knowing how switches work helps you install them safely and correctly. Switches control the flow of electricity to your fan and light. This section explains the types of switches and wiring parts you will find.
Types Of Fan And Light Switches
There are different switches for fans and lights. A single-pole switch controls one device from one place. A double-pole switch can control two devices or circuits. Some switches have multiple speeds for fans. Dimmer switches allow you to change light brightness. Knowing the switch type helps you choose the right one.
Identifying Wiring Components
Wires carry electricity to your fan and light. The common wires are black, white, and green or bare copper. Black wires are hot and carry power. White wires are neutral and complete the circuit. Green or bare wires are ground for safety. Identifying these wires is key for safe installation. Look at your wiring carefully before starting.
Preparing The Wiring
Preparing the wiring is the first step in connecting a fan and light switch safely. Proper preparation helps prevent electrical hazards and ensures the switch works well. This section guides you through key tasks before installing a new switch.
Turning Off Power
Safety starts with turning off the power. Find the circuit breaker for the room you work in. Switch it off to stop electricity flow. Use a voltage tester on wires to check no power is running. Never touch wires before confirming power is off.
Removing Old Switches
Remove the old switches carefully. Unscrew the switch cover plate first. Then, unscrew the switch from the box. Gently pull the switch out to see the wires. Note where each wire connects. Take a picture or label wires for easy reinstallation.
Connecting The Fan Switch
Connecting the fan switch is a key step in controlling your ceiling fan. It allows you to turn the fan on and off and adjust its speed. Proper wiring is important for safety and functionality.
Before starting, make sure the power is off. Use a voltage tester to confirm no electricity flows through the wires. This keeps you safe during the process.
Wiring The Fan Control
First, identify the wires coming from the fan and the wall switch. Common wires include black for power, white for neutral, and green or bare for ground.
Connect the black wire from the fan to the black wire from the switch. This wire controls the fan motor.
Join the white wires together. These serve as the neutral connection to complete the circuit.
Attach the green or bare copper wire to the grounding screw or wire. Grounding ensures safety from electric shocks.
Use wire nuts to twist the wires together securely. This prevents loose connections that can cause problems.
Securing Connections
After wiring, tuck the wires neatly into the switch box. Avoid pinching or damaging the wires.
Fasten the fan switch to the electrical box with screws. Keep it tight but do not overtighten.
Install the switch cover plate to protect the wires and give a clean look.
Turn the power back on and test the switch. The fan should respond correctly to the controls.
Credit: www.electricaltechnology.org
Connecting The Light Switch
Connecting the light switch is a key step in controlling your fan and light setup. It lets you turn the light on and off easily. Proper connection ensures safety and smooth operation. Follow clear steps to wire your light switch correctly.
Pay attention to wiring colors and switch terminals. This helps avoid mistakes and keeps your home safe.
Wiring The Light Control
First, turn off the power at the breaker. Use a voltage tester to confirm no electricity flows. Connect the black (hot) wire from the power source to the switch’s input terminal. Attach the black wire going to the light fixture to the switch’s output terminal. White (neutral) wires usually connect together in the box. Do not connect neutrals to the switch. Secure all connections with wire nuts. Push wires gently back into the box, avoiding sharp bends.
Ensuring Proper Grounding
Grounding prevents electrical shocks and fires. Find the bare copper or green ground wire in the box. Attach it to the green grounding screw on the switch. If the switch box is metal, connect the ground wire to the box as well. Use a grounding clip or screw for this. Check all ground connections are tight and secure. Proper grounding completes the circuit safely.
Testing The Switches
Testing the switches is an important step after connecting your fan and light switch. This ensures everything works safely and correctly. You can spot any issues before using the fan or light regularly. Follow simple steps to check your work.
Restoring Power
First, turn the power back on at the circuit breaker. This allows electricity to flow to the switches. Make sure the breaker is fully switched on. Do not touch any wires while the power is on. Safety comes first.
Checking Functionality
Next, test each switch separately. Flip the fan switch and listen for the motor sound. The fan blades should start moving smoothly. Then, try the light switch. The light should turn on without flickering. Check the switches several times to confirm they work well.

Credit: smafan.com
Troubleshooting Common Issues
Troubleshooting common issues with fan and light switches helps save time and effort. Many problems arise from simple mistakes or loose connections. Fixing these issues can make your switch work smoothly again.
Checking each part carefully is important. Start with the basics, such as power supply and wiring. Understanding common problems helps to avoid bigger damage or costly repairs.
Check Power Supply
Verify that the circuit breaker is on. Sometimes, the breaker trips and cuts power to the switch. Use a voltage tester to confirm the switch receives electricity. No power means the switch will not work.
Inspect Wiring Connections
Loose or wrong wiring causes many switch problems. Turn off power before checking wires. Make sure all wires are tight and connected to the correct terminals. Look for damaged or frayed wires. Replace any faulty wires immediately.
Test The Switch Itself
Faulty switches can prevent fan or light operation. Use a multimeter to test the switch for continuity. If the switch does not show continuity when on, replace it. A working switch sends power through when toggled.
Look For Overloaded Circuits
Too many devices on one circuit cause overload. This can trip the breaker or cause flickering lights. Reduce the number of devices on the same circuit. This prevents switch and electrical issues.
Ensure Proper Grounding
Grounding protects from electrical shocks and interference. Check if the ground wire is connected to the switch box. A missing or loose ground wire can cause switch malfunctions. Secure grounding improves safety and function.
Frequently Asked Questions
How Do I Wire A Fan And Light Switch Together?
To wire a fan and light switch, connect the power source to the switch. Then, run separate wires from the switch to the fan and light. Use a common neutral wire for both. This setup allows independent control of the fan and light.
Can I Use One Switch For Both Fan And Light?
Yes, one switch can control both fan and light. Use a double-pole switch or a combination switch with two toggles. This lets you operate the fan and light separately or together, depending on your wiring and switch type.
What Tools Are Needed To Connect Fan And Light Switch?
You will need a screwdriver, wire stripper, voltage tester, electrical tape, and wire nuts. These tools help safely connect and secure wires. Always turn off power before starting any electrical work to avoid shock or injury.
Is It Safe To Connect Fan And Light Switch Myself?
Yes, if you follow safety precautions and local codes. Turn off power, use proper tools, and double-check wiring. If unsure, consult a licensed electrician to ensure a safe and compliant installation.
Conclusion
Connecting a fan and light switch is easier than it seems. Follow steps carefully for safe wiring. Double-check all connections before turning power on. Use the right tools and materials to avoid problems. Taking your time helps prevent mistakes. This simple task can improve your room’s comfort and lighting.
Stay patient and focused throughout the process. Remember, safety always comes first when working with electricity. Now, you can enjoy controlling your fan and light with one switch.