Changing a single light switch might seem simple, but doing it without power can feel tricky and even unsafe. What if you want to replace that switch right now, but the power is still on?
Don’t worry—you’re not alone, and you can handle this safely with the right steps. In this guide, you’ll learn exactly how to change your light switch without risking a shock or damaging your electrical system. Keep reading, and by the end, you’ll have the confidence to tackle this task quickly and safely.
Tools And Materials Needed
Before changing a single light switch without power, gather all tools and materials. Having the right items makes the job easier and safer. Use simple tools you likely have at home. Safety gear protects you from any unexpected risks.
Essential Tools
- Screwdriver (flathead and Phillips)
- Voltage tester
- Wire stripper
- Needle-nose pliers
- Replacement light switch
- Electrical tape
- Flashlight or portable light source
Safety Gear
- Insulated gloves
- Safety goggles
- Rubber-soled shoes

Credit: www.youtube.com
Preparing For The Switch Replacement
Preparing for the switch replacement is a key step. It helps keep you safe and makes the job easier. Before touching any wires, you must cut off the power to the switch. This prevents shocks and damage. Take time to check everything carefully before starting the work.
Locating The Circuit Breaker
First, find your home’s circuit breaker panel. It is usually in the basement, garage, or a utility room. The panel holds switches that control power to different parts of your home. Look for the breaker labeled for the room or area where the switch is. This is the switch you need to turn off.
Confirming Power Is Off
After switching off the breaker, confirm the power is off at the light switch. Flip the switch on and off. The light should not turn on. If it still lights up, the power is not off. Double-check the breaker or try another one. Never start work if the power is still on.
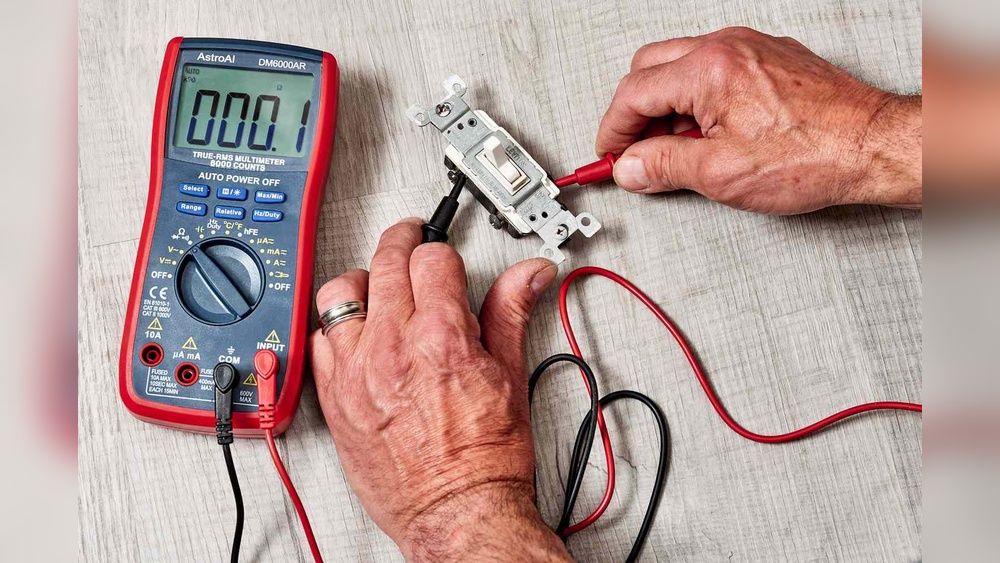
Testing For Voltage
Use a voltage tester or a multimeter to check for electricity. Touch the tester to the switch wires. No signal means no electricity. If the tester shows power, do not continue. Turn the breaker off again and test once more. This step is critical to stay safe.
Removing The Old Light Switch
Removing the old light switch is the first step in changing it safely. This step requires care and attention to avoid damage or injury. Make sure the power is off before starting. The process involves two main tasks: unscrewing the switch plate and detaching the switch itself.
Unscrewing The Switch Plate
Locate the screws holding the switch plate. Usually, there are two small screws at the top and bottom. Use a screwdriver to turn the screws counterclockwise. Keep the screws in a safe place for later use. Gently pull the switch plate away from the wall. If it feels stuck, wiggle it slightly. Avoid forcing it hard to prevent cracks or breaks.
Detaching The Switch
After removing the switch plate, you will see the switch attached to the wall box. Identify the screws that hold the switch in place. Unscrew these with the screwdriver carefully. Slowly pull the switch out from the wall box. Notice the wires connected to the switch terminals. Do not pull the wires hard. Use a flashlight if the area is dark. This step prepares you to disconnect the wires safely next.

Credit: www.youtube.com
Wiring The New Light Switch
Wiring the new light switch is the key step in changing it safely. This part involves matching the right wires and securing them correctly. Understanding the wires and connections helps prevent mistakes and keeps the circuit safe. Follow the steps carefully to ensure the switch works perfectly.
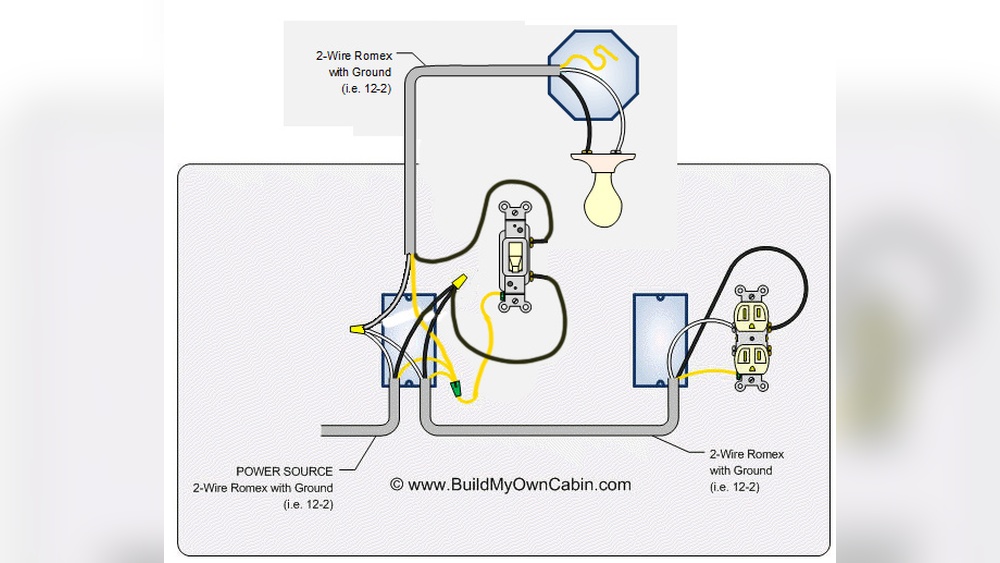
Identifying Wire Types
Start by looking at the wires in the switch box. Most homes have three main wire types: live, neutral, and ground. The live wire usually has black or red insulation. The neutral wire often has white insulation. The ground wire is bare copper or green. Knowing these colors helps you connect the wires properly.
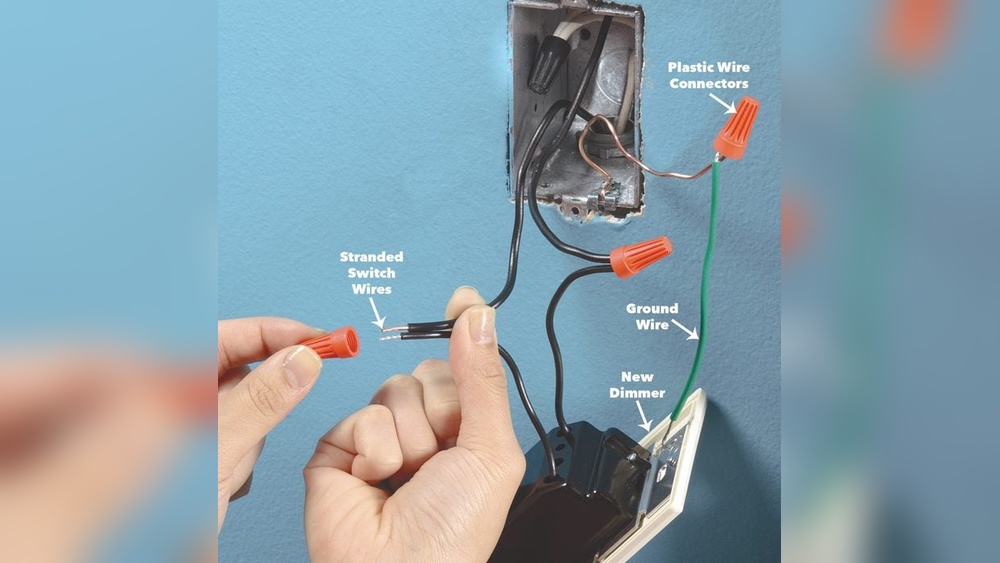
Connecting Wires To The New Switch
Take the new switch and locate its terminals. Attach the live wire to the terminal marked “live” or “common.” Connect the ground wire to the green screw or ground terminal. The neutral wire may not connect to the switch but to the wire connector inside the box. Tighten all screws firmly to avoid loose connections. Double-check every wire before closing the switch box.
Securing The New Switch And Testing
After wiring the new light switch, securing it properly is very important. A firmly mounted switch prevents loose connections and ensures safe use. Testing the switch after restoring power confirms everything works as it should.
Mounting The Switch
Place the switch into the electrical box carefully. Align the screw holes with the box holes. Use a screwdriver to tighten the screws. Do not over-tighten to avoid cracking the switch plate. The switch should feel stable and not move.
Restoring Power And Testing
Turn the power back on at the circuit breaker. Test the switch by flipping it on and off. Check if the light responds correctly. If the light does not work, turn off the power again and check the wiring. Proper testing ensures safety and functionality.
Troubleshooting Common Issues
Troubleshooting common issues helps fix problems fast. It saves time and keeps you safe. Before changing a light switch, know what can go wrong. This guide explains how to spot and fix common problems.
Switch Not Working
Sometimes the switch does not turn the light on. Check if the power is off before working. Test the switch with a voltage tester to confirm no power. Look for broken parts or dirt inside the switch. Replace the switch if it is damaged.
Flickering Light
Flickering lights can mean loose wires or a bad bulb. Tighten the wires connected to the switch and light fixture. Replace the bulb if flickering continues. Make sure the switch is fully on and not damaged.
Loose Connections
Loose connections cause sparks or no light at all. Turn off the power before checking wires. Tighten any loose screws or wire nuts. Secure wires firmly under the terminals. Loose wires can be dangerous and need fixing.
Safety Tips For Electrical Work
Working with electricity can be dangerous without the right safety steps. Safety tips help protect you from shocks and injuries. Always follow simple rules before starting any electrical task. This ensures your work stays safe and smooth.
Taking precautions also helps you avoid costly mistakes. Even small errors can cause big problems. Learning how to handle electrical work safely is important for every home project.
Avoiding Electrical Hazards
Turn off the power at the circuit breaker before starting. Do not rely only on the wall switch to cut power. Use a voltage tester to check if wires are live. Wear rubber-soled shoes and avoid wet areas. Keep metal tools away from wires to prevent shocks. Work in a well-lit area so you can see clearly. Never touch wires with bare hands. Follow all safety rules to avoid accidents.
When To Call A Professional
Call an electrician if you feel unsure or unsafe. Complex wiring or old electrical systems need expert help. Signs like flickering lights or burning smells require professional checks. Do not try to fix problems beyond simple switch changes. Protect your home and family by hiring a licensed electrician. Experts have the right tools and knowledge for safe repairs.

Credit: icreatables.com
Frequently Asked Questions
How Can I Change A Light Switch Safely Without Power?
First, confirm the power is off at the breaker box. Use a voltage tester on the switch to ensure no electricity flows. Only then, proceed to remove and replace the switch safely without risk of electric shock or damage.
What Tools Do I Need To Replace A Light Switch?
You need a flathead screwdriver, a voltage tester, wire strippers, and a replacement switch. These tools ensure you can safely remove the old switch and install the new one without complications.
How Do I Identify The Wires On A Light Switch?
Turn off power and use a voltage tester to check wires. Typically, black or red are hot wires, white is neutral, and green or bare is ground. Correctly identifying them prevents wiring mistakes and hazards.
Can I Replace A Light Switch Without Professional Help?
Yes, if you follow safety steps: power off, use a tester, and understand wiring. For complex setups or uncertainty, hiring a professional electrician is safer and recommended.
Conclusion
Changing a single light switch without power is safe and simple. Always turn off the main power before starting. Use a voltage tester to be sure no electricity flows. Follow the steps carefully to avoid mistakes. Take your time and handle tools with care.
This small project can save money and boost confidence. With patience, anyone can replace a switch safely. Keep these tips handy for future electrical tasks. Safety first, and the job gets done right.