Are you looking to add another light switch to your room but don’t know where to start? Adding a new switch can seem tricky, but with the right steps, you can do it yourself and save money.
Imagine controlling your lights exactly how you want, making your space more convenient and comfortable. In this guide, you’ll discover simple, clear instructions to help you add that extra switch quickly and safely. Keep reading, and soon you’ll have full control over your lighting with just a flick of your finger.

Credit: www.youtube.com
Tools And Materials Needed
Adding another light switch requires the right tools and materials. Preparing these in advance makes the job smoother and safer. This section lists the basic tools and electrical components needed to complete the task.
Basic Tools
- Screwdriver (flathead and Phillips)
- Wire stripper
- Voltage tester
- Drill with bits
- Measuring tape
- Level
- Electrical tape
- Pliers
- Flashlight or work light
Electrical Components
- Light switch (single-pole or three-way)
- Electrical box
- Wire nuts
- Romex electrical cable (14/2 or 12/2 gauge)
- Switch cover plate
- Wire connectors

Credit: diy.stackexchange.com
Safety Precautions
Working with electrical switches needs careful attention to safety. Simple mistakes can cause serious harm or damage. Follow these safety steps to protect yourself and your home. Safety is the first priority before starting any wiring work.
Power Shutoff
Turn off the power at the circuit breaker. This stops electricity from flowing to the switch. Use a tester to confirm the power is off. Never trust just the breaker position. Always double-check to avoid shocks.
Protective Gear
Wear safety goggles to protect your eyes from sparks or debris. Use insulated gloves to reduce the risk of electric shock. Avoid loose clothing or jewelry that might catch on wires. Prepare your workspace with good lighting and a clear area.
Planning Your Wiring
Start by turning off the power to avoid accidents. Plan where the new switch will go and how wires will connect. Check existing wiring to ensure it supports the extra switch.
Locating Existing Switch
Start by finding the current light switch controlling the fixture. This helps understand the wiring setup. Check inside the switch box for wires. Note the wire colors and their positions. Turn off power at the breaker before inspecting. Use a voltage tester to ensure safety. Knowing the existing wiring makes adding a new switch easier.
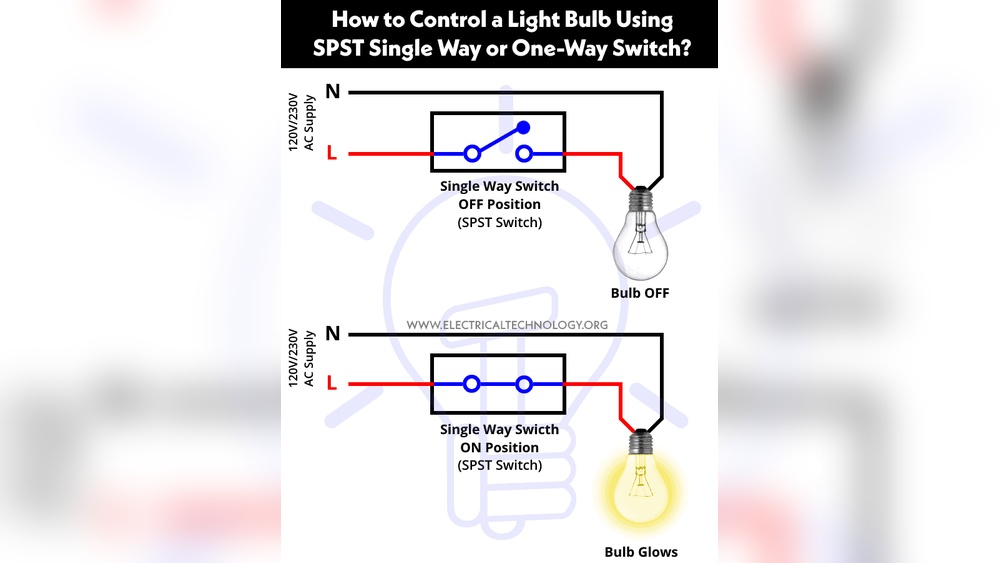
Choosing Switch Type
Select a switch type that fits your needs and wiring. A single-pole switch controls one fixture from one place. A three-way switch lets you control one light from two locations. For more than two switches, use four-way switches. Match the new switch type with the existing one for compatibility. Choose switches that meet local electrical codes.

Credit: www.youtube.com
Turning Off Power
Turning off the power is the first step in adding another light switch safely. This step protects you from electric shocks. Always treat electricity with respect and care.
Before starting any electrical work, ensure the power is completely off. This prevents accidents and damage to your home wiring.
Locate The Circuit Breaker
Find your home’s circuit breaker box. It is usually in the basement, garage, or utility room. Open the box to see all the switches controlling power.
Identify The Correct Breaker
Look for the breaker that controls the light switch you want to add to. It should be labeled. If not, turn off breakers one by one and check which light goes off.
Turn Off The Breaker
Flip the correct breaker switch to the OFF position. This stops electricity from flowing to the switch you will work on. Double-check by flipping the light switch; it should not turn on.
Use A Voltage Tester
Use a voltage tester to check the wires. Touch the tester to the wires to confirm no power is present. If the tester shows no electricity, it is safe to proceed.
Removing The Existing Switch
Removing the existing light switch is the first step to adding another switch. This process requires care and attention for safety. Follow each step carefully to avoid accidents or damage.
Turn Off The Power
Start by turning off the power to the switch. Use the circuit breaker to cut power. Double-check by trying to turn on the light. No electricity means safe work.
Remove The Switch Cover Plate
Use a screwdriver to remove the screws on the cover plate. Gently pull the plate away from the wall. This exposes the switch and wiring behind it.
Unscrew The Switch From The Wall Box
Loosen the screws holding the switch to the wall box. Pull the switch out slowly, exposing the wires. Keep track of the screws for later use.
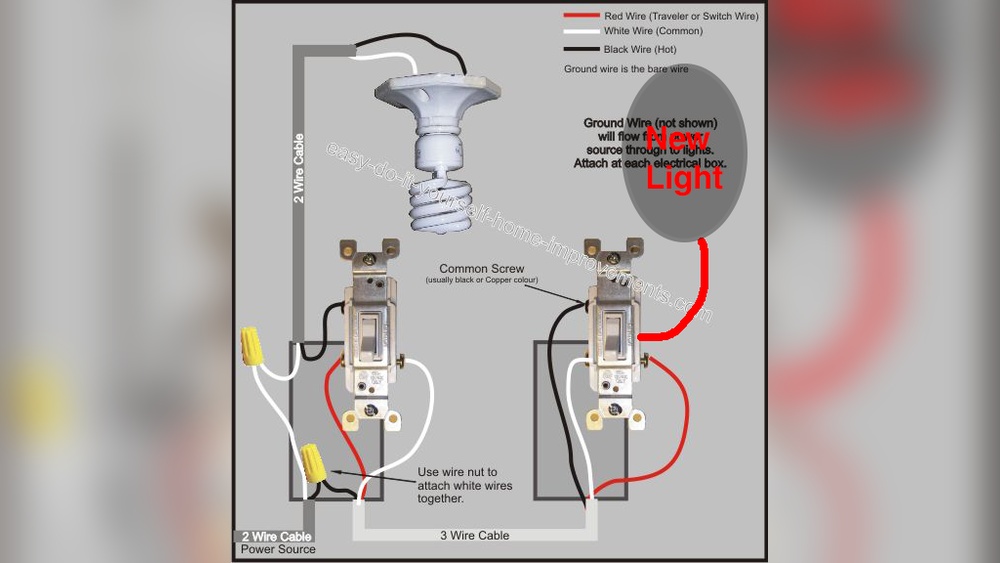
Note The Wiring Connections
Look carefully at how the wires connect to the switch. Take a photo or draw a diagram for reference. This helps when installing the new switch.
Disconnect The Wires
Use a screwdriver to loosen the terminal screws. Carefully detach each wire from the switch. Keep wires separated to avoid confusion later.
Running New Wiring
Running new wiring is an important step when adding another light switch. It lets you connect the new switch to your home’s electrical system. Taking care during this process helps keep your installation safe and reliable.
Measuring Cable Length
Start by measuring the distance from the power source to the new switch location. Add extra length for bends and connections. This ensures you have enough cable to work with. Avoid cutting cable too short, which can cause problems later.
Routing Wires Safely
Plan a clear path for the wires inside walls or ceilings. Avoid sharp bends and tight spaces that can damage the cable. Use cable clips or staples to secure the wires gently. Keep wires away from heat sources and water pipes for safety.
Connecting The New Switch
After installing the new light switch, testing the setup is important. This step ensures everything works safely and correctly. Careful testing helps avoid problems like short circuits or faulty wiring.
Follow simple steps to check your work. Testing confirms the switch controls the light as expected. It also makes sure no wires are loose or damaged.
Restoring Power
Turn the main power back on at the circuit breaker. Do this slowly to avoid sudden electrical surges. Watch for any sparks or unusual sounds near the switch. If you see or hear anything strange, turn the power off immediately and check your wiring again.
Functionality Check
Flip the new switch on and off several times. The light should respond every time without flickering. Test the original switch too, if it still controls the light. Both switches must work independently and together. Check that no switch feels loose or stuck. This confirms your new setup works well and safely.
Testing The Setup
Finishing touches complete the installation of your new light switch. These steps ensure safety and a neat appearance. Take your time to do them right. A well-finished switch looks clean and works well for years.
Securing Switches
Start by placing the switch firmly into the electrical box. Use the screws provided to tighten it. Check that the switch does not move or wiggle. A stable switch helps avoid loose connections and sparks. Tighten screws evenly, but avoid over-tightening to prevent damage.
Installing Cover Plates
Choose a cover plate that fits your switch and wall box. Align the cover plate over the switch. Use the small screws to fix it in place. The cover plate protects wires and gives a finished look. Wipe the plate clean for a polished appearance. Avoid cracking the plate by tightening screws gently.
Finishing Touches
Troubleshooting is key when adding another light switch. It helps fix problems fast and keeps your project on track.
Simple checks can save time and prevent safety issues. Knowing what to watch for makes the process smoother.
Common Issues
One common problem is a switch that does not turn the light on or off. This can happen if wires are loose or crossed.
Another issue is a light flickering or not working properly. This may mean a bad connection or a faulty switch.
Sometimes, the new switch trips the circuit breaker. This could be a sign of a short circuit or overload.
Check all wire connections carefully. Tighten screws and ensure wires are in the correct terminals.
When To Call A Professional
Call a professional if you see sparks or smell burning. These are signs of a serious electrical problem.
If the circuit breaker keeps tripping after fixing connections, get expert help. It might be a hidden wiring issue.
Do not work on electrical parts if you feel unsure or unsafe. A licensed electrician can ensure the job is safe and done right.
Frequently Asked Questions
How Do I Safely Add Another Light Switch?
Turn off the power at the breaker before starting. Use a voltage tester to confirm no electricity flows. Follow wiring diagrams carefully. Use proper tools and materials. If unsure, consult a licensed electrician to avoid hazards.
What Tools Are Needed To Add A Light Switch?
You will need a screwdriver, wire stripper, voltage tester, electrical tape, wire nuts, and a new switch. Having a flashlight and a voltage meter helps ensure safety and accuracy during installation. Always use insulated tools for electrical work.
Can I Add A Light Switch To Control One Light?
Yes, you can add a switch to control a single light fixture. Ensure the switch is wired correctly to the light’s power source. This setup allows independent control of the light from the new switch location.
How Long Does It Take To Install Another Light Switch?
Installing an additional light switch typically takes 30 to 60 minutes. Time depends on wiring complexity and your experience. Preparation and safety checks are essential to prevent delays and errors.
Conclusion
Adding another light switch can brighten your space and improve convenience. Follow each step carefully to ensure safety and success. Double-check all connections before turning the power back on. Remember, patience and caution make the process easier. This small upgrade can make a big difference in your home.
Give it a try and enjoy better lighting control every day. Simple changes often bring the most comfort and ease.