Have you ever wished you could control a single light from two different places? Maybe at the top and bottom of the stairs, or from opposite ends of a room?
Adding a second switch to a light can make your daily routines smoother and more convenient. It’s easier than you might think, and you don’t have to be an expert electrician to do it. In this guide, you’ll discover simple, clear steps to add that second switch yourself.
Keep reading, and you’ll soon have better control over your lighting—and more comfort in your home.

Credit: www.youtube.com
Tools And Materials Needed
Adding a second switch to a light is a useful home project. Having the right tools and materials makes the job easier and safer. Prepare everything before starting to avoid delays or mistakes.
Essential Tools
You need a few basic tools to install a second switch. A screwdriver set is important for removing and tightening screws. Wire strippers help remove insulation from wires safely. A voltage tester checks if wires have power. A drill may be necessary for new holes. Pliers help bend and twist wires as needed.
Materials Required
Gather all materials before starting. Buy a new switch designed for two-way control. Use electrical wire suitable for your home’s wiring system. Electrical tape secures wire connections. Wire nuts join wires safely. A switch box holds the new switch firmly in place. Make sure all materials meet local electrical codes.
Safety Equipment
Safety is key in electrical work. Use insulated gloves to protect hands from shocks. Safety glasses shield eyes from debris. A flashlight helps see in dark spaces. Turn off power at the circuit breaker before starting any work. Double-check with a voltage tester to confirm power is off.

Credit: diy.stackexchange.com
Safety Precautions
Working with electrical wiring can be risky. Safety should be your top priority before adding a second switch to a light. Taking the right safety steps helps avoid shocks, injuries, and damage. Follow these precautions carefully to keep yourself and your home safe.
Turn Off The Power
Always switch off the power at the circuit breaker. Do not rely on just the light switch. Use a voltage tester to confirm no electricity flows in the wires.
Use Proper Tools
Use insulated tools made for electrical work. Avoid using damaged or worn-out tools. Proper tools reduce the risk of electric shock.
Wear Safety Gear
Wear rubber-soled shoes and safety glasses. Gloves made for electrical work add extra protection. Avoid loose clothing that can catch wires.
Check Local Codes
Follow local electrical codes and rules. Permits might be needed for wiring changes. Compliance ensures work is safe and legal.
Work In A Dry Area
Never work in wet or damp conditions. Water increases the risk of electrical shock. Make sure the area is dry before starting.
Types Of Switches For Two-way Control
Adding a second switch to control one light requires understanding the types of switches used. Two-way control means you can turn the light on or off from two different places. This setup is common in hallways, staircases, and large rooms. Choosing the right switch is key to making the system work properly.
Single Pole Double Throw (spdt) Switches
SPDT switches have three terminals and two positions. Each position connects the common terminal to one of the other two terminals. This design allows the switch to change the path of the electrical current. Using two SPDT switches together can control one light from two spots. Electricians often use these switches for two-way lighting setups. They are reliable and easy to install with basic wiring knowledge.
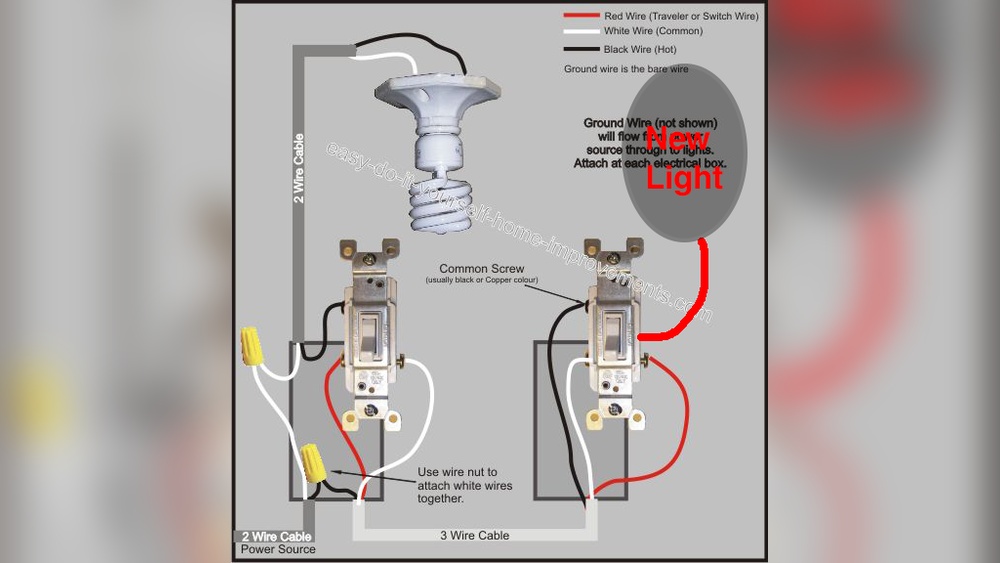
Three-way Switches Explained
Three-way switches are the standard in many homes for two-way control. They look like regular switches but have three terminals. One terminal is common, and the other two are travelers. The travelers connect the two switches, allowing current to flow through either path. This lets the light turn on or off from either switch. Three-way switches simplify the wiring process. They are widely available and fit most electrical boxes.
Planning Your Wiring Layout
Planning your wiring layout is the first step to add a second switch to a light. It helps you understand the current setup and decide the best way to connect the new switch. Careful planning reduces mistakes and keeps your work safe.
Locating Existing Wiring
Start by finding where the current wires run. Check inside the switch box and light fixture. Turn off the power before touching anything. Use a voltage tester to be sure. Look for wires that carry power and those that lead to the light.
Note the wire colors and their connections. Common colors are black for hot, white for neutral, and green or bare for ground. Mark these wires with tape or a marker. This helps you avoid confusion later.
Mapping The Circuit Path
Draw a simple map of your wiring. Include the power source, switches, and light. Show how wires connect each point. This visual guide helps plan the new switch’s wiring path.
Decide where the new switch will go. Check if wires can reach that spot easily. Plan to run new wires in walls or ceilings without blocking them. Keep wires neat and away from heat or sharp edges.
Turning Off Power
Turning off the power is the first and most important step before starting any electrical work. It keeps you safe from electric shocks and prevents damage to your home wiring. Always treat electricity with respect and caution.
Before you begin adding a second switch to your light, make sure the power is completely off. This small step protects you and your tools.
Locate The Circuit Breaker
Find the main electrical panel in your home. It usually sits in the basement, garage, or a utility closet. Open the panel door and look for the breaker that controls the light you want to work on.
Switch Off The Correct Breaker
Flip the breaker switch to the off position. This stops electricity from flowing to the light and switches. Double-check by turning on the light to see if it is off.
Use A Voltage Tester
Before touching any wires, test them with a voltage tester. This device shows if electricity is still present. Only proceed when the tester shows no power.
Inform Others In Your Home
Let everyone in your house know the power is off. This avoids anyone turning the breaker back on by mistake. Safety is a shared responsibility.
Removing The Existing Switch
Start by turning off the power at the breaker to stay safe. Remove the switch cover and unscrew the old switch from the box. Carefully pull the switch out to expose the wires for the new connection.
Turn Off The Power
Start by switching off the power at the circuit breaker. This step keeps you safe from electric shocks. Never work on a live switch. Use a voltage tester to confirm no electricity flows to the switch.
Remove The Switch Cover Plate
Unscrew the cover plate over the existing switch. Keep the screws in a safe place. Removing the plate reveals the switch and wiring behind it.
Unscrew The Existing Switch
Loosen the screws holding the switch to the electrical box. Pull the switch gently out to see the wires connected to it. Avoid yanking to prevent wire damage.
Label The Wires
Mark each wire using tape or a marker. This makes reconnecting easier later. Note which wires connect to the switch terminals and which are neutral or ground.
Disconnect The Wires
Loosen the terminal screws and detach the wires from the switch. Keep the wires separated to avoid accidental contact. Prepare the wires for the new connections ahead.
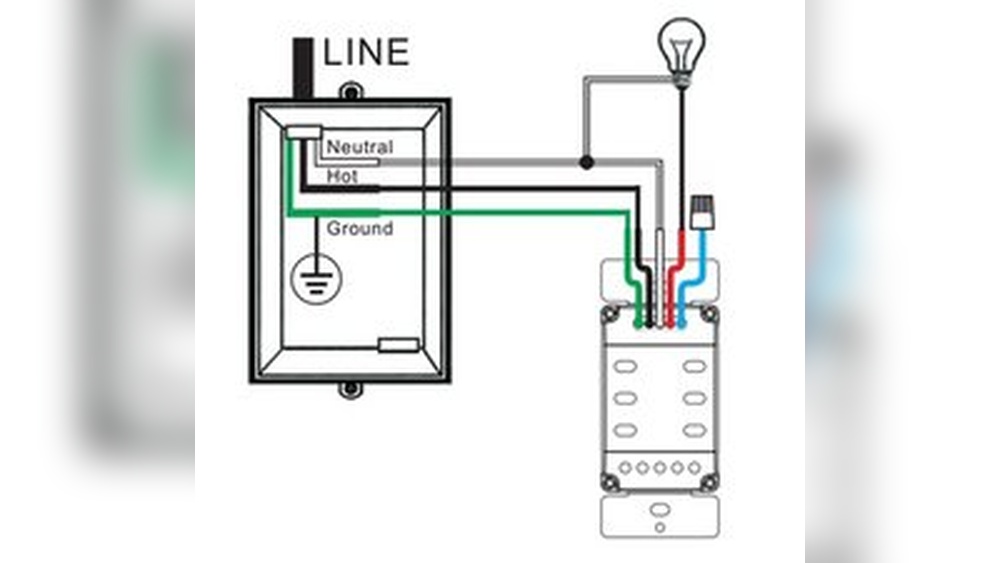
Wiring The Second Switch
Wiring the second switch is an important step in controlling one light from two places. It requires careful connection of wires to ensure safety and proper function. Follow the right steps to make the process smooth and effective.
Connecting Traveler Wires
Traveler wires connect the first and second switches. These wires carry the current between switches. Use two traveler wires, usually red and black. Connect each traveler wire to the traveler terminal on both switches. Tighten the screws firmly to keep the wires secure. Do not mix the traveler wires with other wires. Keep the connections clean and neat for best results.
Ground And Neutral Connections
Ground wires protect you from electrical shocks. Connect the bare copper or green wire to the ground terminal on the switch. Make sure the ground wire is also connected to the metal box if it is metal. Neutral wires complete the circuit for the light. Usually, neutral wires do not connect to the switches. They connect only in the light fixture box. Keep the neutral wires twisted together and covered with a wire nut for safety.
Testing The New Setup
Testing the new setup ensures your second switch works correctly. This step confirms the wiring is safe and functional. It prevents electrical problems and helps avoid damage.
Take your time during testing. Check every switch and connection for proper operation. Safety is the top priority throughout this process.
Turn Off Power Before Testing
Always switch off the main power before touching wires. Use a voltage tester to confirm no electricity flows. This keeps you safe from shocks.
Check Switch Functionality
Turn the power back on. Flip each switch on and off. The light should turn on and off smoothly from both switches.
Test Both Switches Independently
Operate each switch alone. The light should respond correctly to each switch. No flickering or delays should occur.
Inspect For Loose Connections
Turn off power again. Tighten all wire nuts and screws. Loose wires cause poor contact and unsafe conditions.
Final Safety Check
Ensure no wires are exposed. Use electrical tape if needed. Your setup should look neat and secure.
Troubleshooting Common Issues
Adding a second switch to control a light can be very handy. Still, some common problems may appear. Knowing how to fix these issues saves time and effort. This section helps you solve common problems with two-switch setups.
Switch Not Controlling Light
Check if the wiring is correct. A loose wire can stop the switch from working. Turn off power before checking wires. Make sure the switch is connected to the right wires. Test the switch with a voltage tester. Replace the switch if it is broken. Sometimes, the light bulb may be the problem. Try changing the bulb to see if it helps.
Flickering Or Inconsistent Lighting
Flickering lights can be annoying and unsafe. Loose wiring often causes flickering. Inspect all wire connections and tighten them. Use a screwdriver to secure the wires. A bad switch can also cause flickering. Swap the switch with a new one to test. Check if the bulb fits well in the socket. Try a different bulb to rule out bulb issues. Electrical interference or power surges may cause flickering too.
Credit: www.reddit.com
Frequently Asked Questions
How Do I Wire A Second Switch To One Light?
To wire a second switch, use a three-way switch setup. Run traveler wires between switches and connect common terminals. This allows control of one light from two locations efficiently and safely.
What Tools Are Needed To Add A Second Switch?
You’ll need a screwdriver, wire stripper, voltage tester, electrical tape, and three-way switches. Proper tools ensure safe and correct installation of the second switch.
Can I Add A Second Switch Without Rewiring?
Yes, if your wiring supports three-way switches. Use existing traveler wires to connect the second switch. Otherwise, some rewiring may be necessary for proper function.
Is It Safe To Install A Second Switch Myself?
If you understand electrical wiring and follow safety codes, yes. Always turn off power before starting. If unsure, consult a licensed electrician to avoid hazards.
Conclusion
Adding a second switch to a light can make your home more convenient. It allows you to control the light from two places. The steps are simple if you follow safety rules carefully. Always turn off power before starting any work.
Use the right tools and materials for the job. This small change can improve your daily routine a lot. Try it yourself or ask an electrician if unsure. Enjoy the ease of controlling your lights anytime, anywhere.