Are you tired of struggling with buttons that don’t stay fastened or zippers that get stuck? Snap fasteners are a simple, reliable solution that can make your clothes and crafts look neat and professional.
But how do you use a snap fasteners kit correctly? If you want to learn the easy steps to attach snaps quickly and securely, this guide is made just for you. Keep reading, and you’ll discover how to transform your projects with snap fasteners like a pro—no special skills needed!
Choosing The Right Snap Fasteners
Choosing the right snap fasteners is key for a neat and strong finish. Different projects need different types of snaps. Picking the right ones helps your work last longer and look better.
Types Of Snap Fasteners
There are several types of snap fasteners. Sew-on snaps need stitching to attach. They suit fabric projects well. Press snaps snap together with force. They are easy to use for light fabrics. Magnetic snaps close with magnets. Great for bags and thick materials. Each type fits a specific use.
Materials And Sizes
Snap fasteners come in metal, plastic, and nylon. Metal snaps are strong and durable. Plastic snaps are lightweight and cheap. Nylon snaps are flexible and soft. Choose the size based on fabric weight. Small snaps fit thin fabrics. Large snaps work well with thick materials. Match the snap size to your project.
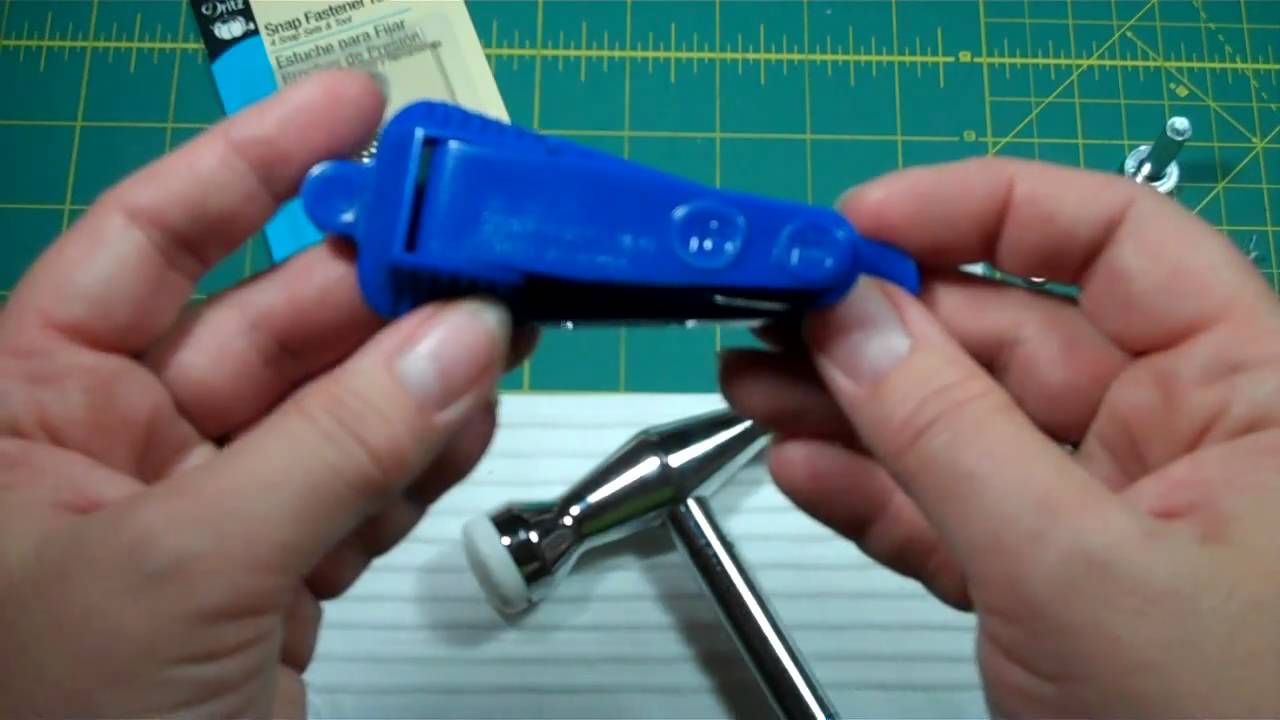
Tools Needed
A snap fastener kit usually includes tools. You need a setting tool or pliers. Some kits have a hammer and anvil. A hole punch can help with thick fabrics. Make sure your tools fit the snap size. Using the right tools makes the job easier and cleaner.
Preparing Your Fabric
Preparing your fabric is a key step before using a snap fasteners kit. Proper preparation ensures the snaps fit well and stay secure. It also helps avoid damage to your fabric during installation.
Marking Placement
Start by deciding where to place the snaps on your fabric. Use a fabric marker or chalk to mark the exact spots. Make small, light marks to avoid permanent stains. Double-check the alignment to keep snaps even and balanced.
Reinforcing Fabric
Snap fasteners need a strong base to hold firmly. Thin or delicate fabrics need extra support. Use small fabric patches or interfacing behind the marks. Sew or iron the reinforcement in place. This step prevents tearing and adds durability.
Cutting Holes
Next, create small holes for the snap prongs. Use sharp scissors or a hole punch. Cut carefully inside the marked spots. Make holes just big enough for the prongs to fit. Avoid making holes too large to keep the fabric strong.
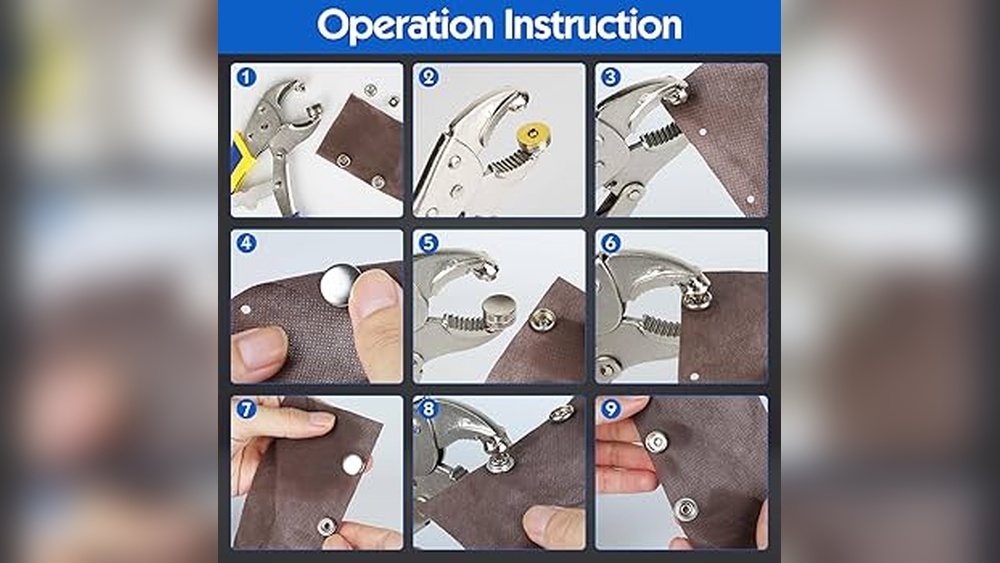
Attaching Snap Fasteners
Attaching snap fasteners is a simple task that improves your clothing and craft projects. Using a snap fasteners kit helps you secure snaps firmly to fabric. Following the correct steps ensures they stay in place and work well.
Positioning The Pieces
Place the snap parts carefully on the fabric. Align the socket and stud on opposite sides. Make sure the fabric is flat and smooth. Proper placement helps the snaps close tightly.
Using The Kit Tools
Use the tools provided in the kit to set the snaps. The kit usually includes a base and a setter. Position the snap part on the base. Hold the setter above the snap for the next step.
Applying Pressure Correctly
Press the setter firmly down onto the snap. Use a hammer or plier tool, depending on your kit. Apply steady and even pressure. Avoid too much force to prevent damage. The snap should attach securely without bending.

Credit: www.youtube.com
Checking Snap Functionality
Checking snap functionality is a key step after installing snap fasteners. It helps ensure your snaps work well and stay secure. This step prevents future problems and keeps your project looking neat. Testing and adjusting snaps can save time and effort later.
Testing Snap Closure
Press the snap parts together gently. They should click or pop into place. Make sure the snap holds firmly without slipping. Open and close the snap several times. This checks if the snap stays secure and works smoothly. If the snap feels loose, it might need adjustment or replacement.
Adjusting Misaligned Snaps
Misaligned snaps can cause difficulty when closing. Check if the parts line up properly. Use pliers to gently bend the snap parts if needed. Move them slightly until they match perfectly. Avoid pressing too hard to prevent damage. Test the snap again after adjustment to ensure proper function.
Common Mistakes To Avoid
Using a snap fasteners kit can be simple. Yet, some common mistakes can cause problems. Avoiding these errors helps your project look neat and work well.
Pay close attention to details. Small errors can lead to snaps not holding or fabric damage. Learn what to watch out for in your work.
Overtightening
Pressing the snap parts too hard can damage them. It may also hurt the fabric. Snap fasteners need a firm but gentle touch.
Use steady pressure. Stop tightening once the snap feels secure. Overdoing it can break the fastener or make it hard to use.
Wrong Placement
Placing snaps in the wrong spot causes alignment issues. Snaps that don’t line up won’t close properly. Check your marks twice before attaching.
Place snaps where the fabric naturally folds. Avoid thick seams or bulky areas. Proper placement ensures easy opening and closing.
Using Incompatible Materials
Some fabrics don’t work well with snap fasteners. Thin or delicate cloth might tear. Thick or stretchy fabric may not hold the snap firmly.
Choose materials suited for snaps. Test a small piece first. This helps you avoid damage and poor fastening.
Credit: generaltools.com
Maintaining Snap Fasteners
Maintaining snap fasteners keeps them working well for a long time. Dirt and moisture can cause them to rust or stick. Regular care helps the fasteners stay clean and strong. This makes your clothes or projects look better and last longer.
Cleaning Tips
Use a soft cloth to wipe snap fasteners gently. Avoid harsh chemicals that can damage the metal parts. A small brush helps remove dirt from tight spots. Dry the fasteners fully after cleaning to stop rust. Light oil can protect metal snaps from moisture. Apply a tiny drop and wipe off the extra.
Storage Recommendations
Store snap fasteners in a dry place to prevent rust. Keep them in a small container or bag to avoid losing pieces. Avoid storing them in humid rooms like bathrooms. Use silica gel packets to absorb moisture in storage boxes. Organize by size and color for easy use later. Proper storage keeps snap fasteners ready and in good shape.
Credit: www.youtube.com
Frequently Asked Questions
What Tools Come With A Snap Fasteners Kit?
A snap fasteners kit usually includes snap buttons, a setting tool, an anvil, and a hammer or press. Some kits also provide instructions and additional accessories for easier installation. These tools ensure precise and secure attachment of snap fasteners to fabric.
How Do I Attach Snap Fasteners To Fabric?
Place the snap parts on both fabric sides, align them properly, and use the setting tool with a hammer or press. Apply firm, even pressure to secure the snaps. Make sure the fabric layers stay flat during the process for a neat finish.
Can Snap Fasteners Be Used On Thick Fabrics?
Yes, snap fasteners can be used on thick fabrics like denim and canvas. Choose a kit with heavy-duty snaps and a sturdy setting tool. Ensure proper alignment and enough pressure to secure snaps firmly on thick materials.
How Do I Remove Snap Fasteners Without Damage?
Use pliers or a seam ripper carefully to pry the snap apart. Avoid pulling or cutting the fabric directly. Gently work around the edges to detach the snap without harming the material or leaving noticeable holes.
Conclusion
Using a snap fasteners kit makes sewing quick and neat. You can fix clothes, bags, and crafts easily. Just follow the steps carefully for best results. Practice a little to get comfortable with the tool. Snap fasteners hold strong but open fast when needed.
Keep your kit handy for small repairs anytime. Enjoy making your projects look tidy and professional. Simple tools can make a big difference in your work. Try it today and see how easy it can be.