If you’ve ever struggled with buttons that won’t stay closed or zippers that get stuck, snap fasteners offer a simple, stylish solution. Learning how to apply snap fasteners yourself can save you time and money, and give your clothes or crafts a professional finish.
Whether you’re fixing a jacket, making a baby onesie, or creating a DIY project, mastering this handy skill is easier than you think. In this guide, you’ll discover clear, step-by-step instructions to help you attach snap fasteners quickly and securely—no confusing jargon, just practical tips you can follow right away.
Ready to transform your sewing game and add snaps like a pro? Let’s dive in!
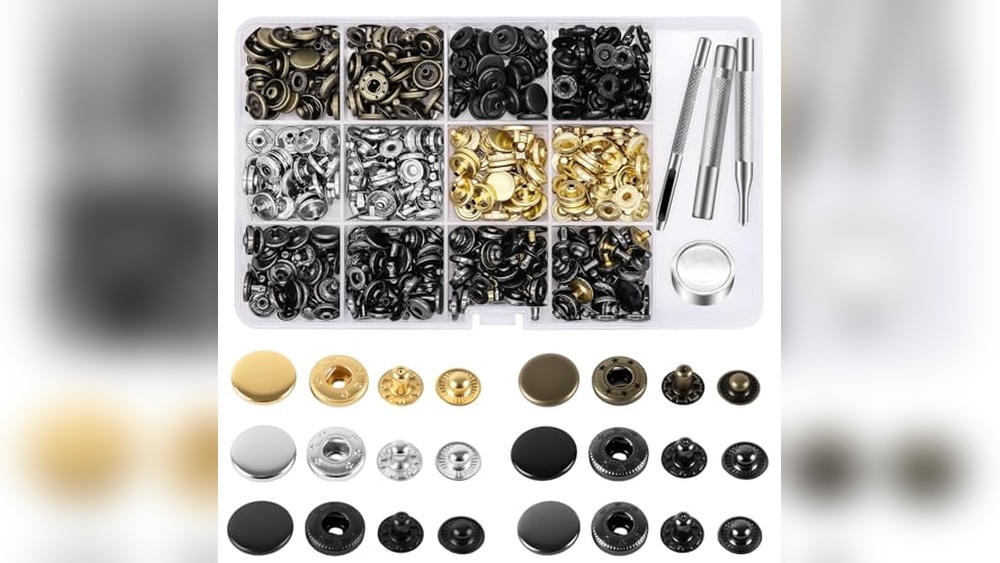
Materials And Tools
Applying snap fasteners requires specific materials and tools for a neat and durable finish. Choosing the right type of snap fastener affects the look and function of your project. Using proper tools makes the installation easier and more precise. Below is a guide to the materials and tools needed to apply snap fasteners effectively.
Types Of Snap Fasteners
Snap fasteners come in various styles. Metal snaps are strong and ideal for heavy fabrics like denim. Plastic snaps suit lightweight materials and are rust-resistant. Sew-on snaps need stitching to attach securely. Pry-off snaps use pressure to close and open easily. Choosing the right type depends on fabric weight and project use.
Essential Tools Needed
A snap fastener installation requires some basic tools. Snap pliers help press the snap parts together without damage. A hammer and setting tools can also attach snaps firmly. Marking tools like fabric chalk or pens ensure accurate placement. A hole punch or awl may be needed to make holes for the snap prongs. Having these tools ready simplifies the process and improves results.
Preparing The Fabric
Preparing the fabric is the first step to apply snap fasteners correctly. Proper preparation ensures the snaps hold securely and look neat. Take time to plan and prepare to avoid mistakes later.
Focus on choosing the right spot for your snaps. Marking and punching holes carefully will make installation easier and precise. These steps save effort and improve the final result.
Choosing Snap Placement
Select spots where the fabric layers meet or overlap. Avoid placing snaps too close to the edge. Leave enough space for the snap to close without stress.
Consider the function of the snap. For closures, place snaps evenly along the edge. For decorative use, space them to balance the design visually.
Marking And Punching Holes
Use a fabric pencil or chalk to mark snap locations. Double-check the marks before punching holes. Accuracy here prevents misalignment later.
Punch small holes with an awl or hole punch tool. The holes should be just big enough for the snap prongs. Avoid making holes too large, or the snap may not hold well.
Using Snap Pliers
Snap pliers make applying snap fasteners quick and neat. They hold each snap part firmly in place. This tool helps press the fastener pieces together without damaging fabric. Using snap pliers reduces mistakes and speeds up your work.
Attaching The Cap And Socket
First, push the cap’s prong through the fabric hole. Place the female socket on the cap’s prong. Position both parts in the snap pliers’ jaws carefully. Squeeze the pliers handles slowly but firmly. The cap and socket will lock tightly together. Check that the snap sits flat and secure.
Securing The Stud And Post
Next, insert the post through the fabric from the back. Place the stud on the post’s tip. Put these parts in the opposite jaws of the snap pliers. Press the handles until the stud and post snap firmly. Avoid squeezing too hard to prevent bending. Test the snap by pressing it closed and open.
Hammer Method
Using the hammer method, place the snap fastener parts on the fabric carefully. Then, tap the setting tool firmly with a hammer to secure the snap. This technique ensures a tight hold without damaging the material.
Positioning Snaps On Anvil
Place the anvil on a solid surface. The anvil holds the snap securely. Put the snap cap on the anvil’s rounded side. This side fits the snap’s shape. Make sure the snap sits flat and steady. Correct positioning helps avoid damage. Align the fabric with the snap cap carefully. The fabric must not shift during setting.
Striking With Setting Tools
Place the setting tool over the snap post. The tool centers pressure on the snap. Hold the tool firmly to prevent movement. Use a hammer to strike the tool’s top. Hit with steady, controlled force. Avoid hitting too hard to prevent bending. Multiple gentle taps work better than one strong hit. Check the snap after each tap. The snap should feel tight and secure.
Sew-on Snap Fasteners
Sew-on snap fasteners offer a simple, durable way to secure fabric pieces. They consist of two parts that snap together firmly. These fasteners work well on clothing, bags, and crafts. Sewing them on by hand gives you control and precision. The process requires basic sewing skills and a needle with thread.
Threading Techniques
Choose a strong thread matching your fabric color. Double the thread for extra strength and knot the end. Thread the needle carefully to avoid tangles. Use a sharp needle to pierce through thick fabric easily. Pull the needle through the snap holes gently to avoid damage.
Securing Snaps With Stitching
Start stitching by going through one hole of the snap. Make several tight stitches around the hole. Move to the opposite hole and repeat the process. Wrap the thread around the snap base for added hold. Finish with a knot on the fabric’s back side. Trim excess thread to keep the work neat.

Credit: so-sew-easy.com
Tips For Perfect Results
Applying snap fasteners with care improves your project’s look and durability. Small steps ensure the snaps hold firmly without harming the fabric. Follow these tips for perfect results every time you attach snaps.
Avoiding Fabric Damage
Choose the right snap size for your fabric thickness. Thin fabrics need smaller snaps to avoid tears. Use a sharp tool to make a clean hole. Avoid forcing the snap parts together; gentle pressure works best. Place a protective layer, like scrap fabric, under your work to prevent marks. Always test on a fabric scrap before working on your main piece.
Ensuring Snap Alignment
Mark snap positions clearly with fabric chalk or a washable marker. Double-check marks before punching holes. Align snap parts carefully; the top and bottom must match perfectly. Use a ruler or measuring tape to keep snaps evenly spaced. Press or hammer the snaps straight down to prevent crooked attachment. Check the snap’s function after setting to ensure easy opening and closing.
Troubleshooting Common Issues
Troubleshooting is key when applying snap fasteners. Small mistakes can cause snaps to fail or not work properly.
Check each snap after installation. Fix problems early to avoid bigger issues later.
Loose Snaps
Loose snaps happen if the snap parts are not pressed tightly. Use the right tools to apply firm pressure.
Make sure the fabric is not too thick or slippery. Thin fabrics may need a small piece of interfacing for support.
Test the snap by opening and closing it a few times. If it feels loose, try reapplying with stronger pressure.
Misaligned Fasteners
Misaligned fasteners cause snaps not to close properly. Mark the exact spot before punching holes.
Place both snap halves on a flat surface. Check alignment visually before pressing them together.
Use a ruler or measuring tape to keep spacing even. Misalignment often happens when fasteners are placed unevenly.

Credit: blog.closetcorepatterns.com

Credit: susieddesigns.wordpress.com
Frequently Asked Questions
How To Install A Snap Fastener?
Mark the snap location and punch a hole. Insert the cap through fabric. Align socket over prongs. Use snap pliers or hammer with setting tool to secure the fastener firmly.
How To Apply Plastic Snap Fasteners?
Mark the snap location and punch a hole. Insert the cap prong through fabric. Align the socket over the cap. Use snap pliers or a hammer and setting tool to secure both parts firmly.
How To Put On Snap Fasteners With A Hammer?
Place snap cap prong through fabric hole. Align socket over cap. Position setting tool on snap. Strike firmly with hammer to secure.
Is There A Trick To Sewing On Snaps?
Yes, the trick to sewing on snaps is to stitch through fabric holes multiple times, wrapping thread tightly around each snap side for security.
Conclusion
Applying snap fasteners is simple with the right steps. First, mark where you want the snaps to go. Then, create small holes carefully. Use snap pliers or a hammer with tools to attach each part. Press firmly to secure the snaps in place.
Check that both sides fit tightly and work well. Practicing a few times helps build confidence. Snap fasteners add convenience and style to your projects. Keep your tools ready and enjoy crafting with ease.